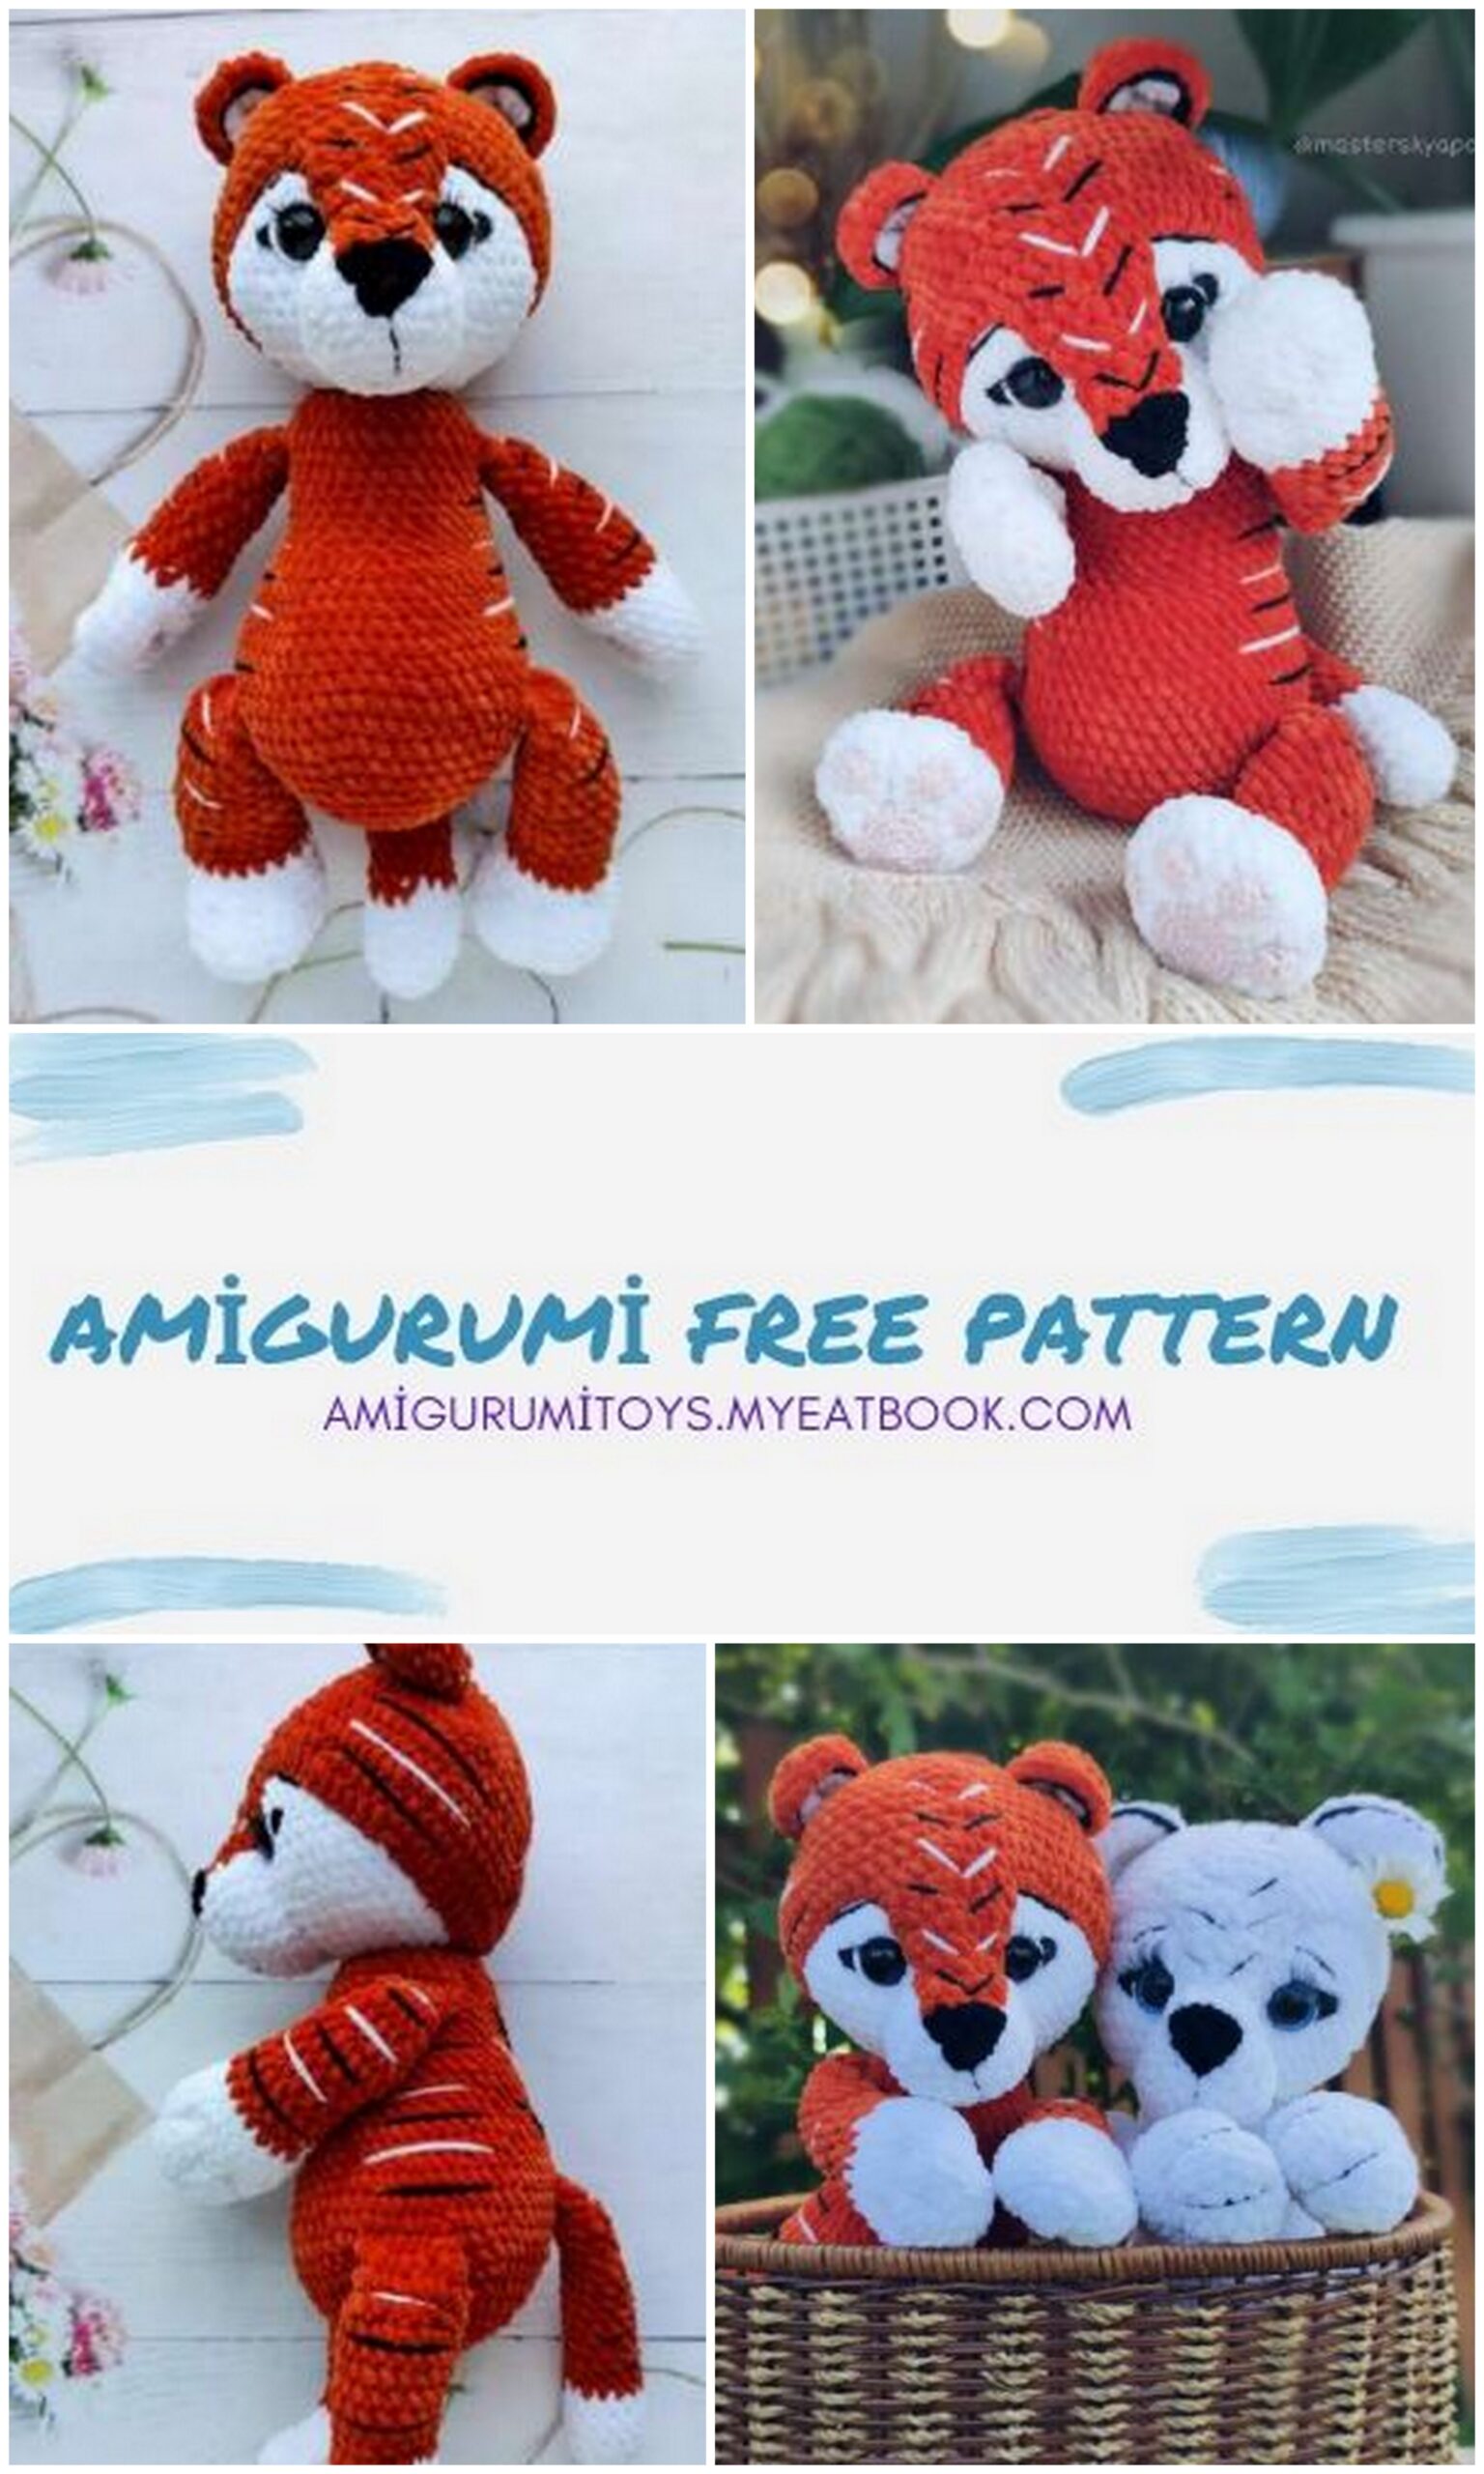
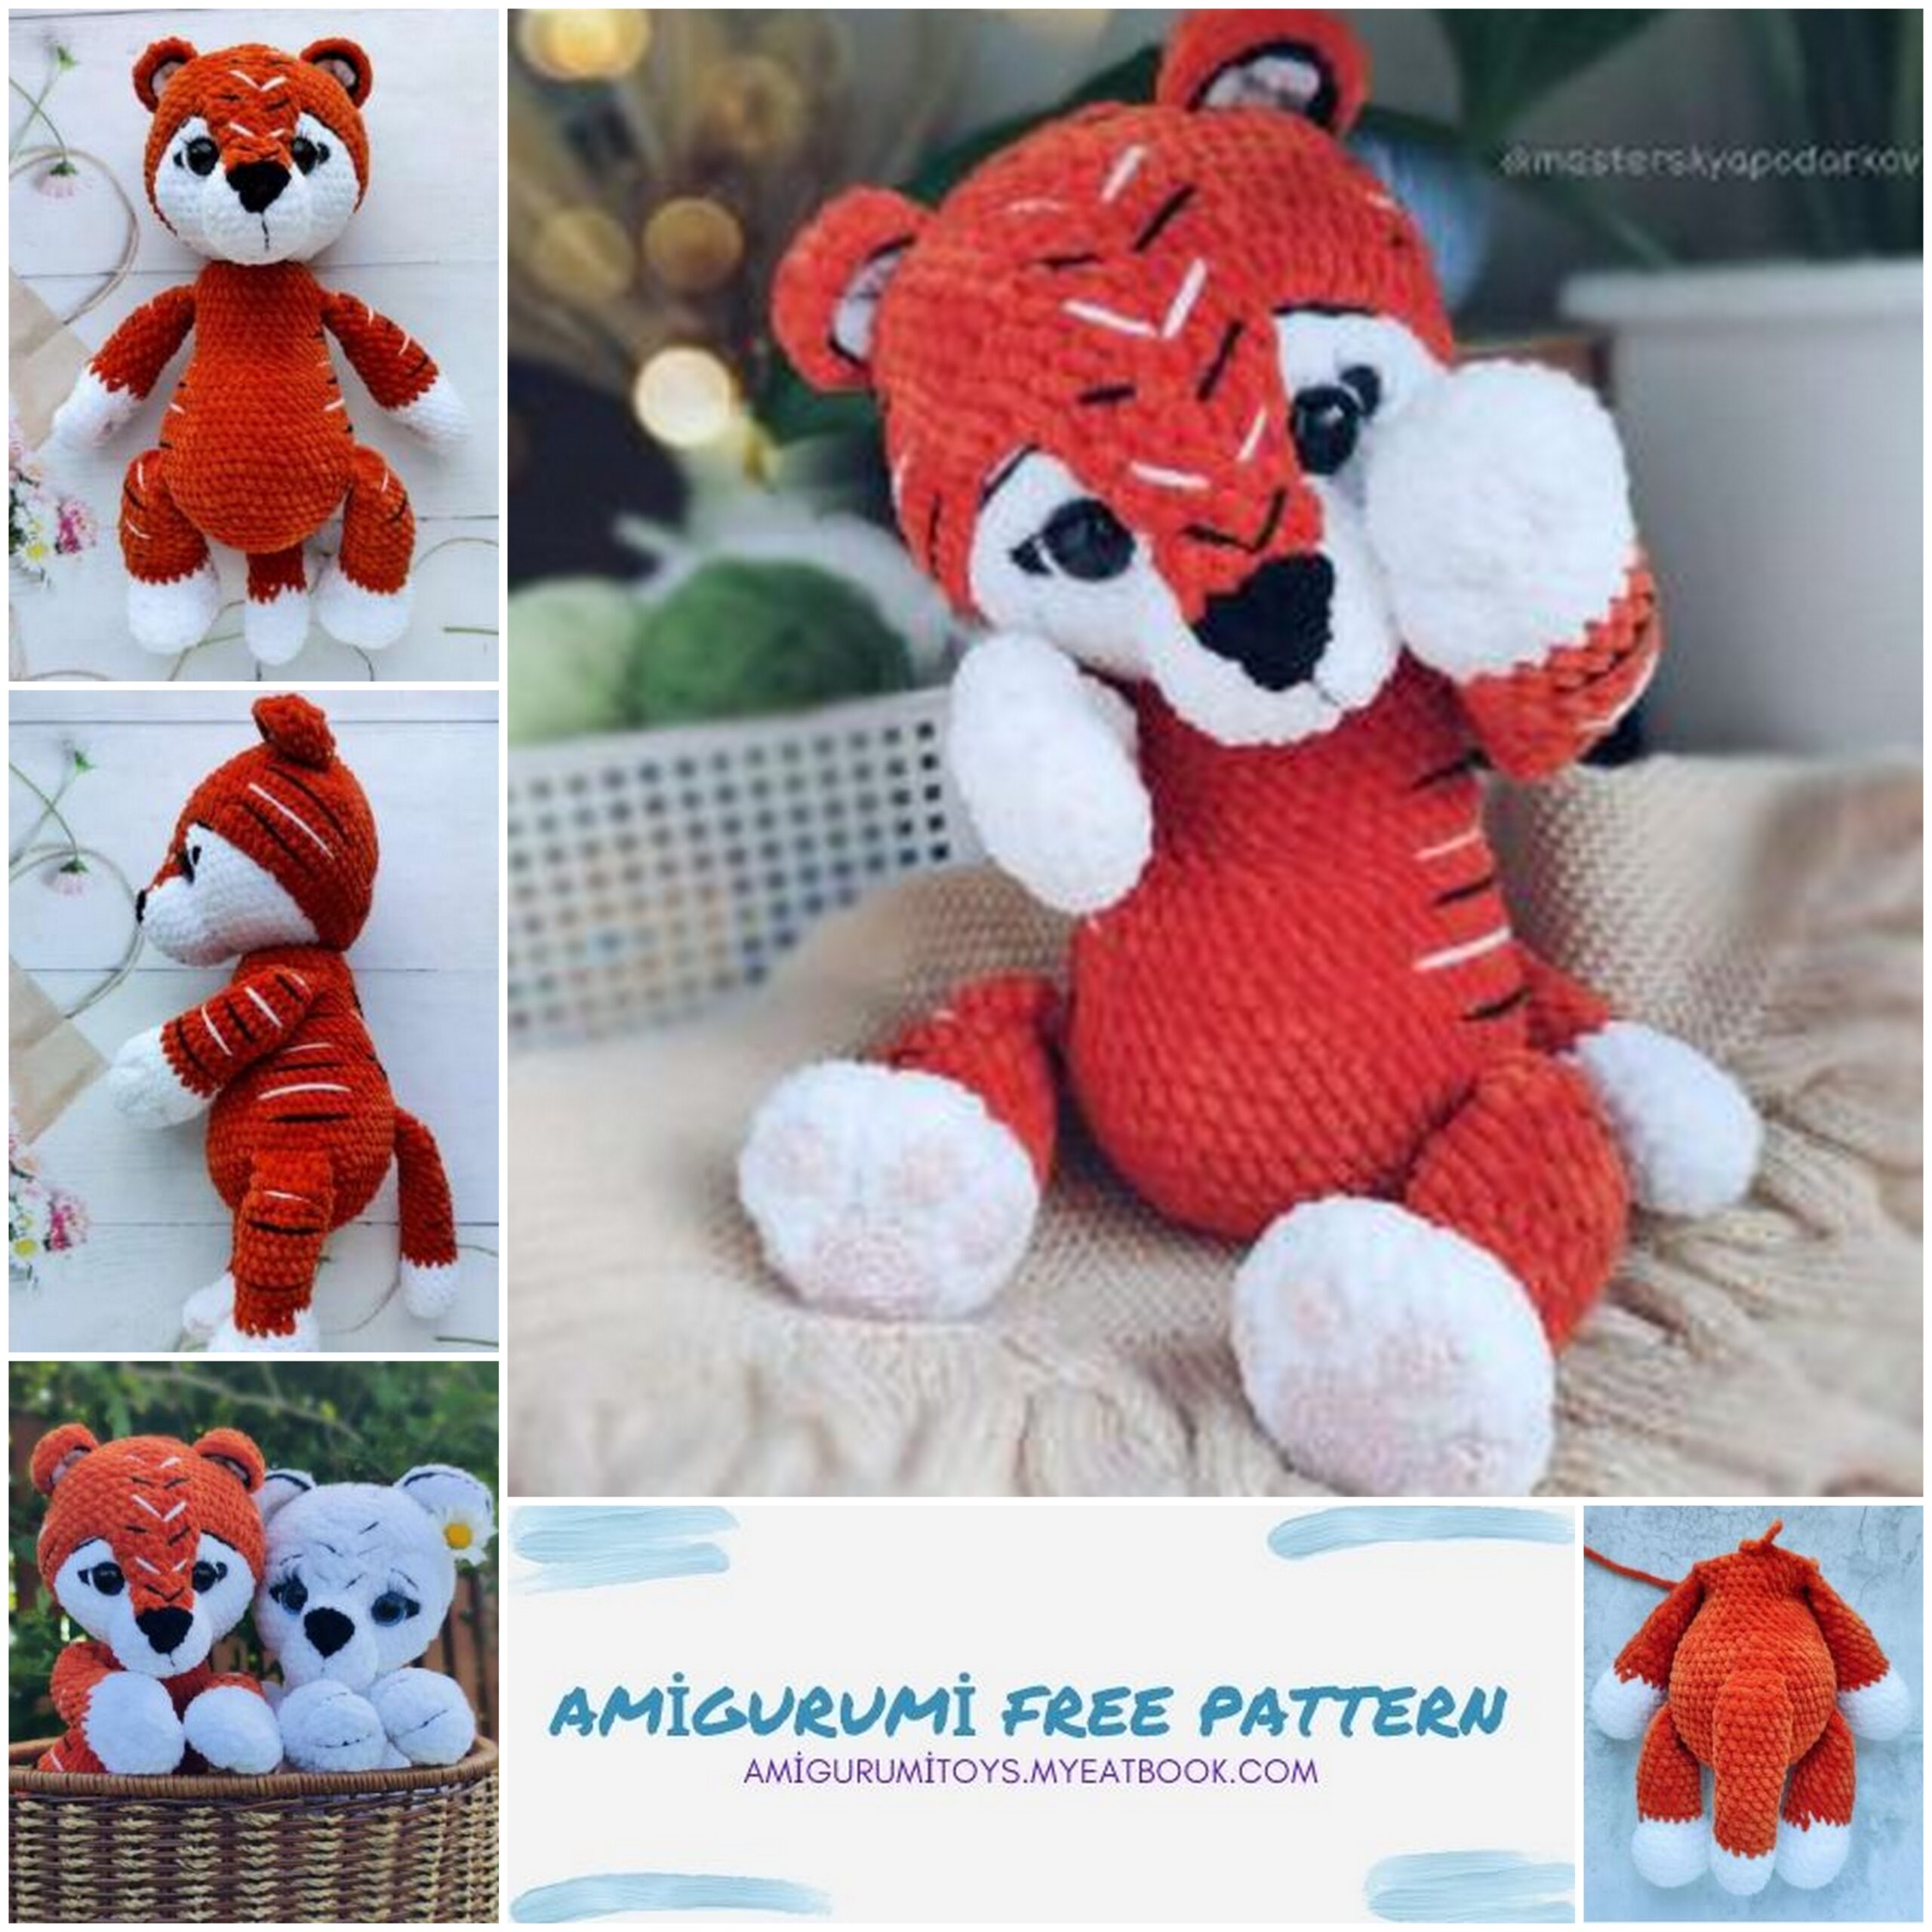
Amigurumi Tiger Striped Striped
List of Recommended Materials
1. Yarn Himalaya Dolphin Baby (or YarnArt Dolce) for the body orange (1 – 2 skeins), white (1 skein).
* For a white tiger – 2 – 2, 5 skeins.
2. White – YarnArt Jeans’s for embroidering stripes and whites of the eyes.
Black – for eyebrows, mouth (smile) and stripes (not a large section threads). Pink – for foot pads.
* For a white tiger, we embroider stripes in white and gray.
3. Hook for plush yarn – 3.5 – 3.75 mm.
4. For YarnArt Jeans – 1.5 mm.
5. Filler (Sintepon, etc.)
6. Needle and sewing thread (for hand sewing)
7. Safety eyes – 14 – 16 mm (1 pair)
8. Needle with a large eye (preferably plastic)
9. Joint – 45 mm. (It is advisable to use a long-stemmed joint or replace with a cotter pin). We select the size of the joint based on your toys.
It is NOT NECESSARY to use a joint. The head can be sewn on.
The colors and choice of yarn are only recommended for this toy.
The pattern is suitable for almost any yarn. But then the size of your eyes will need to be selected based on the size of the resulting toy.
Finished toy size – 33 cm

Symbols
MR – amigurumi ring
SC – single crochet
İNC – increase
DEC – decrease
CH – air loop
PP – lifting loop
DC – double crochet
HDC – half double crochet
SL-ST – connecting post
(1) – number of loops
1. – row
Handles (2 pcs.)
White
1.6 SC to MR (6)
2.6 İNC (12)
3. (1 SC, İNC) * 6 (18)
4. (2 SC, İNC) * 6 (24)
5. – 8.24 SC (24) – 4 rows
9. (2 SC, DEC) * 6 (18)
Orange
10. – 12. 18 SC (18) – 3 rows
We stuff the handles tightly only the lower part of the handle, the upper part the handles can be skipped or lightly filled.
13. (4 SC, DEC) * 3 (15)
14. – 16. 15 SC (15) – 3 rows
17. (3 SC. DEC) * 3 (12)
18. – 20. 12 SC (12) – 3 rows
Fold, knit at both ends 6 SC
Legs (2 pcs.)
The marker runs perpendicularly exactly behind the leg, if necessary
knit 1-2 SC and move marker.
White
1.6 SC to MR (6)
2.6 İNC (12)
3. (1 SC, İNC) * 6 (18)
4. (2 SC, İNC) * 6 (24)
5. (3 SC, İNC) * 6 (30)
6. – 8. 30 SC (30) – 3 rows
9.6 DEC, 6 SC, 6 DEC (18)
10.18 SC (18)
Orange
11. – 20. 18 SC (18) – 10 rows
We stuff the legs tightly only the lower part, the upper part of the leg
you can not fill, or fill it lightly.
21. (1 SC, DEC) * 6 (12)
Fold, knit at both ends 6 SC
Tail
White
1.6 SC to MR (6)
2.6 İNC (12)
3. (3 SC, İNC) * 3 (15)
4. – 6. 15 SC (15) – 3 rows
Orange
7. – 21.15 SC (15) – 15 rows
We stuff the tail tightly during knitting.
22. (3 SC, DEC) * 3 (12)
Fold, knit at both ends 6 SC
Body
It is very important to watch the marker in the body! He must go from behind
the backrest is perpendicular to the top. If necessary, knit another 1-2 SC and
move the marker.
Redhead
1.6 SC to MR (6)
2.6 İNC (12)
3. (1 SC, İNC) * 6 (18)
4. (2 SC, İNC) * 6 (24)
5. (3 SC, İNC) * 6 (30)
6. (4 SC, İNC) * 6 (36)
7. (5 SC, İNC) * 6 (42)
8. (6 SC, İNC) * 6 (48)
9. (7 SC, İNC) * 6 (54)
10.54 SC (54)
11.12 SC, 6 SC – knit in a leg, 18 SC, 6 SC – knit in a leg,
12 SC (54)
12.54 SC (54)
IMPORTANT! We knit the tail at the end of one row and at the beginning the other, so that it is exactly in the middle. The same applies to the handles and legs, they should be exactly on the sides one above the other.
13.51 SC, 3 SC including tail (54)
14.3 SC with tail, 51 SC (54)
We fill the whole body tightly in the knitting process.
15. (7 SC, DEC) * 6 (48)
16. – 17.48 SC (48) – 2 rows
18. (6 SC, DEC) * 6 (42)
19.15 SC, 6 DEC, 15 SC (36)
20. – 25.36 SC (36) – 6 rows
26.6 SC, 6 SC – together with the handle, 12 SC, 6 SC – together with the handle, 6 SC (36)
27. (4 SC, DEC) * 6 (30)
28. (3 SC, DEC) * 6 (24)
29. (2 SC, DEC) * 6 (18)
We insert a joint (45 mm) into the body, preferably with a long leg or replace with cotter pins. It is NOT NECESSARY to use a joint. Head can be sewn on.
30. (1 SC, DEC) * 6 (12)
Decreases until the leg of the joint is closed.
Head
Base
White
1.6 SC to MR (6)
2.6 İNC (12)
3. (1 SC, İNC) * 6 (18)
4. (2 SC, İNC) * 6 (24)
5. (3 SC, İNC) * 6 (30)
6. (4 SC, İNC) * 6 (36)
7. (5 SC, İNC) * 6 (42)
8. (6 SC, İNC) * 6 (48)
9. (7 SC, İNC) * 6 (54)
10. (8 SC, İNC) * 6 (60)
11. – 18.60 SC (60) – 8 rows
Insert the eyes between 13 and 14 rows, the distance between the eyes is 5
– 6 columns. Pre-embroider the arrows and sticking on the eyes
cilia. After the eyes are secured, embroider the whites of the eyes.
We stuff the head tightly, in the process of knitting
19. (8 SC, DEC) * 6 (54)
20. (7 SC, DEC) * 6 (48)
21. (6 SC, D EC) * 6 (42)
22. (5 SC, DEC) * 6 (36)
23. (4 SC, DEC) * 6 (30)
24. (3 SC, DEC) * 6 (24)
25. (2 SC, DEC) * 6 (18)
26. (1 SC, DEC) * 6 (12)
27.6 DEC (6)
Cut the thread, leaving a long tip. Pull the remaining loops off
using a needle and the remainder of the thread.
“Hat”
Orange
1.6 SC to MR (6)
2.6 İNC (12)
3. (1 SC, İNC) * 6 (18)
4. (2 SC, İNC) * 6 (24)
5. (3 SC, İNC) * 6 (30)
6. (4 SC, İNC) * 6 (36)
7. (5 SC, İNC) * 6 (42)
8. (6 SC, İNC) * 6 (48)
9. (7 SC, İNC) * 6 (54)
10. (8 SC, İNC) * 6 (60)
11. (19 SC, İNC) * 3 (63)
12. – 16.63 SC (63) – 5 rows
Trim the thread. We continue knitting, stepping back 26 loops
(we attach the thread again). This is necessary so that the “steps” at the base spouts were on the same level.
17.10 SC (10)
Further, expanding the knitting each row and knit according to the pattern in the opposite side
18. From the second loop from the hook 9 SC (9)
19.From the second loop from the hook 8 SC (8)
20. From the second loop from the hook 7 SC (7)
21. From the second loop from the hook 6 SC (6)
22. From the second loop from the hook 5 SC (5)
23. From the second loop from the hook 4 SC (4)
24. İNC, 4 SC (4)
Black
To make the color change even, use the video tutorial
25. İNC, 4 SC (4)
26. From the second loop from the hook 3 SC (3)
27. From the second loop from the hook 2 SC (2)
28. DEC, fasten the thread, cut.
Muzzle
White
1.6 SC to MR (6)
2.6 İNC (12)
3. (1 SC, İNC) * 6 (18)
4. (2 SC, İNC) * 6 (24)
5. – 7.24 SC (24) – 3 rows
Ears (2 pcs.)
White – 2 parts
1.6 SC to MR (6)
2.6 İNC (12)
3. (1 SC, İNC) * 6 (18)
Fasten the thread, cut
Red – 2 parts
1.6 SC to MR (6)
2.6 İNC (12)
3. (1 SC, İNC) * 6 (18)
We do not cut the thread, we put the red and white parts together,
Tie in a circle at both edges 18 SC. Fasten the thread, cut.
Pads (Lower legs)
Pink
Large – 2 pieces
1.6 SC to MR (6)
2.6 İNC (12)
3. (1 SC, İNC) * 6 (18)
4. (2 SC, İNC) * 6 (24)
Fasten the thread, cut.
Small – 8 pcs
1.6 SC to MR (6)
2.6 İNC (12)
Fasten the thread, cut.
Pads (Upper feet)
Pink
Large – 2 pieces
1.6 SC to MR (6)
2.6 İNC (12)
3. (1 SC, İNC) * 6 (18)
Fasten the thread, cut.
Small – 8 pcs
1.6 SC to MR (6)
2. (2 SC, İNC) * 2 (8)
Fasten the thread, cut.
Assembly
Sew the muzzle between 7 and 14 rows inclusive.
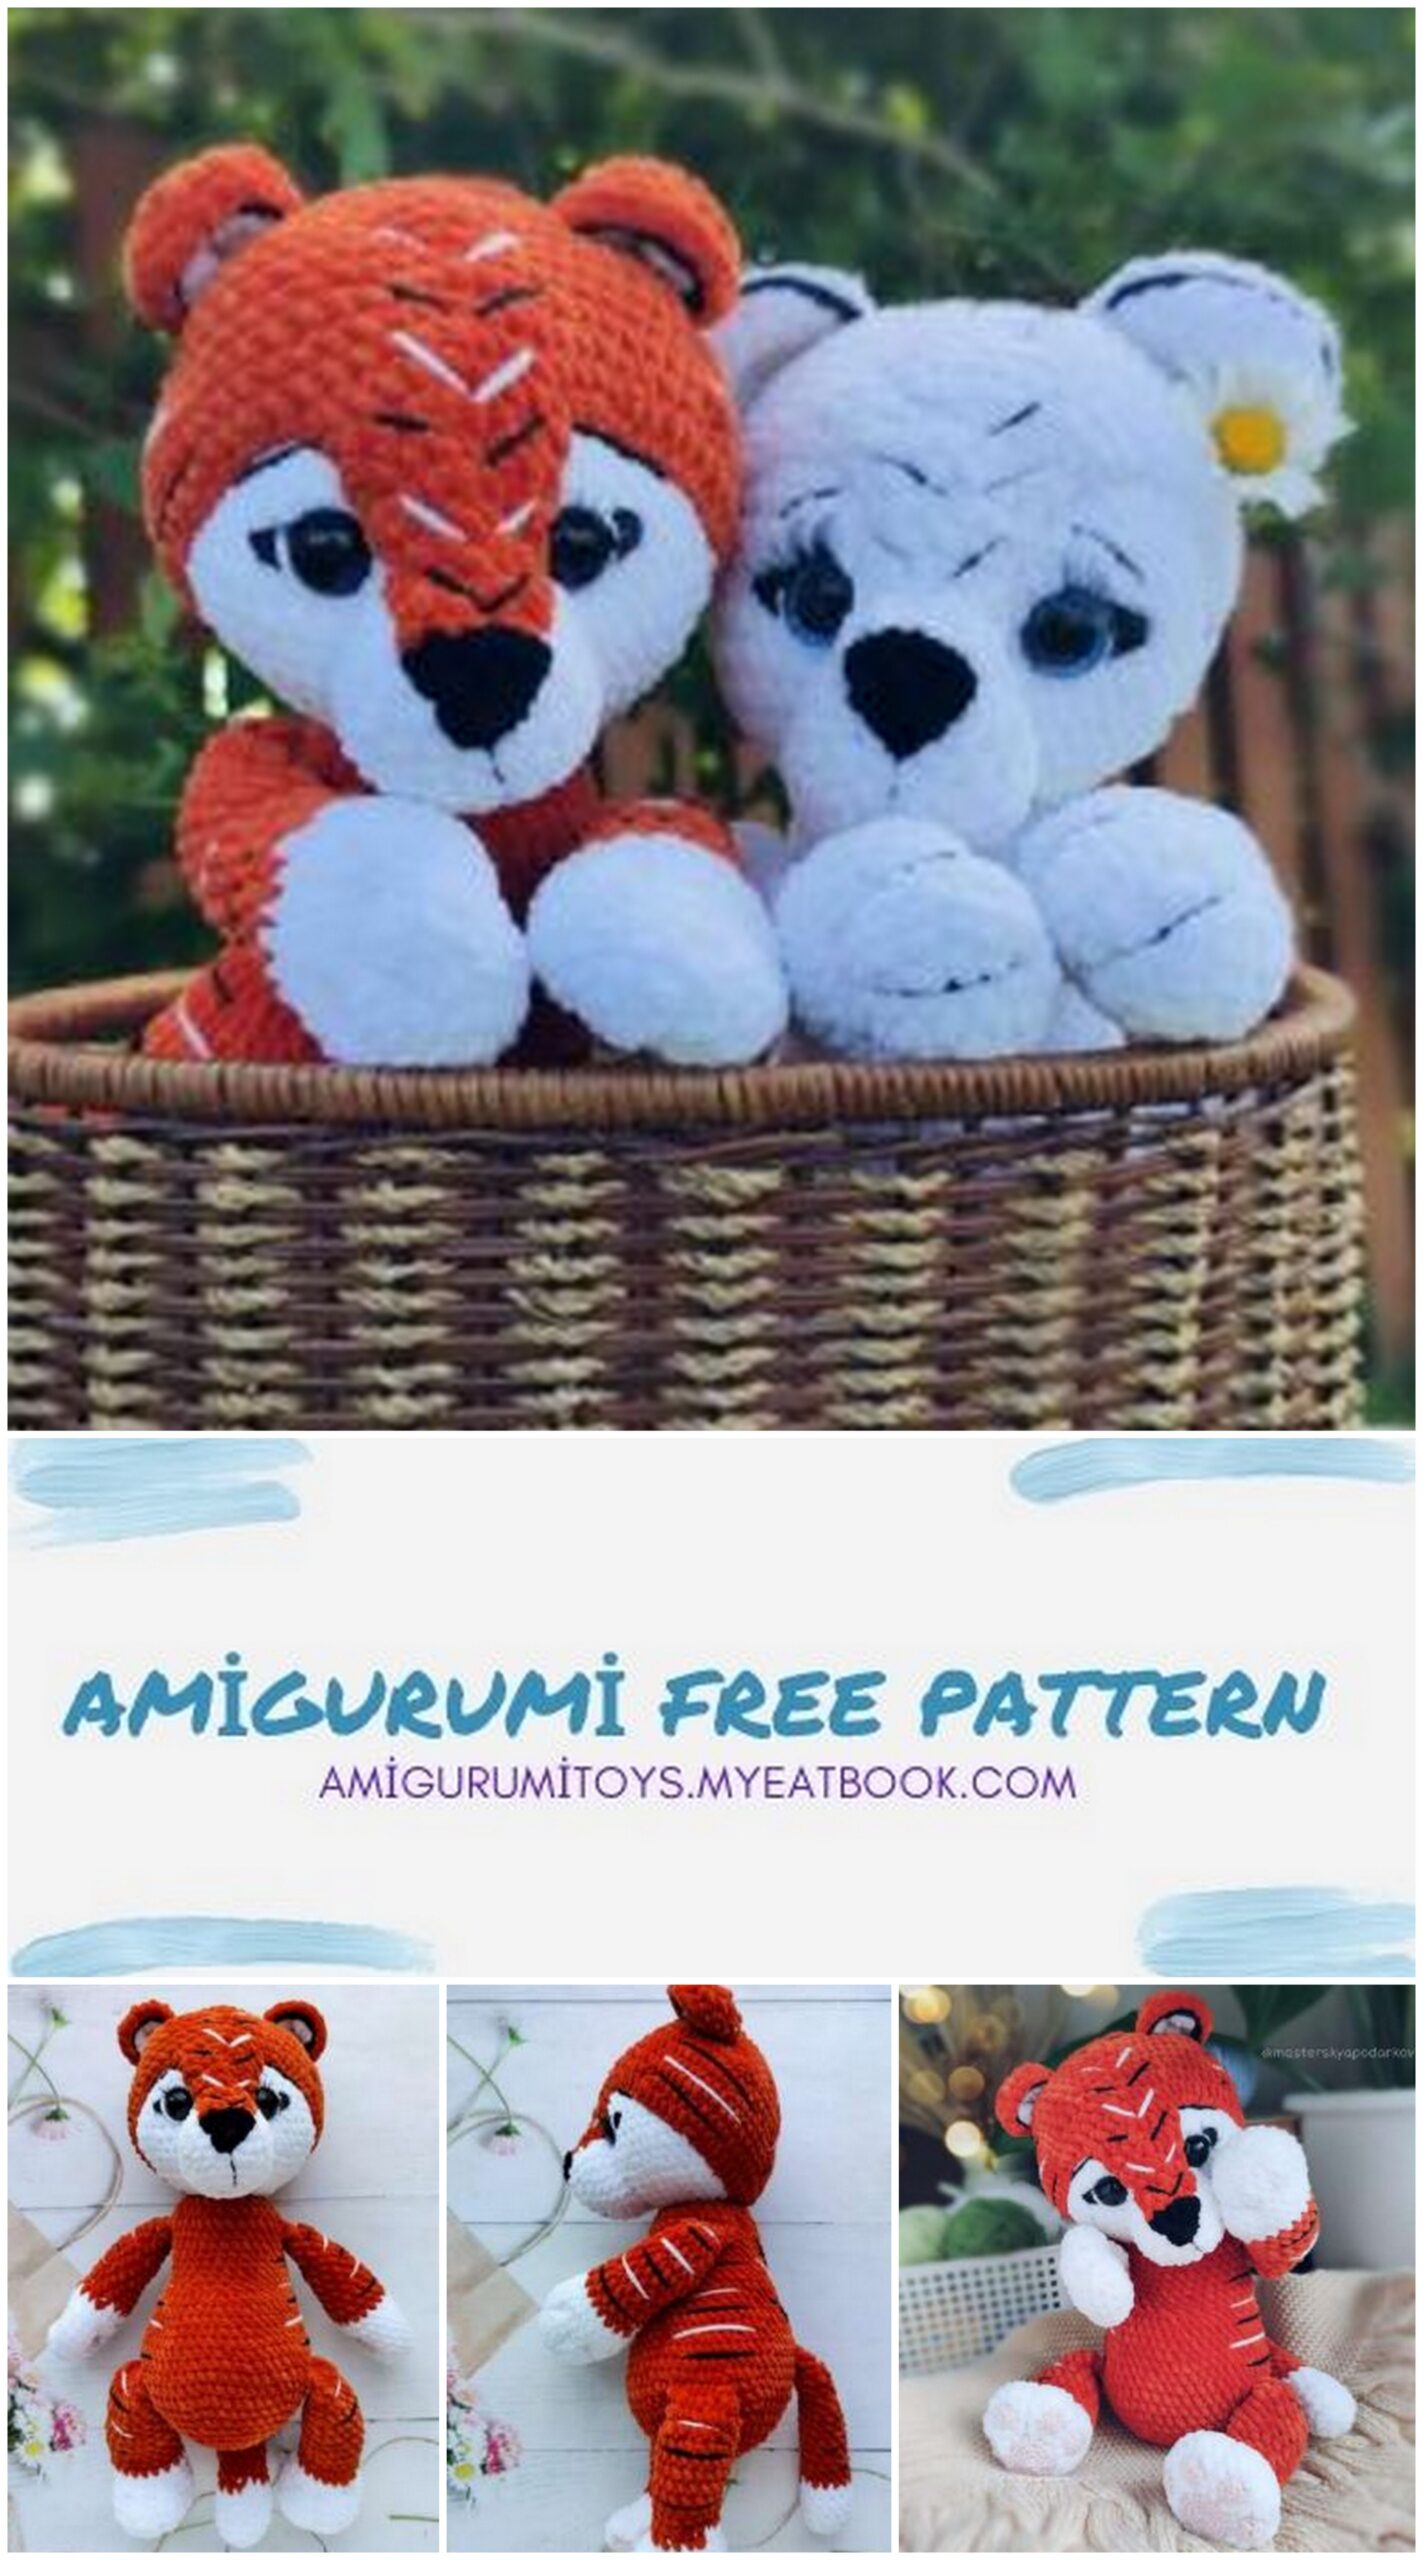
Sew the cap 2-3 rows above the eyes. So that the tip of the nose is in the middle of the muzzle. We embroider eyebrows, stripes at the nose and a smile.
Sew the ears in 4-11 rows of the red part of the head of the “cap”
We embroider stripes in 1-2 threads (any thin thread or floss) alternating between white and black. For a white tiger, alternate gray and black stripes.
We make braces on the legs.
Sew pads on the paws, as shown in the photo.
Congratulations!
Your toy is ready!