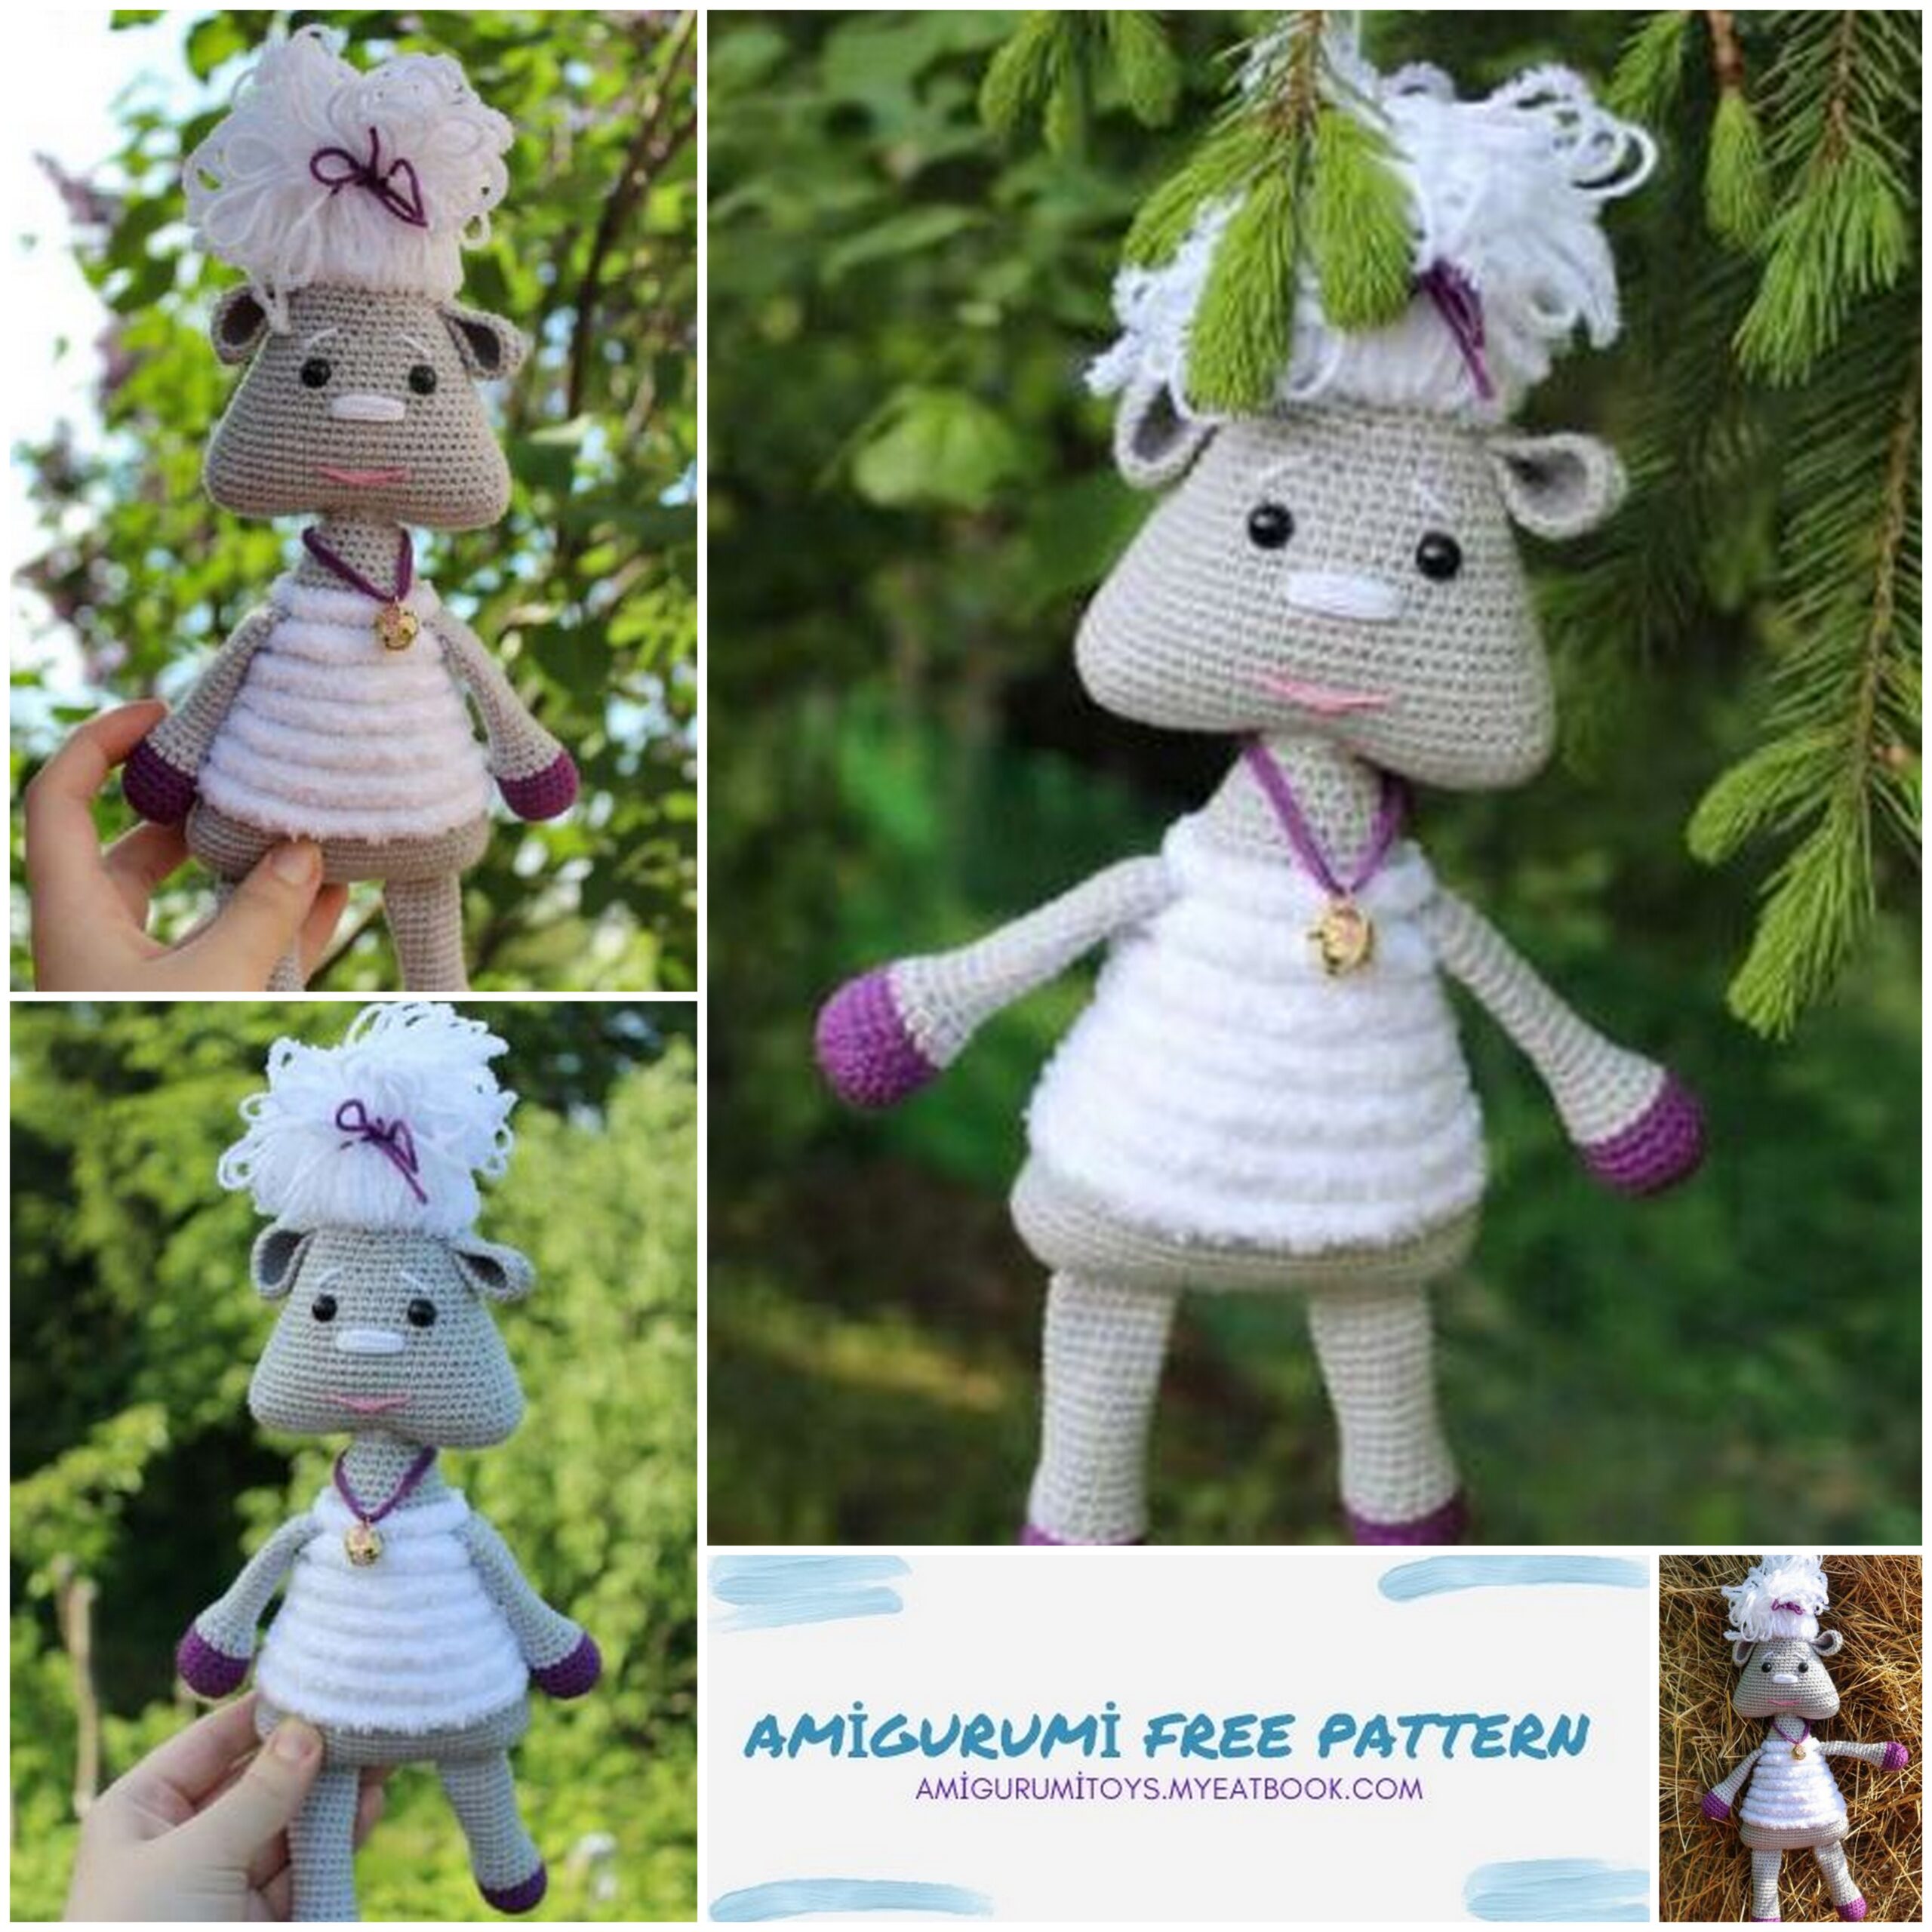
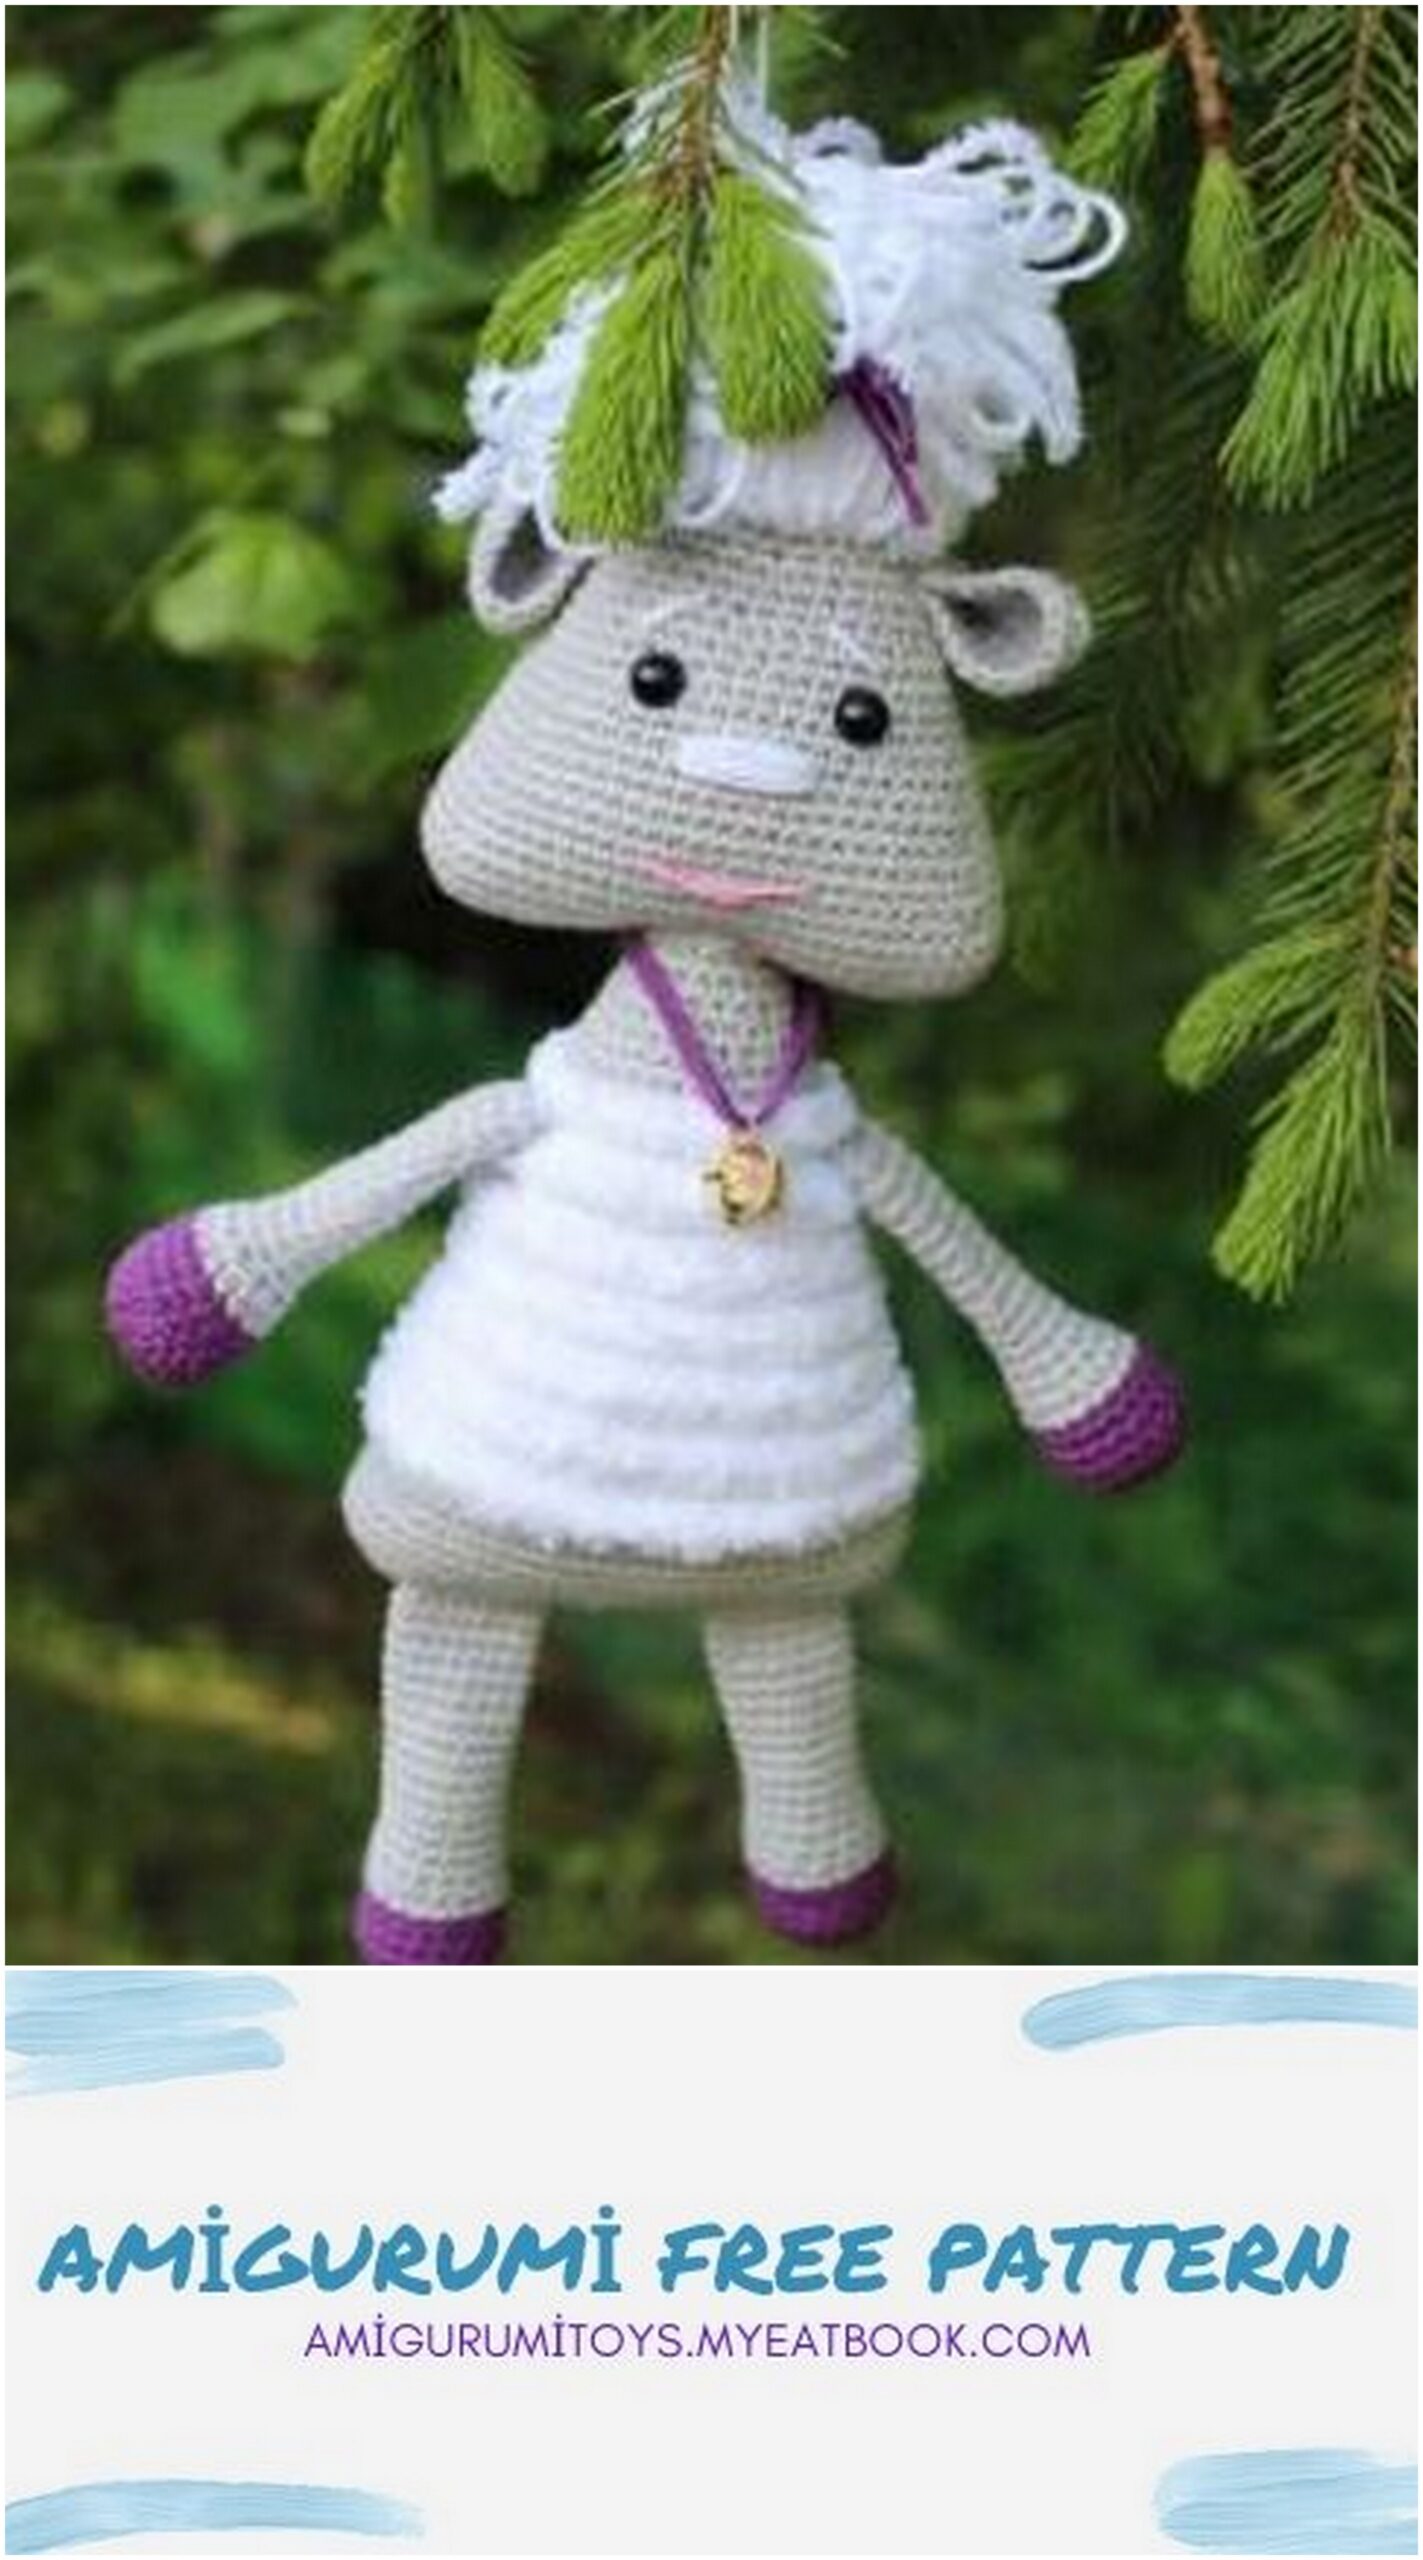
Amigurumi Sheep Free Pattern
Description:
The master class consists of 12 pages, contains a detailed description of the process, photos of step-by-step manufacturing, assembly of parts and decoration of the toy.
Difficulty: medium.
The master class does not contain knitting lessons.
Basic crochet skills are assumed.
Subject to the use of these materials, the finished toy is 26 – 30 cm in size.
materials and tools:
Semi-cotton yarn in 3 colors: main (gray); color of your choice; color matching yarn Baby Softy. I use: Alize Cotton Gold 330m / 100g (# 200 – gray, # 55 – white) and YarnArt Jeans 160m / 50g (# 50 – purple)
Yarn Alize Baby Softy 115m / 50g. I am using # 55 – white.
Consumption is slightly less than 40g of each color.
Filler for toys such as holofiber.
The hook is the right size for your yarn. I am using # 2.0.
Needle for stitching parts and embroidering a face.
Safety eyes d = 8mm.
Scissors.
Hello my friend!
Before you is the third description of the toy from
“triangular” series. I am very glad that this cute, childishly naive and insanely warm creature will contact
with your caring hands.
I want to say that to create this cute lamb, I
spent a lot of time. And even more for decorating a master class for a toy. Therefore, if you have any suggestions or comments, then I am happy to wait for your feedback. But most of all I would like to see your toy!
Create with pleasure! I believe in you!
Advice:
Amigurumi toys are knitted tightly so that the filler does not shine through the knitting. If the knitted fabric is not tight enough, use a smaller crochet hook.
In order not to be mistaken in the number of crocheted stitches in each row, use a knitting marker. Mark the beginning of each row with it.
Spread the filler evenly and make sure that no lumps form. Add the stuffing in small portions, giving the details the required shape.
Legend:
MR – amigurumi ring
TZS – knitting only for the back wall of the loop
CH – air loop
SL-ST – connecting post
SC – single crochet
İNC – increase (we knit 2 columns in one loop)
DEC – decrease (knit 2 stitches together)
(2 SC, DEC) * n – repeat what is in parentheses n times
(36) – the number of columns in a row
Head:
We knit in the main (gray) color.
Tie a chain of chain stitches: 25 CH. Start knitting the first row from the second loop from the hook. We knit in a spiral (in the first row we knit first along one side of the chain from CH, then we go to the other side)
1st row: 1 İNC, 22 SC, 2 İNC (in the last loop of the chain), 22
SC, 1 İNC (52). Set knitting marker.
2nd row: 2 İNC, 22 SC, 4 İNC, 22 SC, 2 İNC (60)
3rd row: 3 İNC, 25 SC, 5 İNC, 25 SC, 2 İNC (70)
4-6 row: 70 SC
7 row: 4 SC, DEC, 24 SC, DEC, 7 SC, DEC, 24 SC, DEC, 3 SC (66)
8 row: 66 SC
9 row: 4 SC, DEC, 22 SC, DEC, 7 SC, DEC, 22 SC, DEC, 3 SC (62)
10 row: 62 SC
11 row: 4 SC, DEC, 20 SC, DEC, 7 SC, DEC, 20 SC, DEC, 3 SC (58)
12 row: 58 SC
13 row: 4 SC, DEC, 18 SC, DEC, 7 SC, DEC, 18 SC, DEC, 3 SC (54)
Row 14: 54 SC
15 row: 4 SC, DEC, 16 SC, DEC, 7 SC, DEC, 16 SC, DEC, 3 SC (50)
16 row: DEC, 23 SC, DEC, 23 SC (48)
17 row: (6 SC, DEC) * 6 (42)
Row 18-19: 42 SC
20 row: (5 SC, DEC) * 6 (36)
Row 21-22: 36 SC
23 row: (4 SC, DEC) * 6 (30)
24 row: 30 SC
Insert the eyes on the secure mount between rows 16 and 17. Distance between eyes 8 SC.
Fill the part with filler.
We turn to the most important thing – to the hairstyle.
We will knit a hairstyle with elongated loops in two strands.
To do this, prepare a Baby Softy (Alize) for the beach and a semi-cotton thread to match it. The length of the toy’s hair depends on the length of the extended loops, so make the extended loops for knitting a sheep at least 5 cm.
Kotukhova Love


Head:
We knit the extended loops in two threads (semi-cotton + Baby Softy). We knit the rest (ordinary) loops in one thread, only with semi-cotton.
Change the color of the thread, knit a hairstyle:
25 row: 30 SC / extended loops /
26 row: (3 SC, DEC) * 6 (24)
27 row: (2 SC, DEC) * 6 (18)
28 row: 18 SC / extended loops /
Fill the part tightly, giving the shape of a triangle.
Cut the Baby Softy thread. Continue knitting with semi-cotton only.
29 row: (1 SC, DEC) * 6 (12)
Add filler.
30 row: 6 DEC (6)
Finish knitting 1 SL-ST + 1 CH. Tighten the thread and cut, leaving a long end.
Thread the end of the thread into a wide-eye needle and using a forward stitch (catching only the front half-loops) pull off the remaining 6 SC. Fasten the thread.
Insert the needle at the top of the head and pull it out on the opposite side of the head (in the area of the future neck). Make a head-tighten. Fasten the thread. If the end of the thread remains long enough, then the nose can be embroidered.
registration:
1. Gather the lush hair in a bun and tie it with a thread of a contrasting color.
2. Embroider the nose in the middle. Between the 2nd and 3rd rows below the eyes. Duration of nose 6 SC. We embroider with the same semi-cotton thread that was used in the hairstyle.
Ears (2 parts):
We knit in the main (gray) color.
Tie a chain of chain stitches: 11 CH. Start knitting the first row with second loop from the hook.
1 row: 10 SC + CH rise, Expand knitting (knit in the opposite direction).
2nd row: 10 SC. Expand knitting.
3 row: / in the second loop from the hook / 9 SC + CH lift. Expand knitting (knit in the opposite direction).
4th row: 9 SC. Expand knitting.
5 row: / in the second loop from the hook / 8 SC + CH lift. Expand knitting (knit in the opposite direction).
6 row: 8 SC. Expand knitting (knit in the opposite direction).
7 row: / in the 2nd loop from the hook / 7 SC + 1 CH lifting. Expand knitting.
8 row: / we tie the part in a circle / 20 SC + 1 CH rise. Expand knitting (knit in the opposite direction).
9th row: 20 SC + CH Finish knitting. Tighten the thread and cut, leaving a long end. Thread a wide-eye needle, Fold the part in half and sew using
Assembly
and design:
1. Attach the ears and sew them symmetrically on the sides of the head. For the very hairstyle.
2. We embroider the mouth and eyebrows. There are no recommendations here, only your imagination. For each sheep has its own smile and eyebrows.
Torso:
We knit in the main (gray) color.
Tie a chain of chain stitches: 25 CH. Start knitting the first row from the second loop from the hook. We knit in a spiral (in the first row we knit first along one side of the chain from CH, then we go to the other side)
1 row: 1 İNC, 22 SC, 2 İNC (in the last loop of the chain), 22 SC, 1 İNC (52)
2nd row: 2 İNC, 22 SC, 4 İNC, 22 SC, 2 İNC (60)
3rd row: 3 İNC, 25 SC, 5 İNC, 25 SC, 2 İNC (70)
4-7 row: 70 SC
8 row: 5 SC, DEC, 24 SC, DEC, 7 SC, DEC, 24 SC, DEC, 2 SC (66)
9th row: 66 SC We begin to knit a fur coat (semi-cotton).
Change thread color.
10 row: 66 SC
11 row: 5 SC, DEC, 22 SC, DEC, 7 SC, DEC, 22 SC, DEC, 2 SC (62)
12 row: 62 SC / TZS
13 row: 62 SC
14th row: 5 SC, DEC, 20 SC, DEC, 7 SC, DEC, 20 SC, DEC, 2 SC (58)
15 row: 58 SC / TZS
16 row: 58 SC
17 row: 5 SC, DEC, 18 SC, DEC, 7 SC, DEC, 18 SC, DEC, 2 SC (54)
18 row: 54 SC / TZS
Row 19: 54 SC
20 row: 5 SC, DEC, 16 SC, DEC, 7 SC, DEC, 16 SC, DEC, 2 SC (50)
21 row: 50 SC / TZS
22 row: 50 SC
23 row: (8 SC, DEC) * 5 (45)
24 row: 45 SC / TZS
25 row: 45 SC
26 row: (7 SC, DEC) * 5 (40)
27 row: 40 SC / TZS
28 row: 40 SC
29 row: (6 SC, DEC) * 5 (35)
Change color to main (gray)
Kotukhova Love
Torso:
30 row: 35 SC / TZS
31 row: (5 SC, DEC) * 5 (30)
32 SC: 30 SC
Stuff the detail tightly, giving the shape of a triangle
33 row: (4 SC, DEC) * 5 (25)
34 row: 25 SC
35 row: (3 SC, DEC) * 5 (20)
Row 36 – 38: 20 SC
Finish knitting 1SL-ST + 1CH. Tighten and cut the thread, leaving a long end for sewing on the head.
Fill the part with filler.
Registration:
1. In order for the lamb to be fluffy, she needs to wear a Baby Softy coat. To do this, use all the front walls of the loop that remained on the body after knitting. Each time grabbing the front wall of the buttonhole, knit 1 SC into it.
2. Sew on the head with the thread left when knitting the body, in the middle of the head. Tie the parts together to hide the threads after tightening the head. Add some padding to the neck, tamping it well. This is necessary in order to avoid creases and the “effect” of a dangling head.
Handles (2 parts):
We start knitting handles from the hoof. To do this, we need to connect two circles of the same size, according to the diagram below.
We knit in the color of your choice:
1st row: 6 SC in MR
2nd row: 6 İNC (12)
3rd row: (1 SC, İNC) * 6 (18)
After knitting the first circle, finish knitting 1SL-ST + 1CH. A thread
tighten and trim.
Having knitted the second circle, do not cut the thread, we continue to knit it further. Place the first circle on the second (wrong side to wrong side) and connect them as indicated in the 4th row. Hide the tip of the thread of the first circle inside the part.
4th row: 18 SC, behind both walls of the loop, both parts
5-7 row: 18 SC
Change the color to the main one (gray).
8 row: 18 SC
9 row: (1 SC, DEC) * 6 (12)
10 – 23 row: 12 SC
Finish knitting 1SL-ST + 1CH. Tighten the thread and cut, leaving a long end. Fill the part by about 1/3.
Thread a wide-eye needle, Fold the piece in half and sew using the “buttonhole stitch”.
Assembly:
Symmetrically, on the sides, attach and sew hands to the body between 1 and 2
“fluffy” rows on top.
Legs (2 parts):
We start knitting legs from the hoof. To do this, we need to connect two circles of the same size, according to the diagram below.
We knit in the color of your choice:
1st row: 6 SC in MR
2nd row: 6 İNC (12)
3rd row: (1 SC, İNC) * 6 (18)
After knitting the first circle, finish knitting 1SL-ST + 1CH. Tighten and cut the thread.
Having knitted the second circle, do not cut the thread, we continue to knit it further. Place the first circle on the second (wrong side to wrong side) and connect them as indicated in the 4th row.
Hide the tip of the thread of the first circle inside the part.
4th row: 18 SC, behind both walls of the loop, both parts
5-7 row: 18 SC
Change the color to the main one (gray).
8 row: 18 SC
9 row: (4 SC, DEC) * 3 (15)
10 – 23 row: 15 SC
Finish knitting 1SL-ST + 1CH. Tighten the thread and cut, leaving a long end. Fill the part by about 1/3.
Thread a wide-eye needle, Fold the piece in half and sew using the “buttonhole stitch”.
Assembly:
Attach and sew on the legs
between the 1st and 2nd rows of the body. On the
that distance from each other,
which you like.
Tail:
We knit in two strands (Baby Softy + semi-cotton on tone)
Step back from the beginning before you start knitting the ponytail.
threads about 4 cm.
Dial a chain of 13 CH.
In the second loop from the hook 12 SL-ST + 1CH.
Finish knitting leaving the end of the threads about 4 cm.
These ends are needed to secure the tail to the finished toy.
Assembly:
Secure the tail using the ends of the threads left after knitting. Do it in any way convenient for you, in the middle of the back, under the 1st “fluffy” row from the bottom.
CONGRATULATIONS
YOUR sheep
READY! 🙂