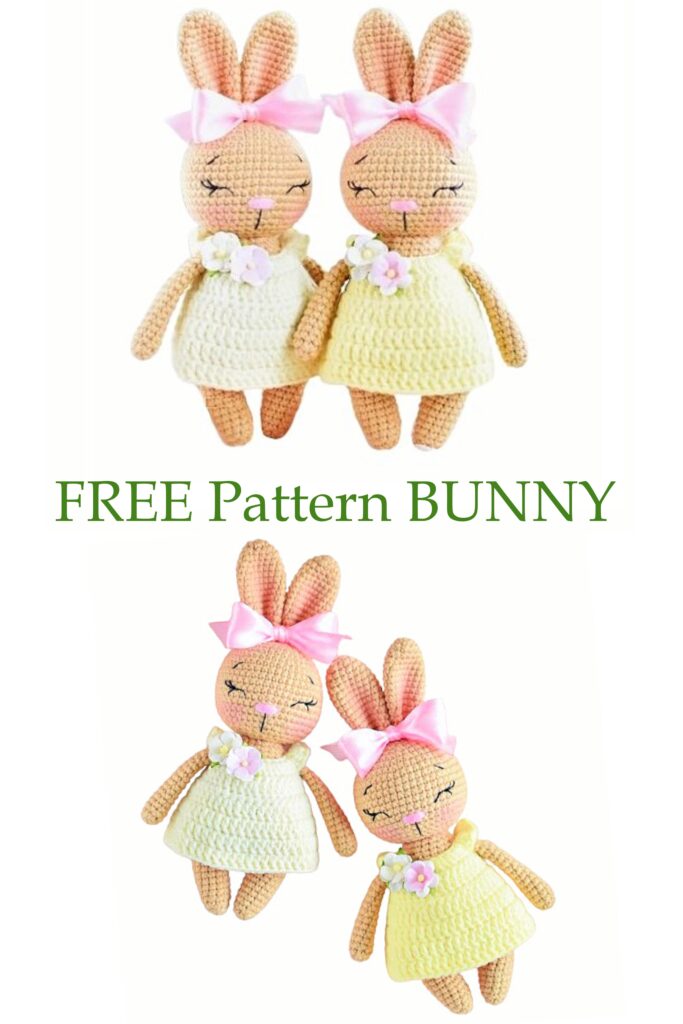
Here are instructions for knitting cute little bunnies. Thanks to this description, you will be able to create a beautiful and unique handmade toy yourself. I wish you pleasant knitting and even stitches!
The difficulty of this master class is medium. The size of the finished toy using the specified materials is about 17cm (excluding ears)
Required materials and tools:
1. Yarn:
-YarnArt Jeans 50g/160m, color No. 07 – for body
-YarnArt Jeans 50g/160m, color No. 67 – for dress
2. Hook No. 2
3. Filling – holofiber
4. Thick sewing needle, scissors, pins, knitting marker
5. A little black and pink thread for embroidering the face
6. Blush or dry pastel for cheeks
7. 1 button with a diameter of 8-10 mm
8. Satin ribbon 20mm wide (about 30cm long), as well as artificial flowers, brooch, buttons – any decor to your taste – for decoration
Abbreviations
MR – amigurumi ring
Sc – single crochet
Ch – air loop
Sl-st – connecting post
İnc – increase
Dec – decrease
DC – double crochet
(…) – the number in brackets means the number of loops in the row
(…)*X – repeat X number of times the specified amount in parentheses

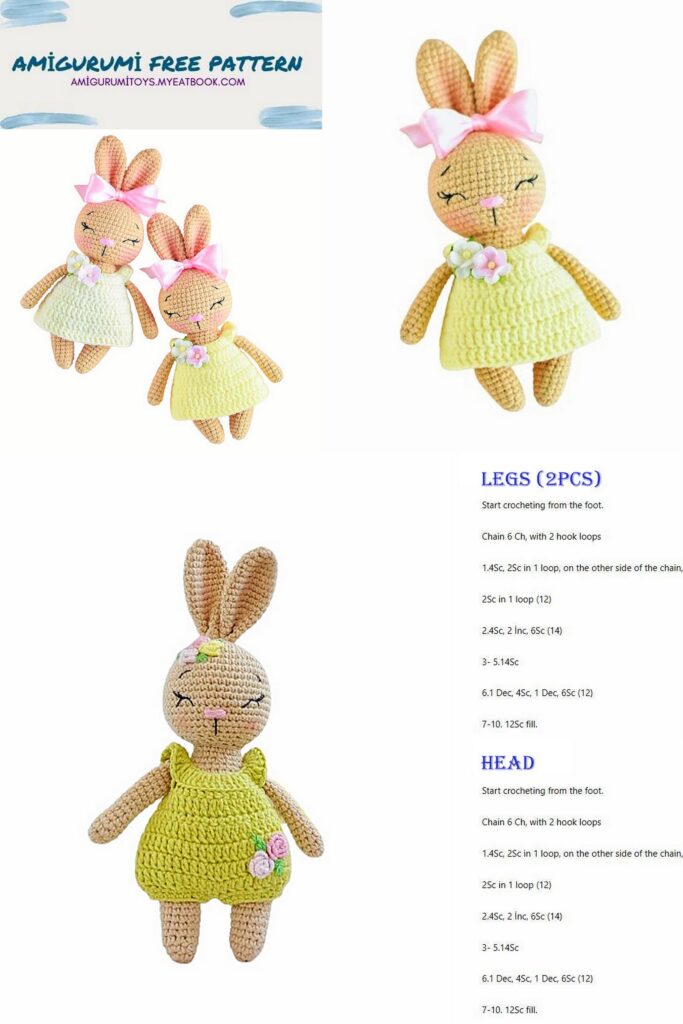
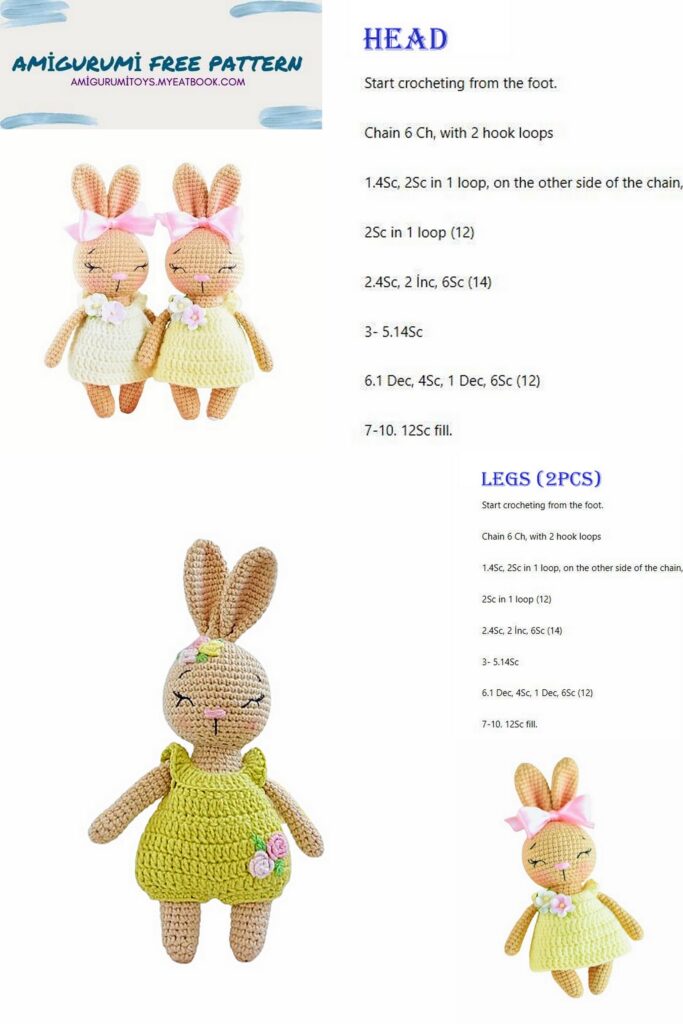
Head:
1st row: 6Sc in MR
2nd row: İnc in each loop (12Sc)
3rd row: (1Sc, İnc)*6 (18Sc)
4th row: 1Sc, İnc, (2Sc, İnc)*5, 1Sc (24Sc)
5th row: (3Sc, İnc)*6 (30Sc)
6th row: 2Sc, İnc, (4Sc, İnc)*5, 2Sc (36Sc)
7th row: (5Sc, İnc)*6 (42Sc)
8th row: 3Sc, İnc, (6Sc, İnc)*5, 3Sc (48Sc)
Rows 9-16: 48Sc (8 rows)
Row 17: 3Sc, Dec, (6Sc, Dec)*5, 3Sc (42Sc)
18th row: (5Sc, Dec)*6 (36Sc)
Row 19: 2Sc, Dec, (4Sc, Dec)*5, 2Sc (30Sc)
Row 20: (3Sc, Dec)*6 (24Sc)
21st row: 1Sc, Dec, (2Sc, Dec)*5, 1Sc (18Sc)
Fasten the thread and cut it, hide the tip of the thread inside the part. Stuff your head tightly.
Ears :
Tie two parts together; no need to stuff.
1st row: 6Sc in MR
2nd row: İnc in each loop (12Sc)
3rd row: (3Sc, İnc)*3 (15Sc)
4th row: 15Sc
5th row: (4Sc, İnc)*3 (18Sc)
Rows 6-11: 18Sc (6 rows)
Row 12: (4Sc, Dec)*3 (15Sc)
13th row: 15Sc
Row 14: (3Sc, Dec)*3 (12Sc)
15th row: 12Sc
Place the edges of the piece together and knit 6Sc.
Fasten the thread, cut it, leaving a long end for sewing.
Pens :
Knit two parts, while knitting, fill only the palm
(first 4-5 rows), do not stuff the rest.
1st row: 6Sc in MR
2nd row: (1Sc, İnc)*3 (9Sc)
Rows 3-16: 9Sc (14 rows)
Place the edges of the piece together and knit 4Sc.
Fasten the thread, cut it, leaving a long end for sewing.
Legs and torso:
Stuff the legs and body tightly while knitting.
1st row: 6Sc in MR
2nd row: (1Sc, İnc)*3 (9Sc)
3rd row: (2Sc, İnc)*3 (12Sc)
4-5 rows: 12Sc (2 rows)
6th row: (İnc, 5Sc)*2 (14Sc)
7-9 rows: 14Sc (3 rows)
Finish knitting Sl-st, fasten the thread, cut. Knit the second leg in the same way as the first, but do not cut the thread, but continue knitting.
Row 10: Work 7Sc, pick up a chain of 4Ch and join it to the first leg where you left off (in the stitch following Sl-st).
Next, knit 14Sc along the first leg, 4Sc along the chain of chain stitches, 7Sc (36Sc)
11th row: İnc, 6Sc, İnc, 2Sc, İnc, 6Sc, İnc, 7Sc, İnc, 2Sc, İnc, 7Sc (42Sc)
Rows 12-18: 42Sc (7 rows)
Row 19: (Dec, 19Sc)*2 (40Sc)
Row 20: 40Sc
21st row: 4Sc, Dec, (8Sc, Dec)*3, 4Sc (36Sc)
22-23 rows: 36Sc (2 rows)
Row 24: (7Sc, Dec)*4 (32Sc)
25th row: 32Sc
Row 26: 3Sc, Dec, (6Sc, Dec)*3, 3Sc (28Sc)
Row 27: 28Sc
Row 28: (5Sc, Dec)*4 (24Sc)
Row 29: 24Sc
Row 30: 2Sc, Dec, (4Sc, Dec)*3, 2Sc (20Sc)
31st row: 20Sc
Row 32: (Dec, 8Sc)*2 (18Sc)
Fasten the thread, cut it, leaving a long end for sewing.
Design and assembly:
Decorate the bunny’s face. To do this, mark the locations of the eyes with pins, they are located between the 14th and 15th rows of the head, the distance between the points is 7Sc, the width of the eye is 3Sc.
Embroider the eyes.
Click on the icon to watch a video on embroidering eyes.
Between rows 15 and 16, use horizontal stitches to embroider a nose (nose width 3Sc). Then embroider the mouth and eyebrows. Use blush or dry pastel to rouge your cheeks.
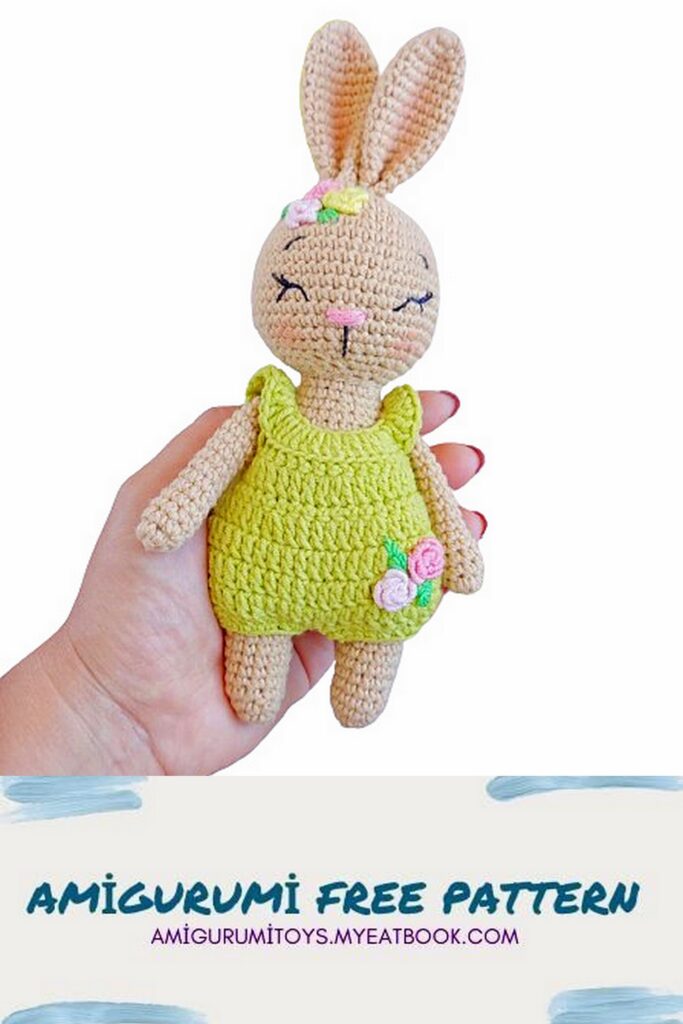
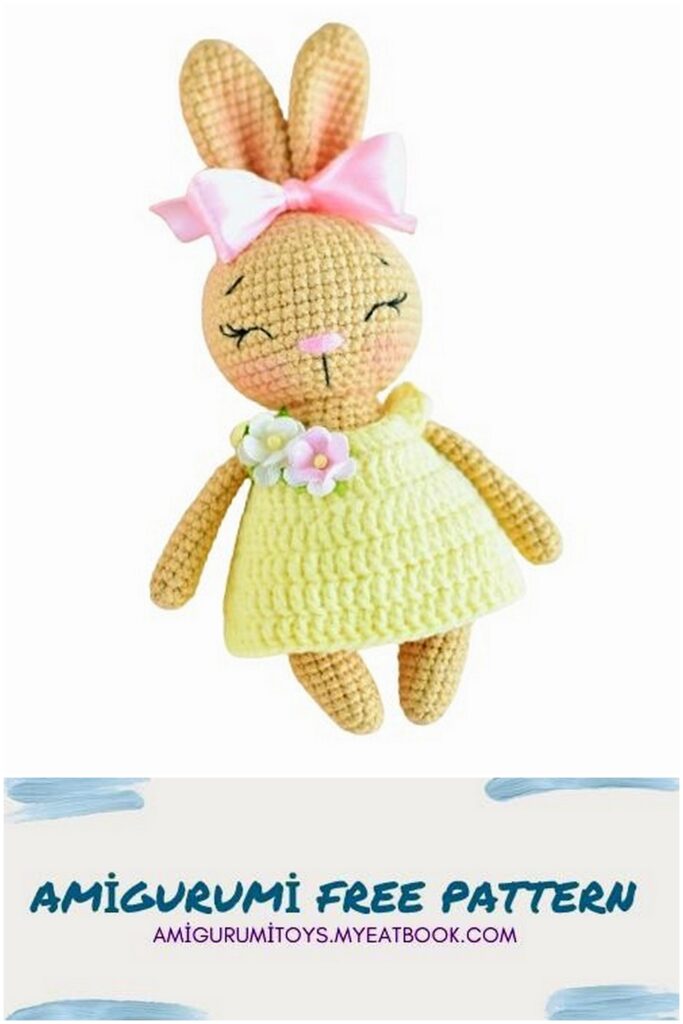
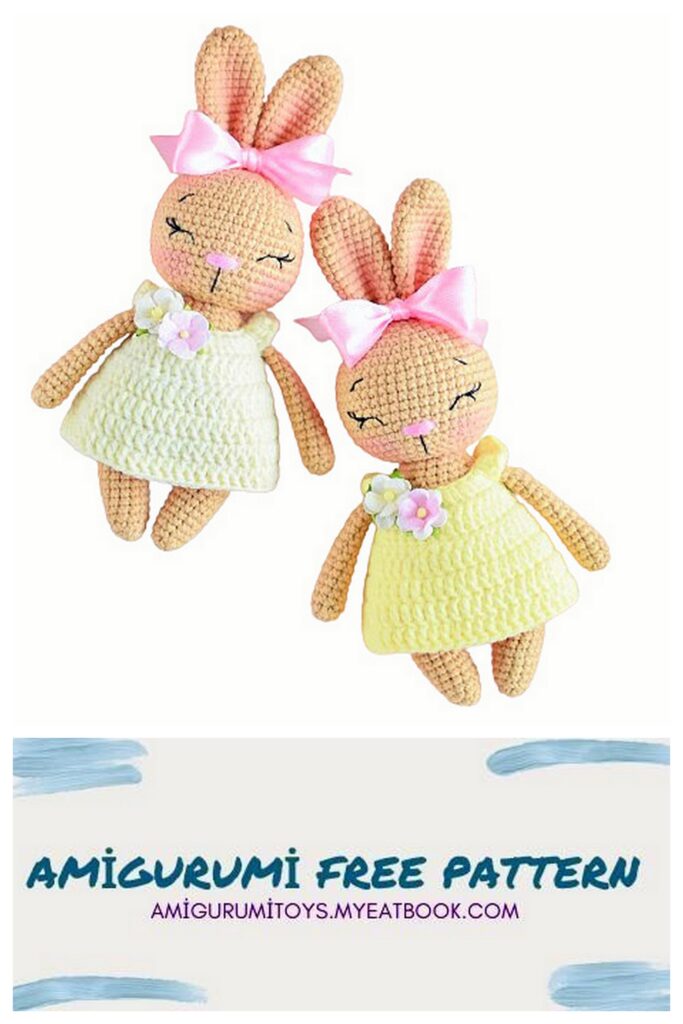
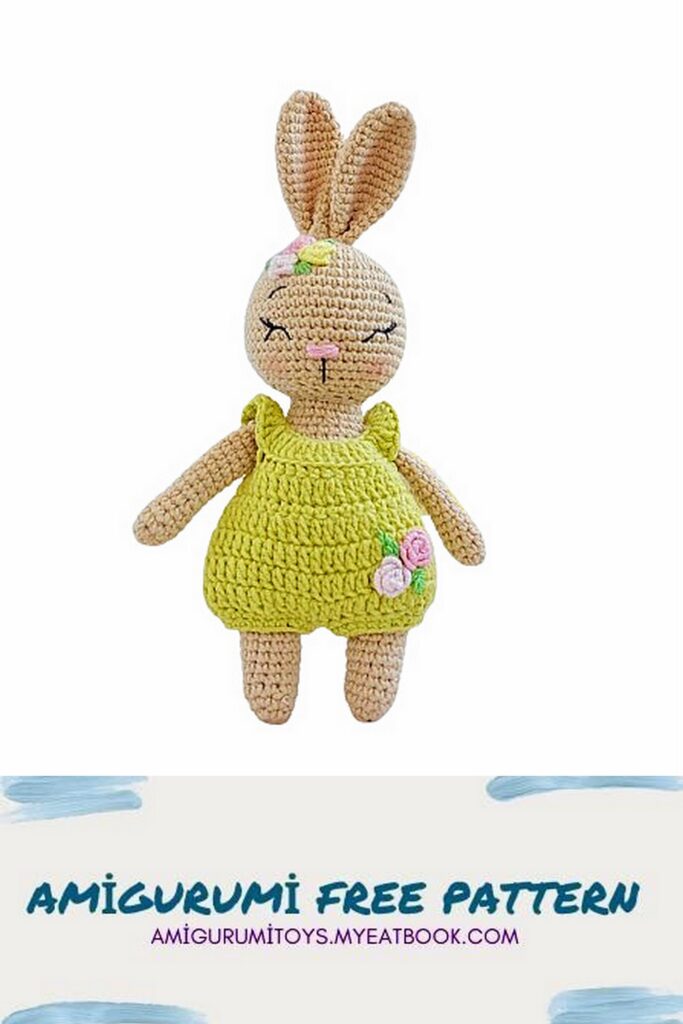
After decorating the face, sew on the ears. Fold the base of the ear in half and sew as shown in the photo.
Sew the ears on the very top of the head; you can also apply a little blush to the inside of the ear. Pin the head to the body and sew firmly in a circle. Sew the handles on the sides symmetrically, stepping back approximately 4 rows from the upper edge of the body.
Tie a satin ribbon bow on the bunny’s head, around the ears.
Dress :
Make a chain of 28Ch+3Ch lifts. When casting on, leave the thread length
approximately 20 cm, from which we will make a loop at the end of knitting.
1st row: starting from the fourth loop from the hook: İnc in each loop from DC (56DC), turn
2nd row: 1Ch rise, 8Sc, 2Ch, skip 12 loops of the previous row and continue knitting in the next loop – 16Sc, 2Ch, skip 12 loops of the previous row and continue knitting in the next loop – 8Sc (36Sc), turn
3rd row: 3Ch lift, (5DC, inc from DC)*6 (42DC), turn
4th row: 1Ch lift, 42 Sc, turn
5th row: 3Ch lift, 3DC, İnc from DC, (6DC, İnc from DC)*5, 3 DC(48DC)
Join the knitting in a circle using Sl-st, then knit in circular rows, each row starting with a 3Ch rise and ending with Sl-st
6-8 rows: 48DC (3 rows)
Finish knitting, fasten the thread, cut it, hide the end of the thread.
Using the thread you left when casting on, cast on a chain of 5Ch (or other required amount), form a loop and sew. Sew on a button. Decorate the front of the dress as you wish, for example, with decorative buttons, a brooch, flowers (I used paper flowers for scrapbooking).
Congratulations!
Your bunny baby is ready!
Thanks for knitting with me! See you again!