List of required materials
* YarnArt Jeans (brown) – color 70 – 1.5 skeins;
* YarnArt Jeans (flesh) – color 73 – 1 skein;
* YarnArt Jeans (white) – color 01 – quite a bit;
* YarnArt Jeans (yellow) – color 58 – 1.5 skeins;
* Filler (I have holofiber);
* The eyes are black with a diameter of 18mm;
* Wire for the frame (optional);
* Beaded wire with a diameter of 0.5 mm (you can take a larger diameter) (for wings);
* Hook (I have No. 1.5);
* Needle for stitching details;
* Scissors;
* Glue;
* Eyelashes (optional);
* Nail polish (white). I draw highlights on their eyes.
Abbreviations
SC – single crochet;
SL-ST – connecting post;
CH – lifting loop;
CH – air loop;
İNC – increase, i.e. in one loop we knit 2 SC;
DEC – decrease, from two loops we make 1 SC;
* – number of repetitions;
DC – single crochet;
MR – amigurumi ring.
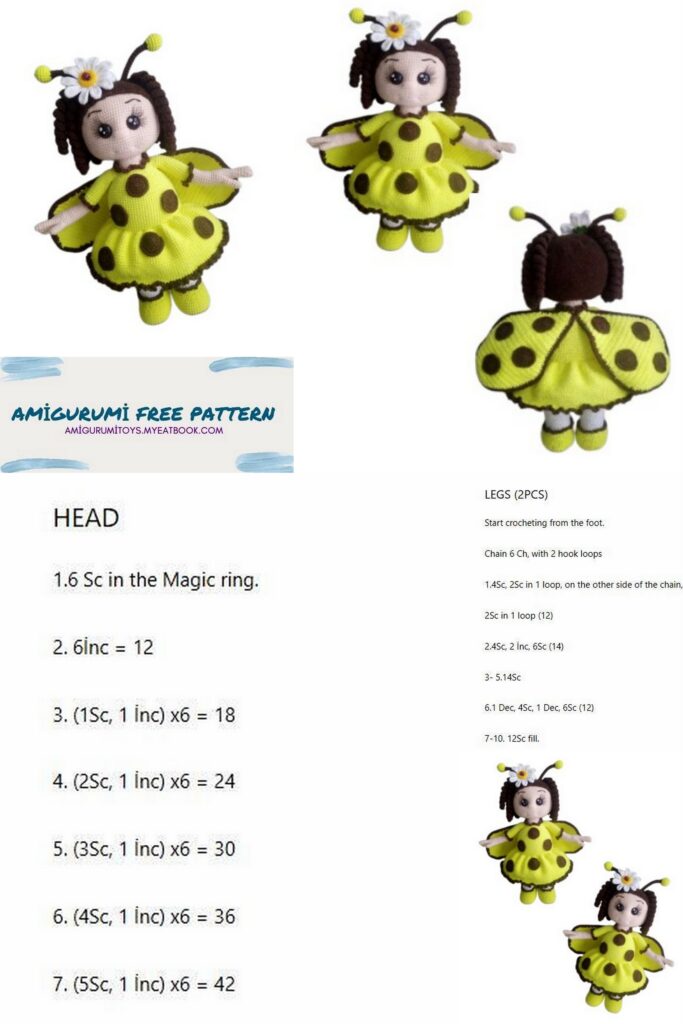
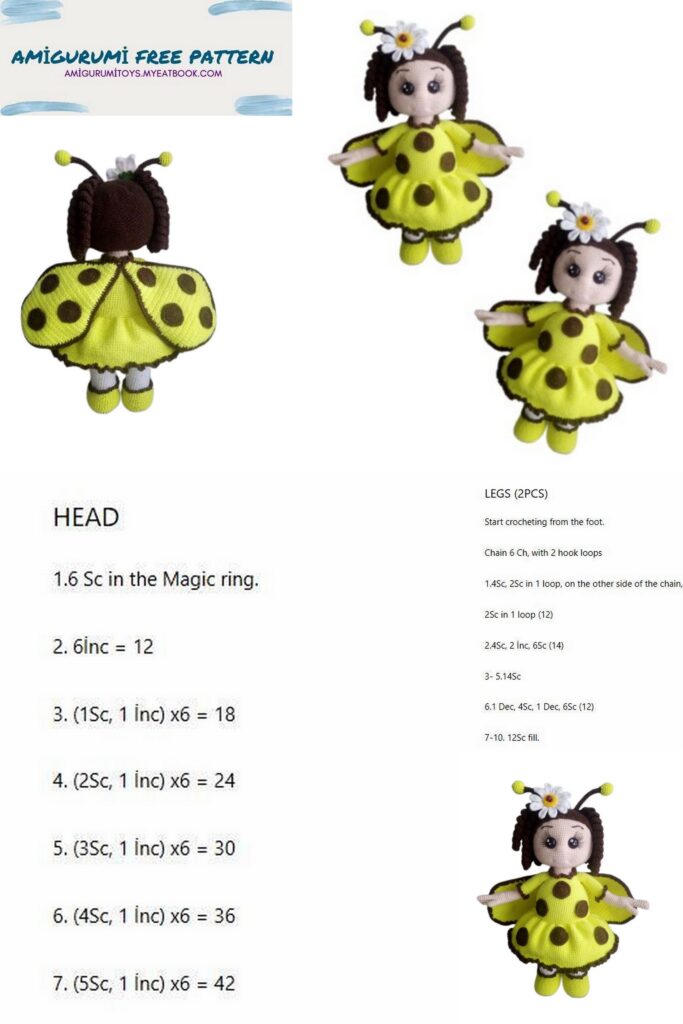
Head
We knit yarn Yarnart Jeans color 73 crochet No. 1.5. We’ll head knit using connecting posts and lifting loops (all other parts of the toy are knitted in a spiral).
Note: I knit with crosses.
So, we collect a chain of 10 air loops and, starting from the second loops from the hook, knit:
1. 2 SC in 1 st, 7 SC, 3 SC in 1 st, 6 SC, 2 SC in 1 st, SL-ST, CH (20).
2. (İNC)*2, 7SC, (İNC)*3, 7SC, İNC, SL-ST, CH (26).
3. (SC, İNC) *2, 7 SC, (SC, İNC) *3, 7 SC, SC, İNC, SL-ST, CH (32).
4. SC, İNC, 2 SC, İNC, SC, 7 SC, SC, İNC, (2 SC, İNC) *2, SC, 7 SC, SC, İNC, SC, SL-ST, CH (38).
Why do I knit so hard? It’s simple!))) So that our gains are not noticeable.
5. (3 SC, İNC) *2, 7 SC, (3 SC, İNC) *3, 7 SC, 3 SC, İNC, SL-ST, CH (44).
6. 2 SC, İNC, 4 SC, İNC, 2 SC, 7 SC, 2 SC, İNC, (4 SC, İNC) *2, 2 SC, 7 SC, 2 SC, İNC, 2 SC, SL-ST, CH(50).
7. (5 SC, İNC) *2, 7 SC, (5 SC, İNC) *3, 7 SC, 5 SC, İNC, SL-ST, CH (56).
8. 3 SC, İNC, 6 SC, İNC, 3 SC, 7 SC, 3 SC, İNC, (6 SC, İNC) *2, 3 SC, 7 SC, 3 SC, İNC, 3 SC, SL-ST, CH(62).
9. (7 SC, İNC) *2, 7 SC, (7 SC, İNC) *3, 7 SC, 7 SC, İNC, SL-ST, CH (68).
10. 4 SC, İNC, 8 SC, İNC, 4 SC, 7 SC, 4 SC, İNC, (8 SC, İNC) *2, 4 SC, 7 SC, 4 SC, İNC, 4 SC, SL-ST, CH(74).
11. (9 SC, İNC) *2, 7 SC, (9 SC, İNC) *3, 7 SC, 9 SC, İNC, SL-ST, CH (80).
12. 5 SC, İNC, 10 SC, İNC, 5 SC, 7 SC, 5 SC, İNC, (10 SC, İNC) *2, 5 SC, 7 SC, 5 SC, İNC, 5 SC, SL-ST, CH(86).
13 – 22 (10 rows). 86 SC. Do not forget to knit SL-ST and CH at the end of each row.
In the next row we will make holes for the eyes.
23. 21 SC, 2 CH, 2 sts of the previous row, skip, 11 SC, 2 CH, 2 sts of the previous row, 50 SC, SL-ST, CH (86).
Note: your number of columns at the beginning and end of the row may differ from mine. It all depends on the knitting method (I remind you that I knit with crosses, someone knits with checkmarks) and on the density. Try on the eyes before making holes. The distance between the eyes remains unchanged (11 SC).
24 – 30 (7 rows). 86 SC. At the end of each row SL-ST and CH.
At this stage, I insert the eyes.
31. 5SC, DEC, 10SC, DEC, 5SC, 7SC, 5SC, DEC, (10SC, DEC) *2, 5SC, 7SC, 5SC, DEC, 5SC, SL-ST, CH(80).
32. (9SC, DEC) *2, 7SC, (9SC, DEC) *3, 7SC, 9SC, DEC, SL-ST, CH (74).
33. 4SC, DEC, 8SC, DEC, 4SC, 7SC, 4SC, DEC, (8SC, DEC) *2, 4SC, 7SC, 4SC, DEC, 4SC, SL-ST, CH(68).
34. (7SC, DEC) *2, 7SC, (7SC, DEC) *3, 7SC, 7SC, DEC, SL-ST, CH (62).
35. 3SC, DEC, 6SC, DEC, 3SC, 7SC, 3SC, DEC, (6SC, DEC) *2, 3SC, 7SC, 3SC, DEC, 3SC, SL-ST, CH(56).
36. (5SC, DEC) *2, 7SC, (5SC, DEC) *3, 7SC, 5SC, DEC, SL-ST, CH (50).
37. 2SC, DEC, 4SC, DEC, 2SC, 7SC, 2SC, DEC, (4SC, DEC) *2, 2SC, 7SC, 2SC, DEC, 2SC, SL-ST, CH(44).
38. (3SC, DEC) *2, 7SC, (3SC, DEC) *3, 7SC, 3SC, DEC, SL-ST, CH (38).
39. SC, DEC, 2 SC, DEC, SC, 7 SC, SC, DEC, (2 SC, DEC) *2, SC, 7 SC, SC, DEC, SC, SL-ST, CH (32).
40. (SC, DEC) *2, 7SC, (SC, DEC) *3, 7SC, SC, DEC, SL-ST, CH (26).
41. (DEC) *2, 7SC, (DEC) *3, 7SC, DEC, SL-ST. (20).
We finish the row with a connecting column, cut the thread, leaving a long tail for sewing.
We stuff our heads. You can start stuffing earlier. I am doing it now. In problem areas, I help myself with a pencil (I knock out the filler so that there are no creases, and our head has a beautiful rounded shape).
We begin to make weights.
To do this, I take a long needle (I have it 12 cm) and a nylon thread.
I insert the needle on the back of the neck and take it out from the outside of the left eye in the middle.
Then I insert the needle into the middle of the inner side of the same eye and bring it out on the outer side of the right eye.
Again I insert the needle from the inside of the same eye and bring it out on the neck di, stepping back a couple of columns from the place where they were originally injected.
Pull well and tie a strong knot.
Now we make a tightening of the mouth.
We take all the same needle and kapron thread. We introduce a needle on the neck in front and bring it out under the eye, stepping back from it 6 rows.
Note: I have a 4-row indent in the photo. You are indenting 6 rows!!!
Then we insert the needle, stepping back 1 column
and output under the second eye.
We insert the needle again, stepping back 1 column and withdraw it on the neck, a couple of columns from the place where it was originally injected.
Stretch, tie a knot.
Here’s what we got.
We embroider a nose.
We take the needle and the yarn with which we knitted the head. We introduce the needle in this way (see photo) and make a few stitches (I do 6).
My nose takes 2 rows. Both ends of the thread I bring out at the neck and hide inside the head.
Next, I glue the cilia and embroider the eyebrows and mouth.
Now on the eyes I draw highlights.
I do it with white nail polish. You may choose not to. Our girl is so pretty
The head is ready!
In the next step, we knit a Wig for our doll. To do this, we collect a chain of 10 air loops with a brown thread and, starting from the second loop from the hook, we knit in the same way as the head from the first to the twelfth row, inclusive.
Attention: we will knit the wig in a spiral, i.e. without connecting posts and lifting loops!!!
13. (11 SC, İNC) *2, 7 SC, (11 SC, İNC) *3, 7 SC, 11 SC, İNC (92).
14 – 27 (14 rows). 92 SC.
We try on our wig on the head and, if everything suits us, we begin to tie the HDC.
28.92 HDC.
Close, cut the thread, leaving a long tail for sewing.
Note: your cap parameters (volume and depth) may differ from mine. Perhaps you do not need to do so many additional rows, get by with less, or, conversely, add. The same goes for depth. Therefore, please, in the process of knitting, try on your blank on your head.
Sewing on a wig.
Ponytails
With the same brown thread we collect a chain of 63 air loops.
From the third loop from the hook we knit:
(2 DC, 3 DC in 1 loop) * 20 times (to the end of the row), we make a connecting column and, without cutting the thread, we continue: again we collect a chain of 63 air loops and knit similarly:
(2 DC, 3 DC in 1 st) *20, SL-ST and cast on again.
Thus, we knit 5 spirals.
We knit another one of the same ponytail.
We sew our ponytails.
Horns or antennas (as you like)
We knit with brown thread. We leave the initial tail long, so that later we can sew our horns to the head.
Note: we do not fill the horns. We fill only yellow cones.
1. 6 SC to MR (6).
2 – 16 (15 rows). 6SC (6).
Change the thread to yellow.
17. (İNC) *6 (12).
18. (SC, İNC) *6 (18).
At this stage, I insert the wire. I take a piece of about 25 cm.
With the help of pliers, I bend the end of the wire so that it does not leave the antenna in the future and at the same time, so that it fits in the yellow bump.
19 – 21 (3 rows). 18SC(18).
22. (SC, DEC) *6 (12).
23. (DEC) *6 (6).
We stuff, close the remaining loops with a needle, hide the thread.
We outline the place on the head where our horns will be. I have them right above my ponytails. We pass the free end of the wire through the head (I capture not only the cap, but the head itself).
We knit the second antenna in the same way as the first.
Now, to secure our horns, we sew them on. No wonder we left long ponytails.
Pens
We knit fingers. Each handle will have 4.
We start knitting with a flesh-colored thread.
1. 7 SC to MR (7).
2 – 5 (4 rows). 7SC (7).
We do SL-ST. We cut the thread. There will be only one such finger on the pen.
Next, we knit 3 identical fingers:
1. 6 SC to MR (6).
2 – 6 (5 rows). 6SC (6). We do not cut the thread on the last finger.
We continue to knit the right hand:
1. 3 SC on the first finger, 3 SC on the second, 6 SC on the third, 3 SC on the second, 3 SC on the first (18).
2 – 4 (3 rows). 18SC(18).
Now we knit a thumb:
5. 6 SC, connecting SC of a finger with a handle, then, as it were, go back and knit 5 SC along the finger, again connecting SC of a finger with a handle, 10 SC (23).
6. 6SC, DEC, 4SC, DEC, 9SC (21).
Note: for those who find it difficult to knit fingers, I can offer another option: in MR, dial 6 SC, then add up to 18 SC in a row and knit a handle to the desired length.
7 – 8 (2 rows). 21 SC (21).
9. (5 SC, DEC) *3 (18).
At this stage, you can fill your fingers. I stuff quite a bit.
10 – 19 (10 rows). 18SC(18).
Change the thread to yellow.
20.18SC(18).
21. Behind the back wall of the loop 18 SC (18).
Next, we knit for the entire loop.
22 – 36 (15 rows). 18SC(18).
We make SL-ST, we cut the thread.
In the 21st row, join the brown thread and tie over the remaining half loops in this way: (SC, 3 CH) *to the end of the row. We do not skip the loops of the previous row.
We knit the left handle on the 4th row inclusive in the same way as the right one.
5. We knit the thumb: 1 SC, connecting SC of a finger with a handle, 5 SC along the finger, connecting SC of a finger with a hand, 15 SC (23).
6.SC, DEC, 4SC, DEC, 14SC (21).
From the 7th row we knit in the same way as the first handle.
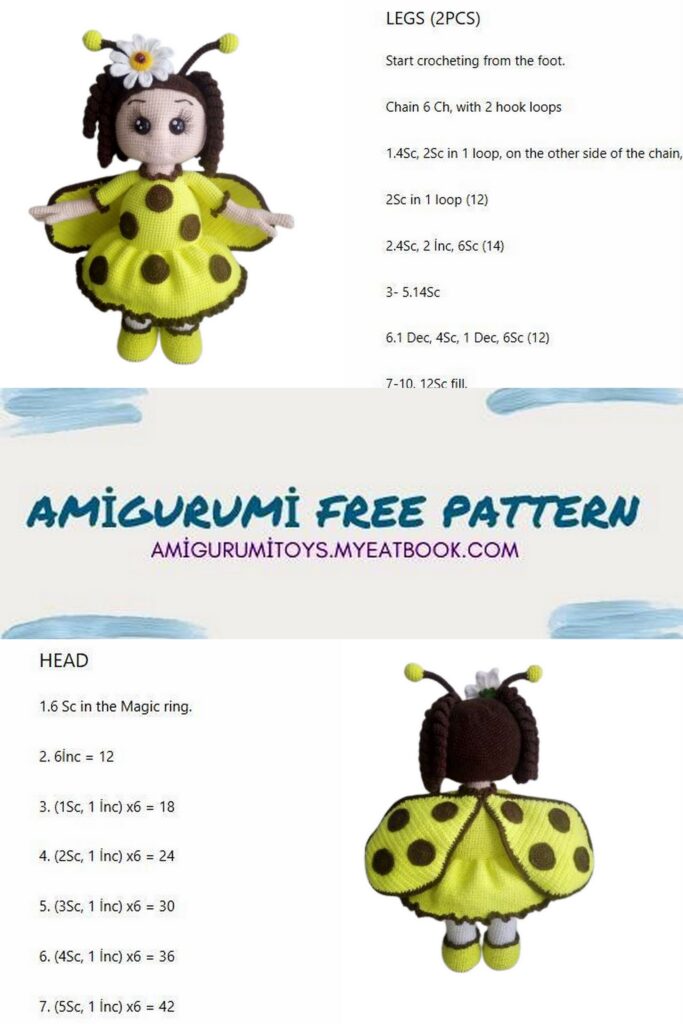
legs
Note: I knit a frame toy, so in the process of knitting the legs, I don’t immediately stuff them. And I will do it when my legs are ready, i.e. after
48th row. If you do not need a frame, then as you knit your legs you can hit.
So, we begin to knit with a brown thread.
We collect 10 air loops and, starting from the second loop from the hook, we knit:
1. 2 SC in 1 st, 7 SC, 3 SC in 1 st, 6 SC, 2 SC in 1 st (20).
2. (İNC) *2, 7 SC, (İNC) *3, 7 SC, İNC (26).
3. (SC, İNC) *2, 7 SC, (SC, İNC) *3, 7 SC, SC, İNC (32).
4. SC, İNC, 2 SC, İNC, SC, 7 SC, SC, İNC, (2 SC, İNC) *2, SC, 7 SC, SC, İNC, SC (38).
5. (3 SC, İNC) *2, 7 SC, (3 SC, İNC) *3, 7 SC, 3 SC, İNC (44).
6. 2 SC, İNC, 4 SC, İNC, 2 SC, 7 SC, 2 SC, İNC, (4 SC, İNC) *2, 2 SC, 7 SC, 2
SC, İNC, 2 SC (50).
Cut out the insole.
My insoles are cut out of this plastic.
7. Change to yellow thread and knit a row behind the back wall of the loop: 50 SC (50).
Next, we continue to knit for both walls of the loop.
8 – 12 (5 rows). 50 SC (50).
At this point, I insert the insole.
13. 16SC, (SC, DEC) *8, 10SC (42).
14.42SC (42).
15. 12SC, (SC, DEC) *8, 6SC (34).
16.34SC(34).
17. 13SC, (SC, DEC) *4, 9SC (29).
We change the thread to brown and make a strapping of our shoe for the front walls of the loops of this row: (do not remove the marker)
18/1
. (SC, chain 3) *to the end of the row. Columns of the previous row
We DO NOT skip. We tied it, we make SL-ST, we cut the thread, we hide it.
Here’s what we got.
We still have the back walls of the loops of the 18th row. For them, we will continue knitting.
We attach a white thread to the half-loop where we have a marker and knit
18/2. 29SC(29).
19 – 30 (12 rows). 29SC(29).
31/1
. We make the strapping for the front half loops in the same way as in the 18th row:
(SC, 3 CH) *to the end of the row).
31/2
. We attach to the half loop where we have the marker, a flesh-colored thread and knit 29 SC (29).
32 – 41 (10 rows). 29SC(29).
42. İNC, (5 SC, İNC) *4, 4 SC (34).
43 – 48 (6 rows). 34SC(34). At the end of the last row we make SL-ST.
We cut the thread. One leg is done. We knit the second in the same way as the first, but we do not cut the thread.
As soon as both legs are ready, I insert the wire frame and stuff it, helping myself with a pencil.
I take a piece of wire (I have an aluminum wire) about 60 cm long. I fold it in half and make loops at the ends. Insert into legs
(we will have the first leg on the right, the second on the left) and start stuffing. In the process of stuffing, adjust the legs so that they do not warp.
Note: Unfortunately, I don’t know the diameter of my wire, but it’s about the same thickness as a sushi stick.
We connect our legs:
49. 2 SC on the second leg, 5 stitches, SC with the first leg, 33 SC on the first leg, 5 SC on the chain, 32 SC on the second leg (78).
Note: I do SC with the first leg in the 15th loop after SL-ST. Those. at the end of the 48th row we made SL-ST, and now from this connection we count forward 15 columns and connect the legs. BUT all the density and method of knitting is different. Therefore, be sure to try on the legs and only after you are absolutely sure, connect.
50 – 61 (12 rows). 78SC (78).
Now we shift the row by 44 SC, i.e. we knit 44 SC, knit another 1 column and put a marker in it. This is where the row will start.
Change the thread to yellow.
62.78SC (78).
And again we make 2 bias loops. In the third we put a marker.
63/1
. Behind the back wall of the loop 78 SC (78).
64 – 77 (14 rows). 78SC (78).
Note: after the 63rd row, I knit a couple more rows and return to knitting the skirt. It’s more comfortable for me. You can tie it at the very end.
So, skirt:
We attach the yellow thread in the 63rd row, where we have the front half loops.
63/2
(I’ll label it as 1st row):
1. (SC, 3 SC in 1 loop) *to the end of the row (156).
2 – 21 (20 rows). 156 SC (156).
22. (10 SC, DEC) *13 (143).
At the end of the row we make SL-ST, cut the thread. We tie with brown yarn in the same way as the shoes.
Now we return to the body. We finished knitting on the 77th row.
78. (11 SC, DEC) *6 (72).
79.72SC (72).
80. 5SC, DEC, (10SC, DEC) *5, 5SC (66).
81.66SC (66).
82. (9 SC, DEC) *6 (60).
83.60SC (60).
84. 4SC, DEC, (8SC, DEC) *5, 4SC (54).
At this stage, I stuff the toy and knit the handles.
I try on and mark with needles.
85. 12 SC, 6 SC on arm and body together, 21 SC, 6 SC on second arm and body together, 9 SC (54).
86. 12 SC, 12 SC on hand, 21 SC, 12 SC on second hand, 9 SC (66).
At this stage, I insert the frame into the handles and stuff (quite a bit).
I repeat: you can knit without a frame!
87. (4SC, DEC) *11 (55).
88.55 SC (55).
89. (3 SC, DEC) *11 (44).
90. 5SC, DEC, 3SC, DEC, 2SC, DEC, 5SC, DEC, 5SC, DEC, 2SC, DEC, 3SC, DEC, 3SC, DEC (36).
We change the thread to body and knit the next row behind the back wall of the loop.
91. for s/n 36 SC (36).
Don’t forget to stuff our doll.
92 – 96 (5 rows). 36SC(36).
We make SL-ST, cut the thread, leaving a long tail for sewing.
Now we return to the row where we have half loops left and we tie with brown yarn in the same way as we did with shoes and a skirt.
Next e the tap will be sewing on the head. It won’t be easy
BUT! if you were able to tie this doll, then you will cope with this difficulty)))
I try on the head and fix it with the help of needles. I sew.
I sew in this way: I make a stitch on the head, pull out the thread, then I make a stitch on the neck, pull the thread, and so on to the end.
Now we will knit spots.
With a brown thread in MR we collect 6 SC. This will be our first row.
2. (İNC) *6 (12).
3. (SC, İNC) *6 (18).
4. SC, İNC, (2 SC, İNC) *5, SC (24).
We cut the thread. Who will sew, leaves a long tail for sewing. I will paste.
We knit 14 such spots.
Wings
With yellow yarn, we collect 3 CH and another loop of lifting.
Starting from the second loop from the hook, we knit:
1. İNC, SC, İNC, CH. We unfold knitting.
2.5SC, CH. U-turn.
3. İNC, 3 SC, İNC, CH. U-turn.
4.7SC, CH. U-turn.
5. İNC, 5 SC, İNC, CH. U-turn.
6.9SC, CH. U-turn.
7. İNC, 7 SC, İNC, CH. U-turn.
8.11SC, CH. U-turn.
9. NC, 9 SC, NC, CH. U-turn.
10.13SC, CH. U-turn.
11. İNC, 11 SC, İNC, CH. U-turn.
12.15SC, CH. U-turn.
13. İNC, 13 SC, İNC, CH. U-turn.
14.17SC, CH. U-turn.
15. İNC, 15 SC, İNC, CH. U-turn.
16.19SC, CH. U-turn.
17. İNC, 17 SC, İNC, CH. U-turn.
18.21SC, CH. U-turn.
19. İNC, 19 SC, İNC, CH. U-turn.
20.23SC, CH. U-turn.
21. İNC, 21 SC, İNC, CH. U-turn.
22.25SC, CH. U-turn.
23. İNC, 23 SC, İNC, CH. U-turn.
24.27SC, CH. U-turn.
25. İNC, 25 SC, İNC, CH. U-turn.
26.29SC, CH. U-turn.
27. İNC, 27, İNC, CH. U-turn.
28 – 31 (4 rows). 31 SC, CH. U-turn.
32. skip the first loop, 28 SC, DEC, CH.
33.29SC, CH. U-turn.
34. skip the first loop, 26 SC, DEC, CH. U-turn.
35. 27 SC, CH. U-turn.
36. skip the first loop, 24 SC, DEC, CH. U-turn.
37.25SC, CH. U-turn.
38. skip the first loop, 22 SC, DEC, CH. U-turn.
39. 23 SC, CH. U-turn.
40. skip the first loop, 20 SC, DEC, CH. U-turn.
41. skip the first loop, 18 SC, DEC, CH. U-turn.
42. skip the first loop, 16 SC, DEC, CH. U-turn.
43. skip the first loop, 14 SC, DEC, CH. U-turn.
44. skip the first loop, 12 SC, DEC, CH. U-turn.
45. skip the first loop, 10 SC, DEC, CH. U-turn.
46. skip the first loop, 8 SC, DEC, SL-ST. We cut the thread.
Next, we tie our wing.
To do this, I attach a brown thread where we started knitting with 3 CH. We made a loop with a brown thread and now we thread a beaded wire into it. We press the wire to the winglet and start tying the HDC around the entire wing (we get the wire between the hook and the thread). I do not count how many half columns I get. Here it is up to you. The main thing is to make sure that the canvas does not shrink (this may arise from the fact that HDCs are rarely connected). But you don’t need to overdo it either.
We tied it, cut the thread and wire, hide the tails.
We knit the second wing in the same way as the first.
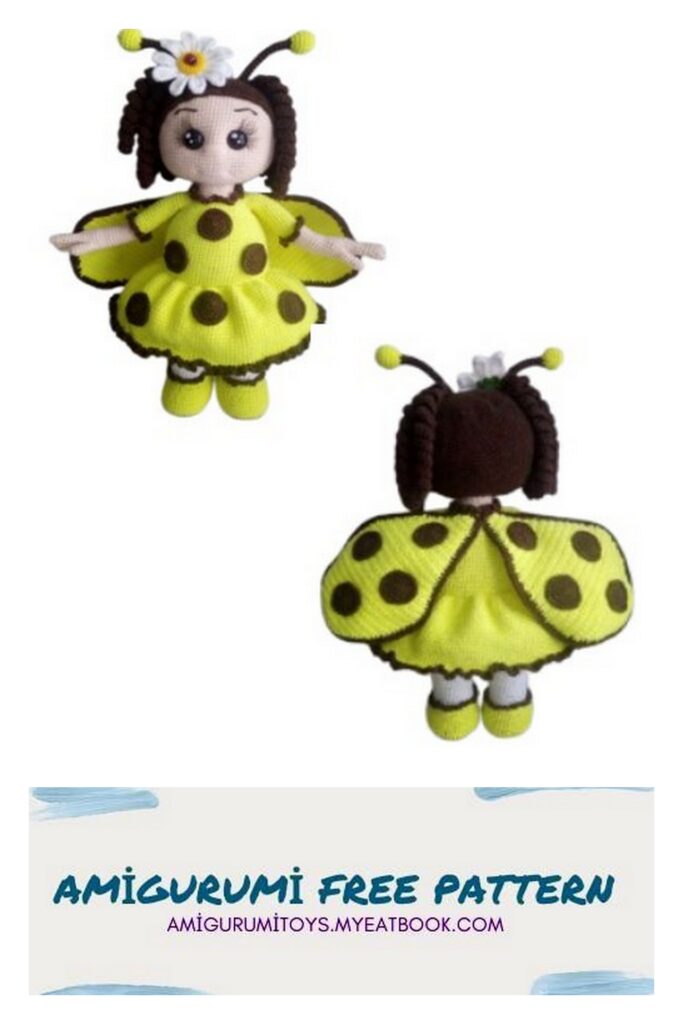
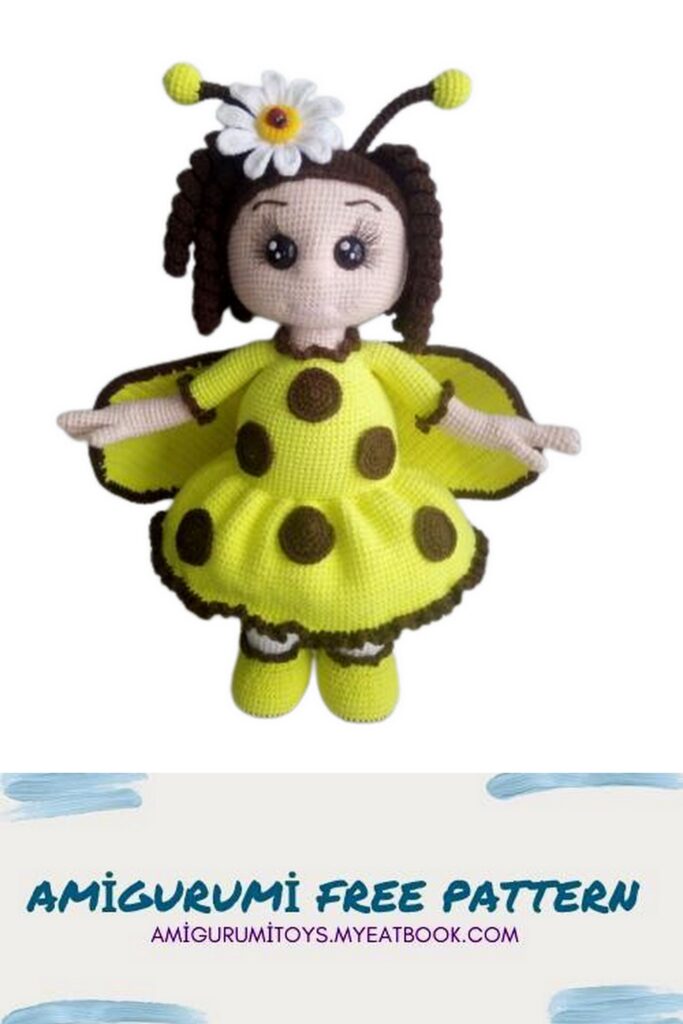
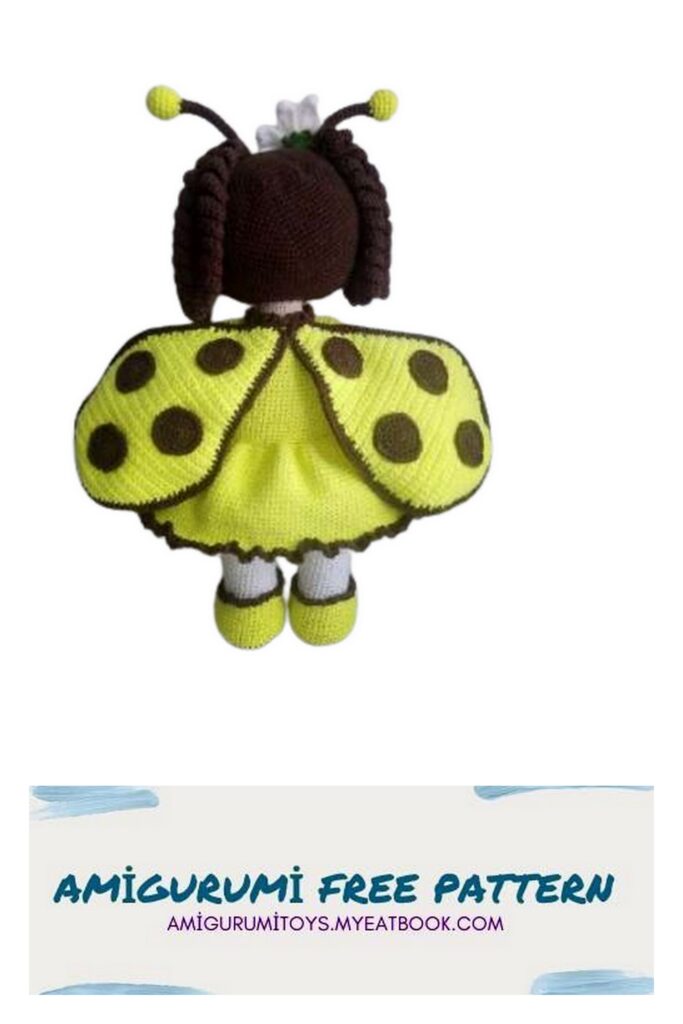
Next, I glue the spots: 4 pieces for each wing and 6 pieces for the dress. I sew wings.
Our doll is ready!