Legend:
SC-single crochet
DC double crochet
CH – air loop
MR ring amigurumi
SL-ST-connecting post
DEC-decrease
İNC-increase
(… ..) * 6 times_ repeat the combination in brackets 6 times.

List of required materials
– Yarn for Bon Bon Panda Baby toy # 3107 – 2 skeins + a little more
-Yarn for the mane – any – the main thing is light. I have a Bambino
-YarnArt Jeans eye yarn – black
– Mouline thread for eye embroidery
-Hook No. 4, No. 2
-Scissors
– sewing machines, needle.
-Marker
-Hollofiber
-Sewing threads
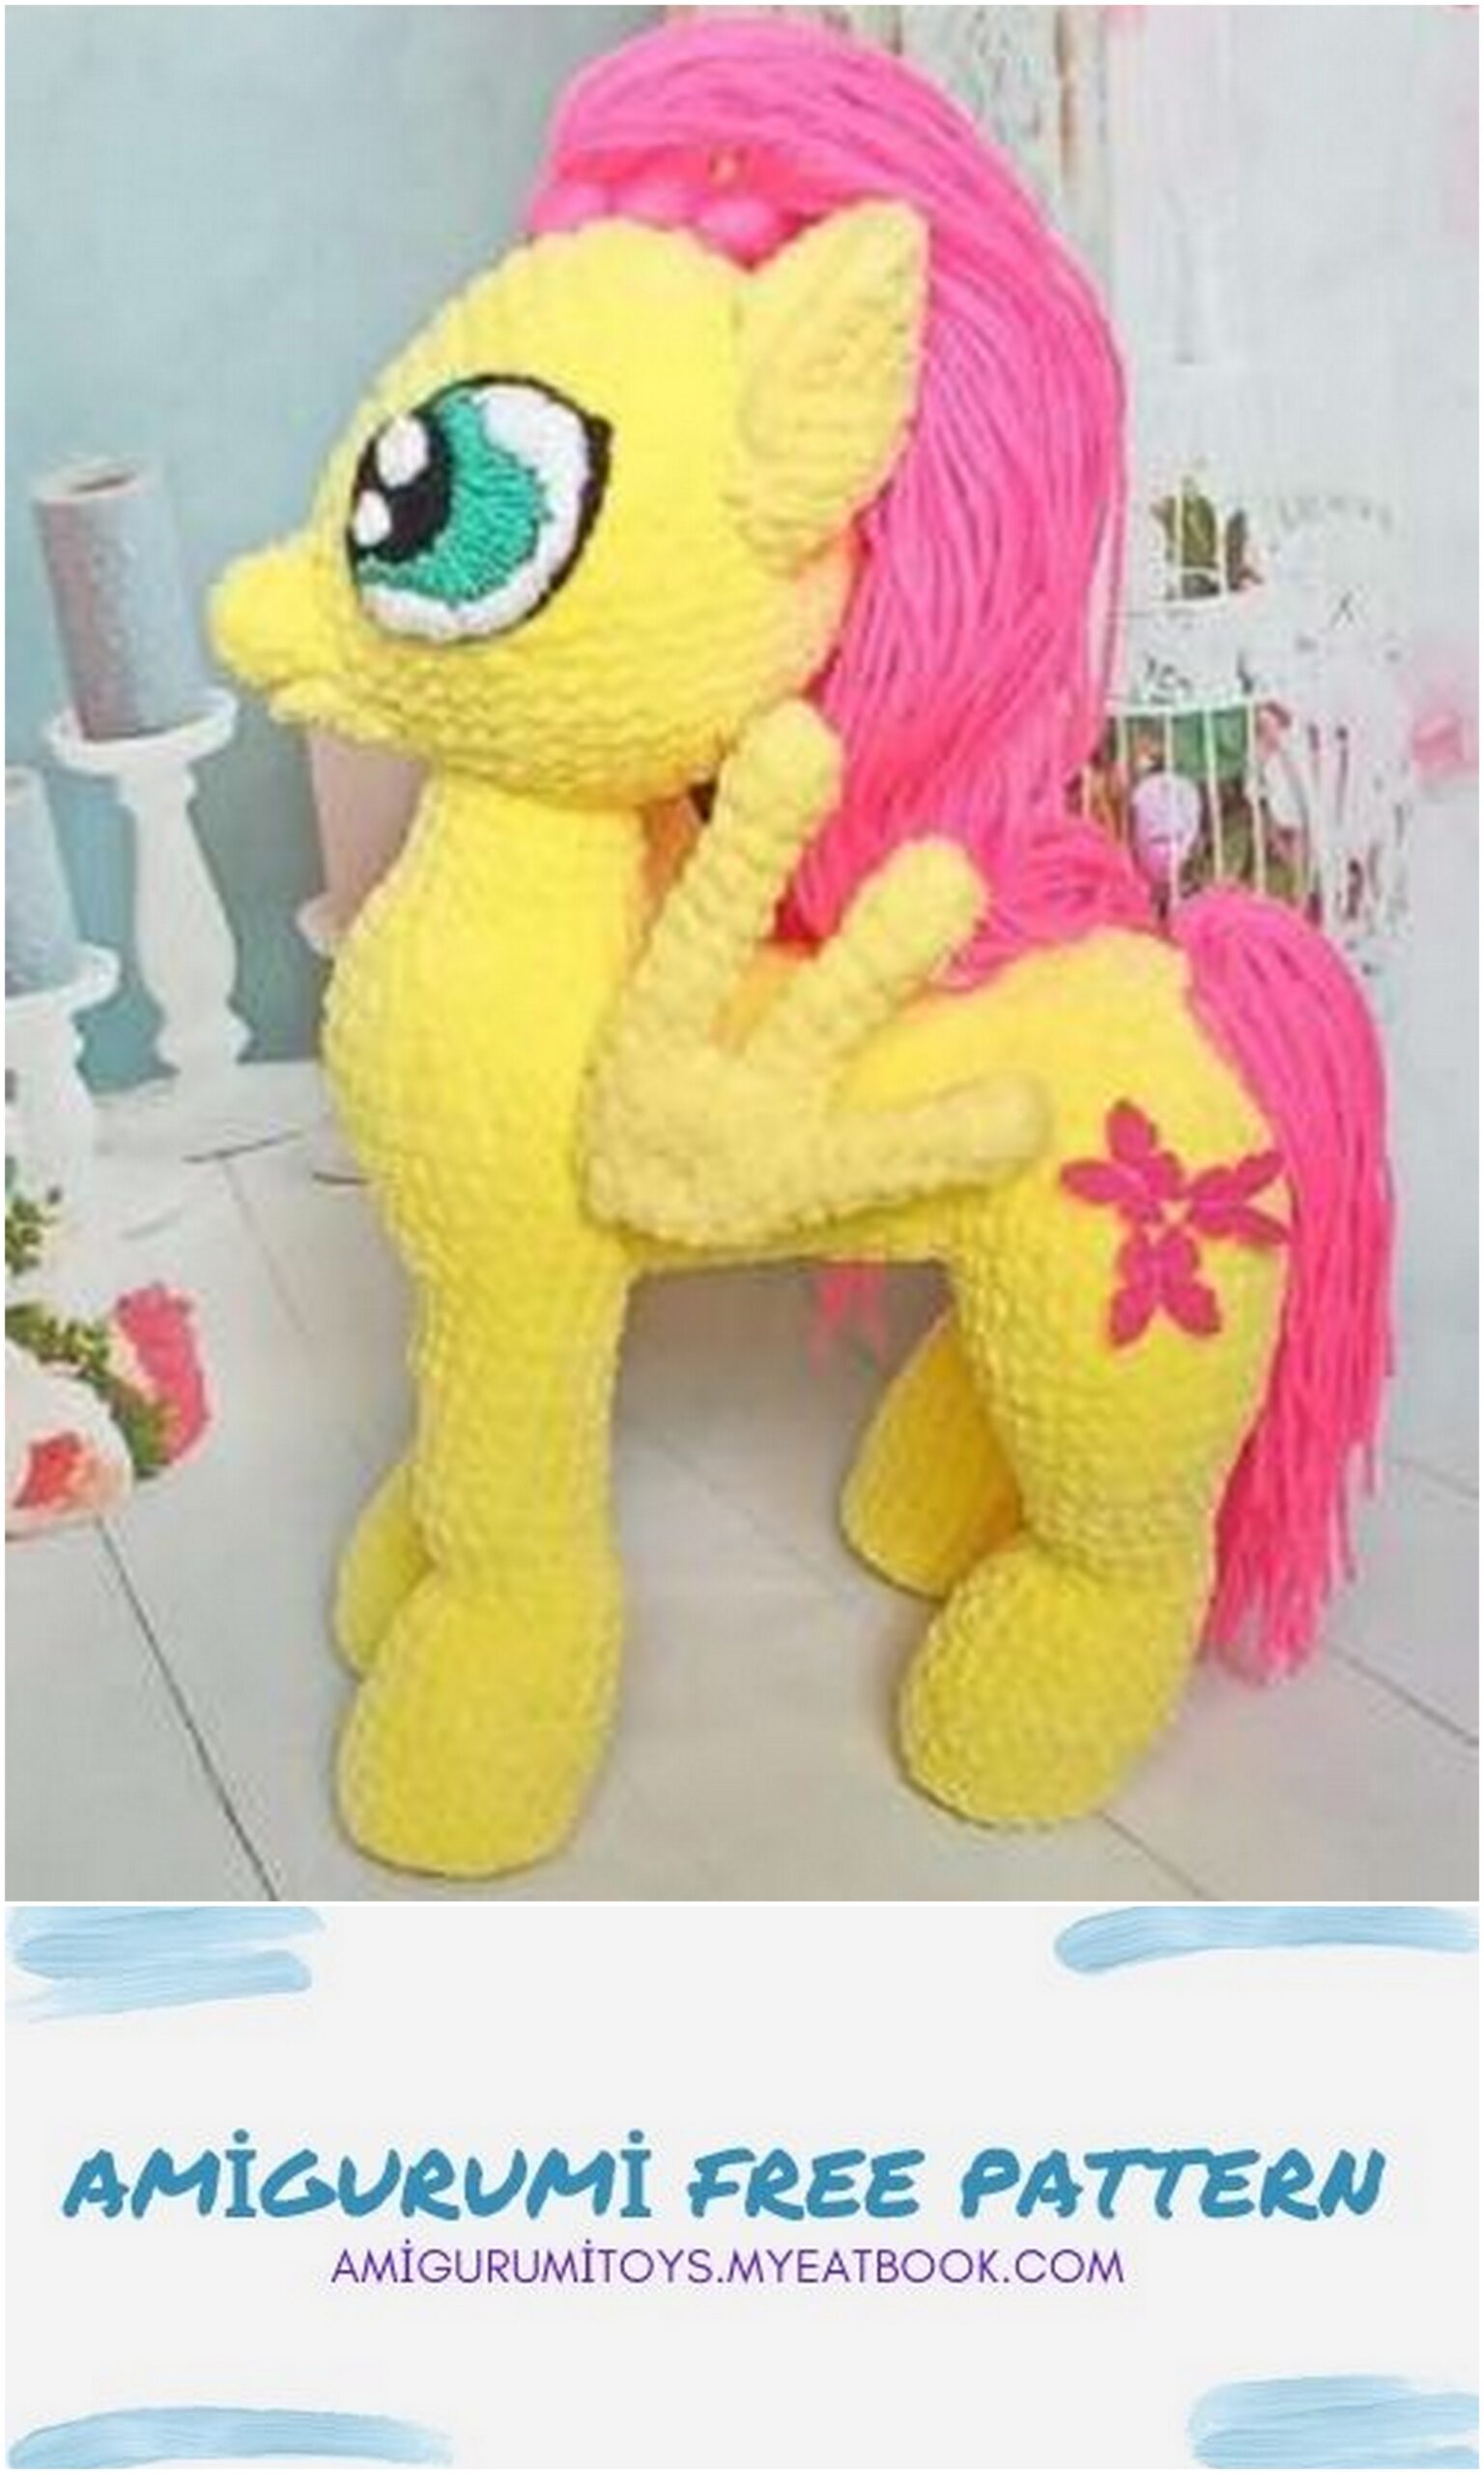
The toy turns out to be 35 cm tall
Attention!!! The toy may turn out to be of a different height, it depends on: yarn, knitting density, selected crochet. I knit tightly, I do not like when there are holes. I also pay special attention to filling the toy, I stuff it very tightly so that all the details get the desired and conceived look. Any yarn can be used, I used this particular plush because I did not find the color in Himalaya and Yarnart.
Well, straight loops for you, let’s go)))))

Hind legs
1 row – 6MR (6)
2nd row – 6İNC (12)
3 row – (1 SC, İNC) * 6 times (18)
4 row – (2SC, İNC) * 6 times (24)
5 row – 24SC for RFP (24)
6-9 row – 24 SC
At this stage, insert the insert, I take thick cardboard and wrap it well with tape.
10 row – 10SC, DEC, 12SC (23)
11 row – 9SC, DEC, 12SC (22)
12 row – 9SC, DEC, 11SC (21)
13 row – 9SC, DEC, 10SC (20)
14 row – 5SC, 4DEC, 7SC (16)
At this stage, we fill the part, because
If you tie it to the end, then it will then be very
Difficult to fill.
15 row – 6SC, 3İNC, 5SC, DEC (18)
16 row – 2DEC, 4SC, 3İNC, 7SC (19)
17 row – 19SC unchanged
18 row – 9SC, DEC, 8SC (18)
19 row – (2SC, İNC) * 6 times (24)
20 row – (3SC, İNC) * 6 times (30)
Rows 21-23 – 30 SC unchanged.
Knit SL-ST on one leg.
By the way, in this photo I did not fill
I didn’t fill my leg in row 14 and then
I had a hard time)))
We knit the second leg in the same way, but on the second leg in the 23rd row we do not tie 9SC, we knit SL-ST and connect with SL-ST with 2 air loops with the 8th SC of the previous row of the second leg.
After SL-ST dialing
SL-ST first legs 2CH
May 8 SC previous a number of
first leg I really hope that the picture with the explanation will help to understand the scheme, if not, write to help)
24 row – 30SC on one leg, 2SC on CH, 30SC on the second leg, 2SC on CH (64)
We put a marker.
25 row – 64 SC
26 row – 29SC, 2DEC, 29SC, DEC (61SC)
27 row – 59SC, DEC (60SC)
28 row – 60SC (60)
29 row – (8SC, DEC) * 6 times (54)
30 row – (7SC, DEC) * 6 times (48)
31 row – (6SC, DEC) * 6 times (42)
32 row – (5SC, DEC) * 6 times (36)
33 row – (4SC, DEC) * 6 times (30)
34 row – (3SC, DEC) * 6 times (24)
35 row – (2SC, DEC) * 6 times (18)
36 row – (1SC, DEC) * 6 times (12)
37 row – 6DEC (6)
Front legs
Repetition of the hind legs up to the 18th row inclusive !!!
1 row – 6MR (6)
2nd row – 6İNC (12)
3 row – (1 SC, İNC) * 6 times (18)
4 row – (2SC, İNC) * 6 times (24)
5 row – 24SC for RFP (24)
6-9 row – 24 SC
At this stage, insert the insert, I take thick cardboard and wrap it well with tape.
10 row – 10SC, DEC, 12SC (23)
11 row – 9SC, DEC, 12SC (22)
12 row – 9SC, DEC, 11SC (21)
13 row – 9SC, DEC, 10SC (20)
14 row – 5SC, 4DEC, 7SC (16)
At this stage, we fill the part, because
If you tie it to the end, then it will then be very
Difficult to fill.
15 row – 6SC, 3İNC, 5SC, DEC (18)
16 row – 2DEC, 4SC, 3İNC, 7SC (19)
17 row – 19SC unchanged
18 row – 9SC, DEC, 8SC (18)
19-23 row – 18SC unchanged, SL-ST.
The first leg is ready.
Similarly, we knit the second, but do not tie 3 SC on the second leg and connect with
SL-ST 4 CH from the 5th SC of the previous row of the second leg.
I tried to explain from the photo, Erase the next page The photo shows that 4CH is typed. Connect the SL-ST with the first leg.
24 row – 18SC (I knit the 18th SC in SL-ST), 4SC in CH, 19SC (I knit the 1st SC in SL-ST, the rest 18SC in the leg), 4SC in CH (45) Knit an offset loop and put a marker …
25 row – 45SC
26 row – 11SC, DEC, 5SC, DEC, 5SC, DEC, 18 SC (42)
27 row – 42SC
28 row – İNC, 34SC, (1SC, İNC) * 3 times, 1SC (46)
29 row – 41SC, 2İNC, 3SC (48)
30 row – 48 SC
We got a beautiful bulging breast
31 row – (6SC, DEC) * 6 times (42)
32 row – 42SC unchanged (42)
33 row – (5SC, DEC) * 6 times (36)
34 row – (4SC, DEC) * 6 times (30)
35 row – (3SC, DEC) * 6 times (24)
36 row – DEC, 20SC, DEC (22)
37-40 rows – 22SC, SL-ST.
Torso
We dial 30 CH, SL-ST.
1 – 6 row – 30SC (30)
7 row – (5SC, İNC) * 6 (36)
8 row – (6SC, İNC) * 6 (42)
9 row – (7SC, İNC) * 6 (48)
SL-ST.
Head
1 row – 3SC in MR (3) Side view
2nd row – 3İNC (6)
3 row – (1SC, İNC) * 3 (9)
4 row – (2SC, İNC) * 3 (12)
5 row – (1SC, İNC) * 2, 2DEC, (1SC, İNC) * 2 (14)
6 row – (2SC, İNC) * 2, 2İNC, (2SC, İNC) * 2 (20)
7 row – 8SC, 4İNC, 8SC (24)
8 row – (3SC, İNC) * 6 (30)
9 row – (4SC, İNC) * 6 (36)
10 row – (5SC, İNC) * 6 (42) Top view
11 row – (6SC, İNC) * 6 (48)
12 row – (7SC, İNC) * 6 (54)
13-17 rows – 54SC unchanged (54)
18 row – (7SC, DEC) * 6 times (48)
19 row – (6SC, DEC) * 6 times (42)
20 row – (5SC, DEC) * 6 times (36)
21 row – (4SC, DEC) * 6 times (30)
22 row – (3SC, DEC) * 6 times (24)
23 row – (2SC, DEC) * 6 times (18)
24 row – (1SC, DEC) * 6 times (12)
25 row – 6DEC (6)
Ears
one row – 6SC in MR
2nd row – 6İNC (12)
3 row – (1 SC, İNC) * 6 times (18)
4 row – (2SC, İNC) * 6 times (24)
3 row – (3SC, İNC) * 6 times (30)
SL-ST
Fold & Knit 3SC
Mouth
We dial 5CH
1 row – 3SC, in the extreme loop 3SC,
2nd row – 2SC, İNC (9)
SL-ST.
Ready mouth
Eyes
We knit YarnArt Jeans in black.
1 row – 6SC in MR
2nd row – 6 İNC (12)
3 row – (1SC, İNC) * 6 (18)
4 row – 2SC, İNC (3SC in one loop), 8SC, İNC (3SC in one loop), 6SC (22)
5 row – 3SC, İNC (3SC in one loop), 10SC, İNC (3SC in one loop), 7SC (26)
6 row – 4SC, İNC (3SC in one loop), 12SC, İNC (3SC in one loop), 8SC (30)
7 row – 5SC, İNC (3SC in one loop), 14SC, İNC (3SC in one loop), 9SC (34)
Knit another 6SC and make SL-ST.
In the yellow pony, I knitted another row without changing and the eyes turned out to be larger, see how you like it better.
Pupil:
We knit YarnArt Jeans in black.
1 row – 6SC in MR
2nd row – 6İNC (12)
3 row – (1SC, İNC) * 6 (18)
4 row – (1SC, İNC) * 3 (21)
SL-ST
We sew on the pupils, I tried to highlight with pins that it would be more or less clear, in general there is no special technique in sewing and embroidering an eye, I do everything at my discretion.
Next, I begin to embroider the eye, first I embroider 2 rows in white, then the remaining space in blue.
The photo shows that I embroidered two rows in white I fill in the rest with blue
Leaving just a little black
See the photo below
For proteins, I took a pehorka and for a large flare I made 6SC in MR, for a small 3SC in MR, and sewed it to the pupil.
All the eye is ready, the second is the same, but do not forget that the pupil on the second eye must be on the opposite side)))
Wings
1st detail
1 row – 6SC in MR
2-6 row – 6SC unchanged SL-ST
2nd detail
1 row – 6SC in MR
2-8 row – 6SC unchanged
SL-ST, CH, connect SL-ST with 3SC of the previous row of the 1st part.
Fasten and cut the thread.
3rd detail
1 row – 6SC in MR
2-10 row – 6SC unchanged
SL-ST, CH, connect SL-ST with 3SC of the previous row of the 2nd part.
We knit another 1SC and place a marker.
We continue to knit, but from this moment I will start the countdown as if from the first row.
1 row – 1SC for detail, 1SC for CH, 6SC for detail, 1SC for CH, 4SC for detail, 1SC for CH, 6SC for detail, 1SC for CH, 1SC (22)
2 row – 22SC (22)
3 row – DEC, 3SC, DEC, 4SC, DEC, 3SC, DEC, 4SC (18)
4 row – 18SC (18)
5 row – (1SC, DEC) * 6 (12) fill the main part
details a little.
6 row – 6DEC (6)
Pull off the hole.
We assemble our toy, everything is shown in the photographs, first I try on with pins and sew the body to the front part, stuff it in half, so that it would be easier to sew the body to the back, because if we fill it completely, it will be impossible to sew.
Next, we also try on pins and sew the body to the back. When a small hole remains, fill the toy completely.
We sew on the head, first we fix it, I do this with the help of special needles for tightening the muzzles, for example, with knitting needles. Then I sew.
We sew on the mouth, we sew only half of the oval (mouth). Immediately Next, we sew on the ears, there is no special technique, I just put an eye on and try on where the ear will be better, and I sew there.
Why is there no specific row? Everything is simple in the yellow unicorn, I made the tilt of the head when sewing a little less, in the pink a little more, respectively, the level of the ears also changes from the tilt with which the head is sewn, so we look and try on.
We tried on, we sew on the ears.
Further, according to the same principle, we sew on the eyes.
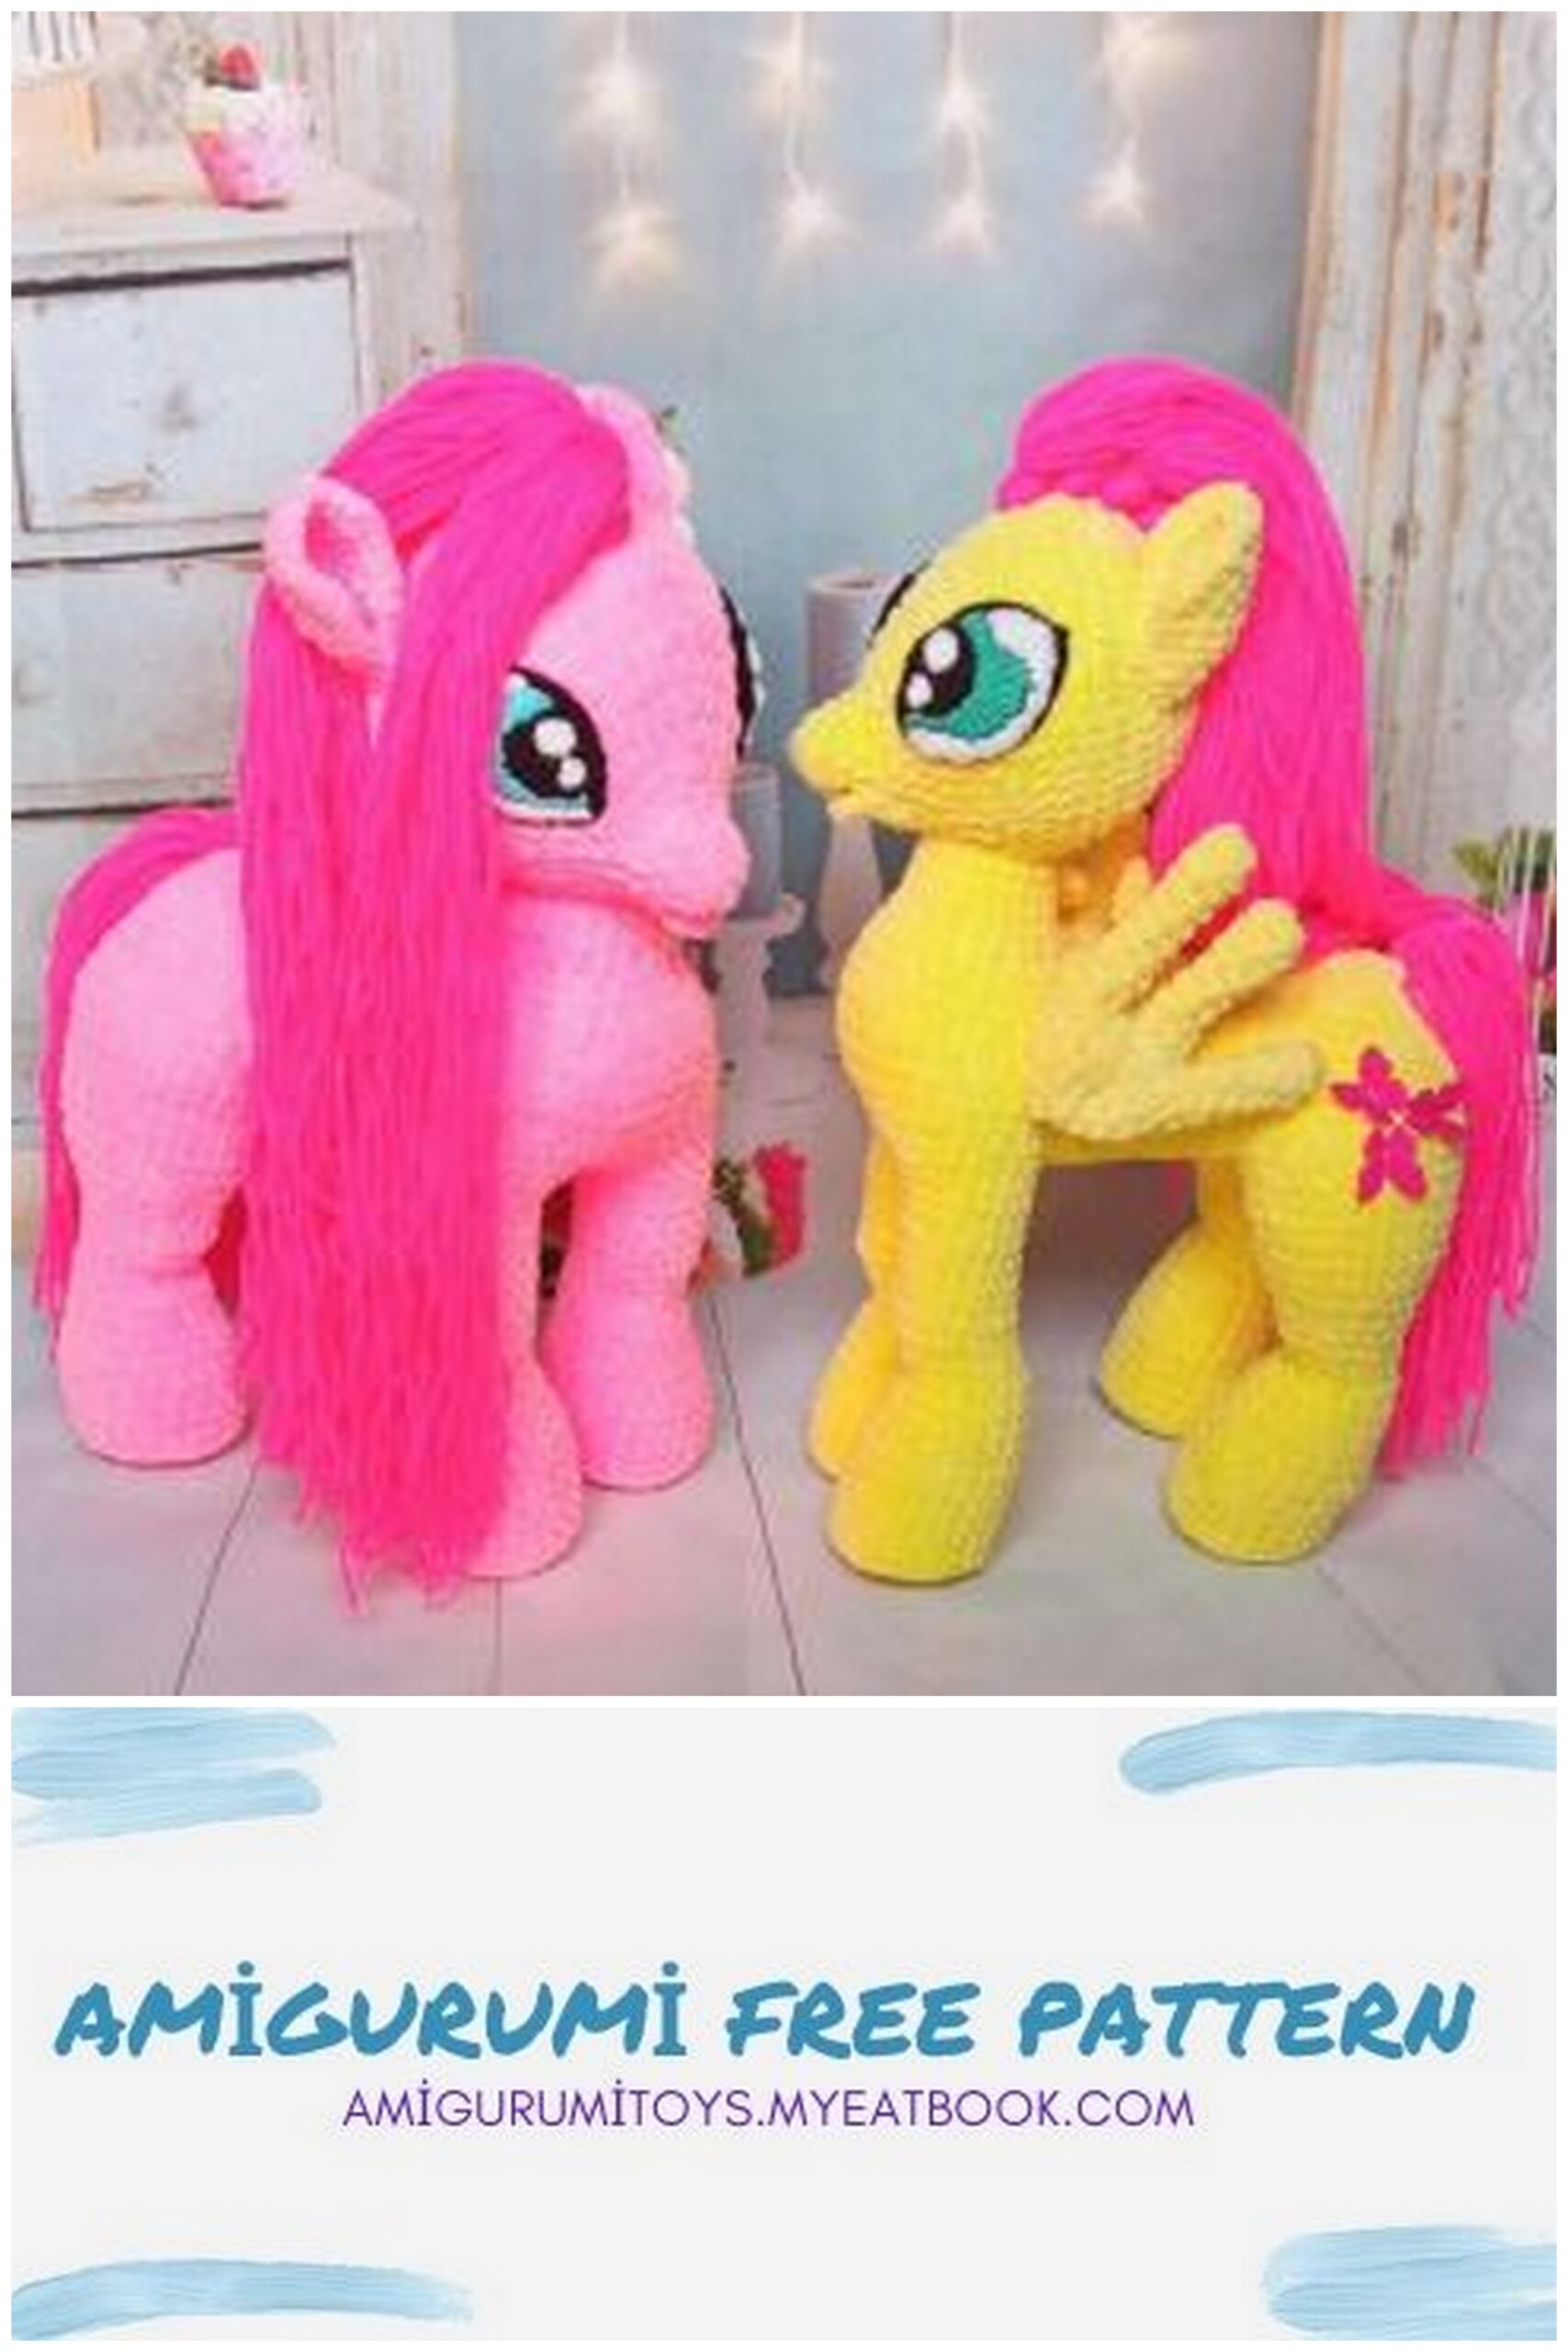
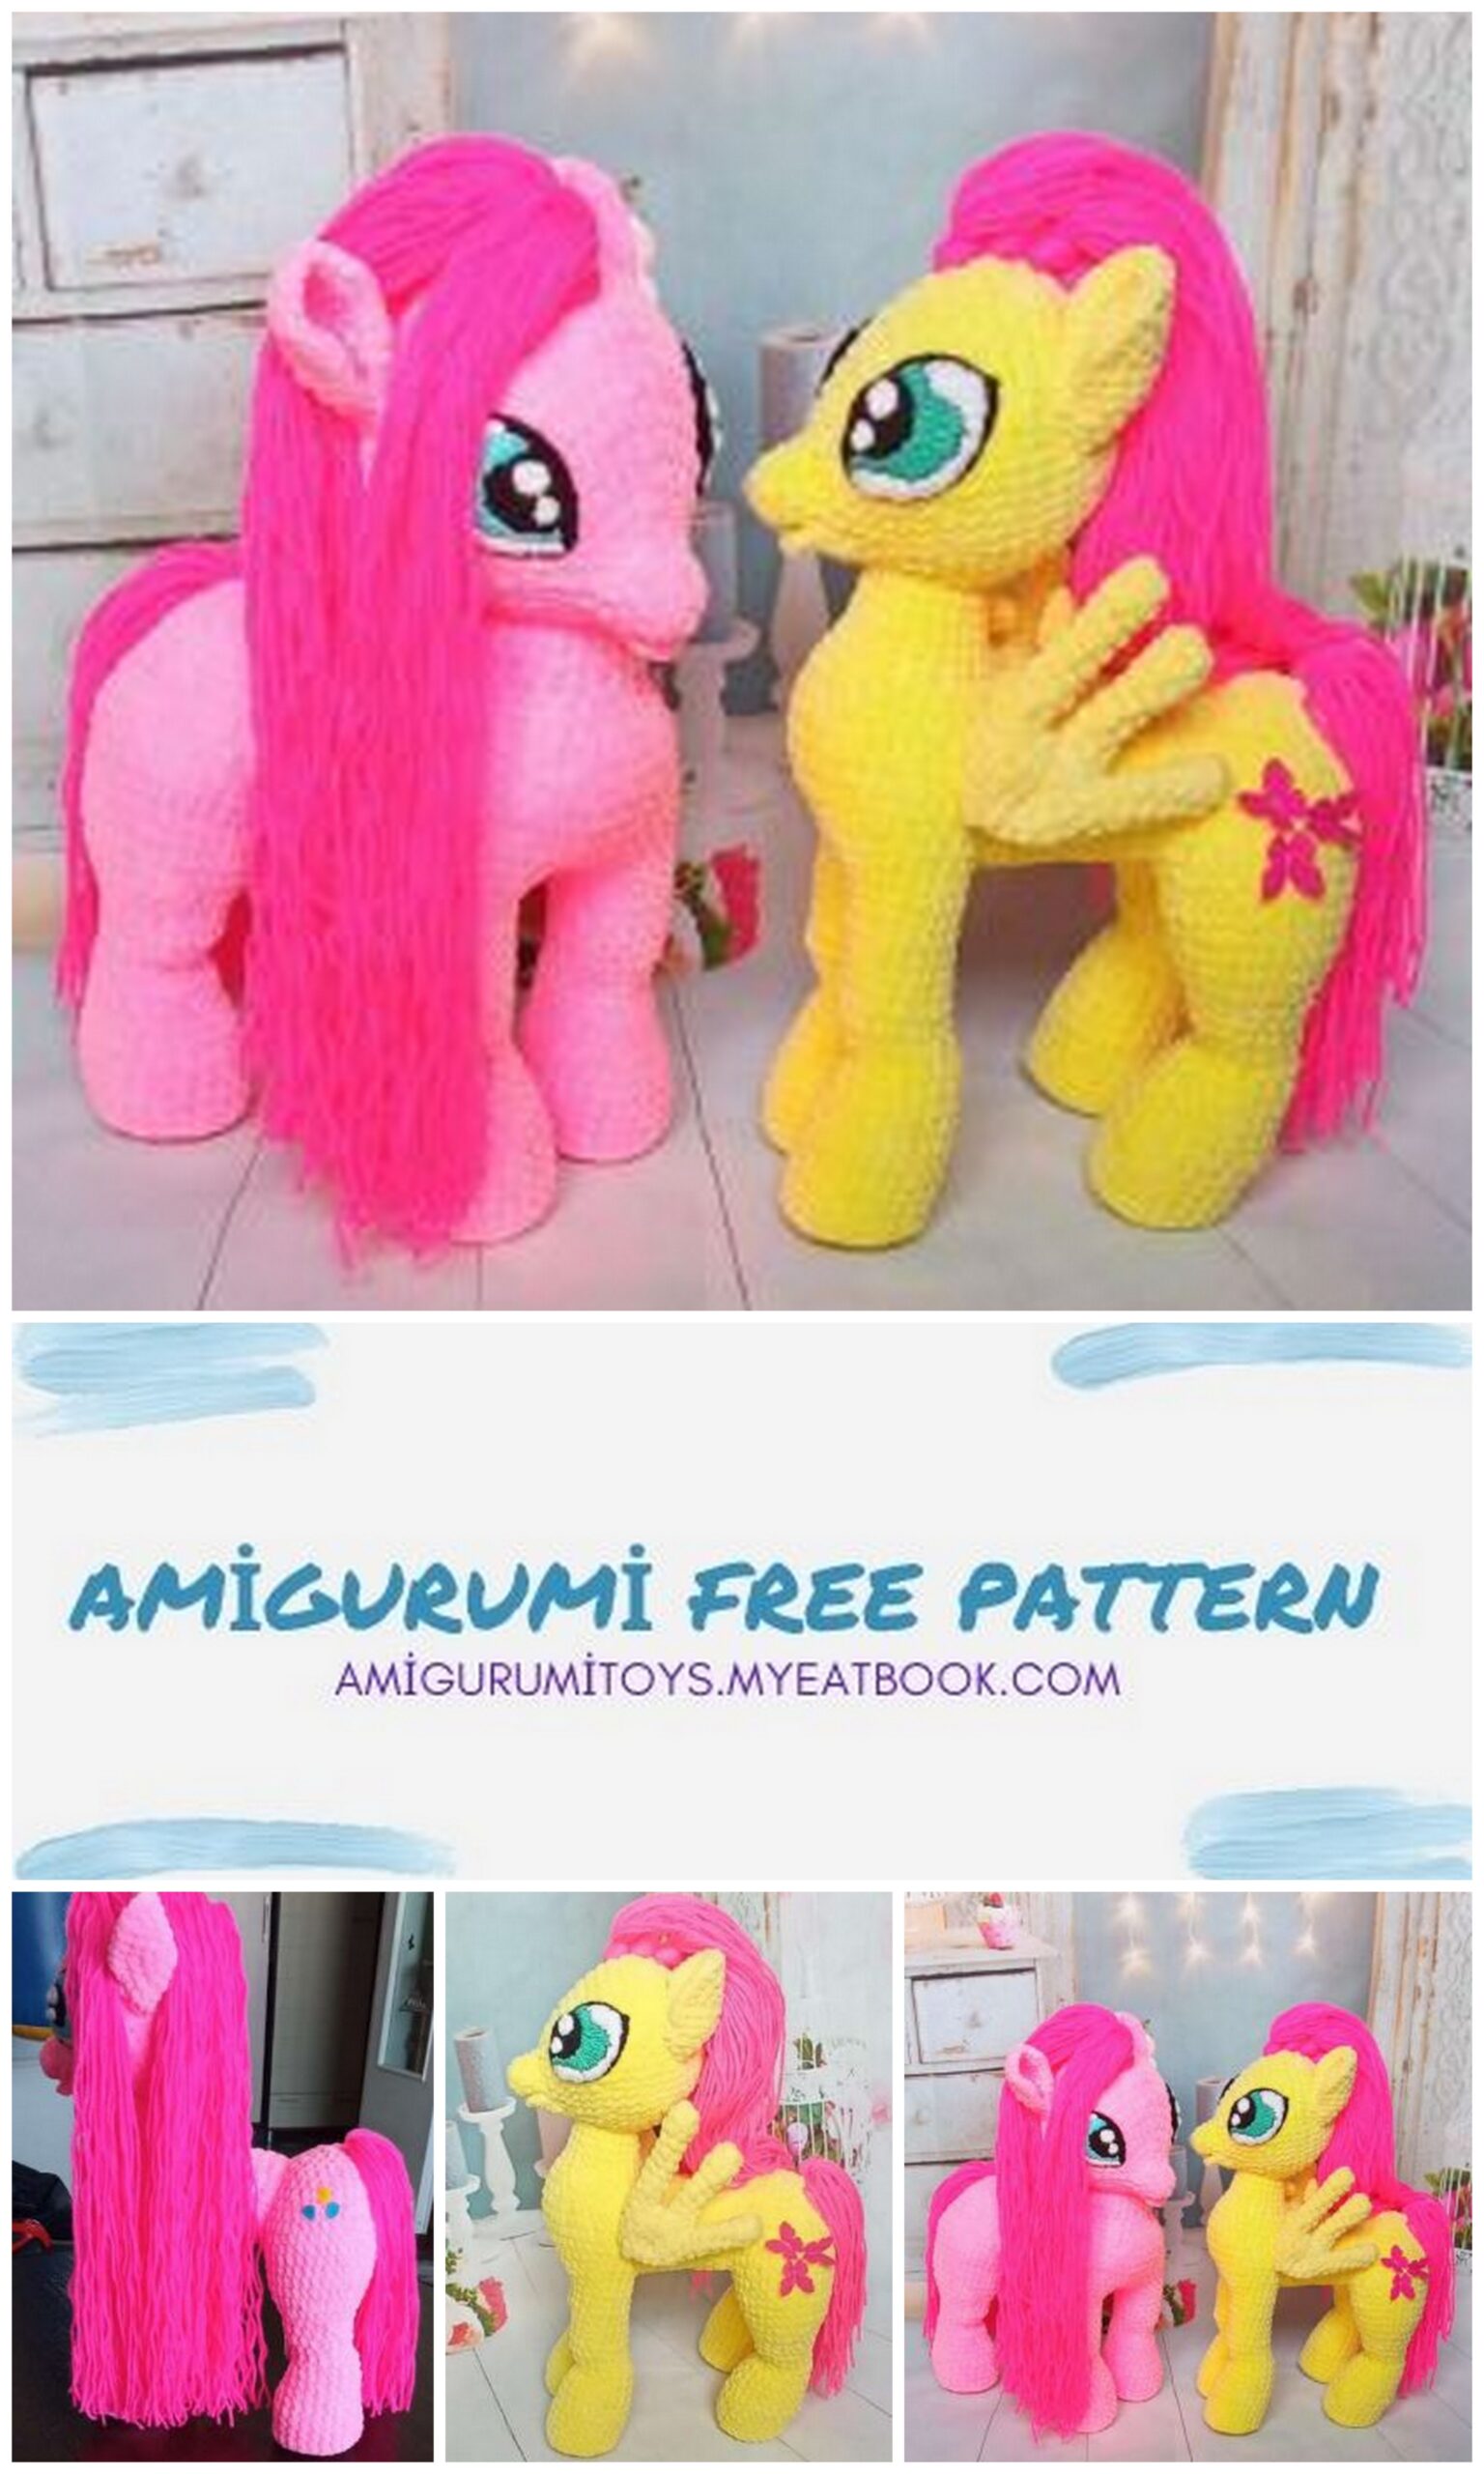
Next, we make a mane, for the tail I cut the strings 50 cm long, for the mane 100 cm.
We form the tail in the middle of the priests, close to the end of knitting (where the hole was pulled together) According to the density, I took 10 strings and threaded it hooking 1-2 loops and made a knot, so that to hide the knots in front of them, I would pass one thread at a time and also made knots, but they turned out to be correspondingly small and hide large nodules, but you can basically leave or make the same nodules as on the mane. Upon completion, we cut it to the same length.
I make a mane from 5 bunches of 20 strings, try to place it in the middle, focusing on the eyes and nose.
If this is a pegasus pony, we sew on the wings. I sew with regular thread in the color of the yarn.
And that’s it, our pony is ready, congratulations !!!!!!!
Thank you for knitting with me)))))