Amigurumi Tiger Cub Free Pattern
Amigurumi Tiger Cub Free Pattern
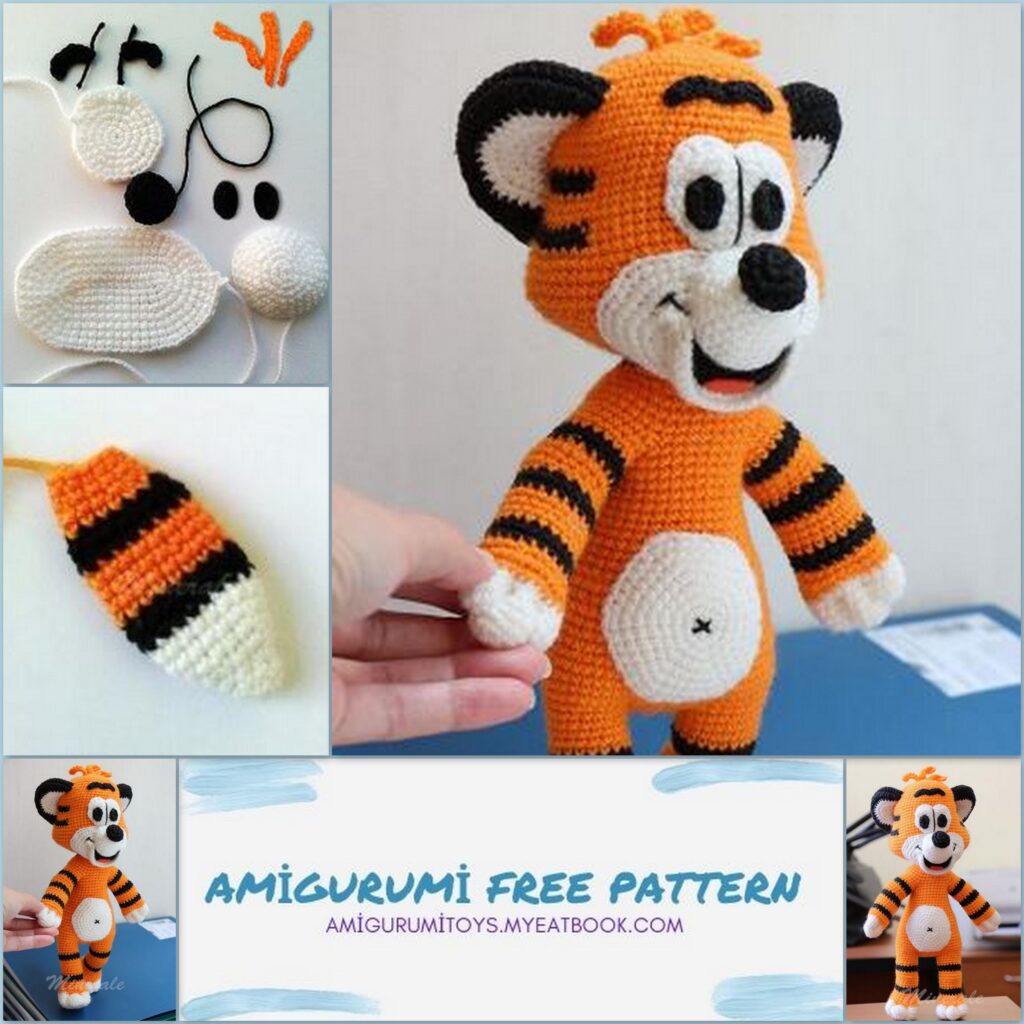
The toy is crocheted. Suitable for children, therefore without a frame. Handles, legs knitted, you do not need to sew them. But you have to be a little patient when creating his “trademark” smile – the whole success of the event depends on it. The height of the tiger cub is 26 cm.
Level: Intermediate.
Materials:
1. Yarn Pekhorka Children’s whim yellow-orange (1 skein), white (about a quarter of a skein), black (about a third of a skein). Or another yarn of the same thickness in a suitable color.
2. Felt is thin, black and red. Small pieces for the mouth.
3. Holofiber.
4. Hook 1.75.
5. Tapestry needle for stitching details.
6. Glue Moment Crystal.
7. Hitting needles with heads.
Legend:
Ch – air loop
Sc – single crochet
Hdc – half double crochet
Dc – double crochet
İnc – increase
Dec – decrease
() * h – knit loops in brackets in black
() хn – repeat loops in brackets n times
We knit the details with a marker, monitor its position. If the beginning of the row shifts, we knit additional offset loops ourselves. In the scheme they are not listed.
DO NOT DO offset loops in rows with black stripes, do before or after them.
Legs (2 pcs.)
We knit in a spiral. Don’t forget about the offset loops and the color change rule. Marker is on the heel.
Cast on 11 vp with white yarn. From the second loop from the hook:
1 row: 9 Sc, 3 Sc in one loop, on the other side of the chain 8 Sc, İnc (22)
2nd row: İnc, 8 Sc, 3 İnc, 8 Sc, 2 İnc (28)
3rd row: (Sc, İnc) x2, 6 Sc, (İnc, Sc) x4, 6 Sc, (İnc, Sc) x2 (36)
4th row: (2 Sc, İnc) х2, 4 Sc, 5 Hdc, İnc Hdc, 4 Hdc, İnc Hdc, 5 Hdc, 4 Sc, (İnc, 2 Sc) х2 (42)
5 row: 3 Sc, İnc, 9 Sc, 4 Hdc, İnc Hdc, 6 Hdc, İnc Hdc, 4 Hdc, 9 Sc, İnc, 3 Sc (46)
6-7 rows: 46 Sc (46)
Change the yarn to yellow.
8 row: Dec, 6 Sc, Dec, 6 Sc, 7 Dec, 6 Sc, Dec, 6 Sc, Dec (35)
Row 9: Sc, Dec, 4 Sc, Dec, 3 Sc, 6 Dec, 3 Sc, Dec, 3 Sc, Dec, Sc (25)
10 row: (2 Sc, Dec) х6, Sc (19)
11-12 rows: 19 Sc (19)
Stuff the foot. Change the yarn to black.
13-14 rows: 19 Sc (19)
Change the yarn to yellow.
15-17 rows: 19 Sc (19)
18 row: 7 Sc, 4 İnc, 6 Sc, Dec (22)
19 row: 2 Dec, 18 Sc (20)
20 row: 20 Sc (20)
21 row: İnc, 5 Sc, 3 Dec, 6 Sc, 2 İnc (20)
Change the yarn to black.
22-23 rows: 20 Sc (20)
Change the yarn to yellow.
24 row: 5 Sc, İnc, 8 Sc, İnc, 5 Sc (22)
Rows 25-28: 22 Sc (22)
Fasten the thread, cut. Fill the leg.
Handle first
White yarn:
1st row: 6 Sc in a ring
2nd row: 6 İnc (12)
3rd row: (1 Sc, İnc) x6 (18)
4th row: (2 Sc, İnc) x6 (24)
5 row: 24 Sc (24)
Yellow yarn.
6-7 rows: 24 Sc (24)
8 row: (4 Sc, Dec) x4 (20)
Black yarn.
9-10 rows: 20 Sc (20)
Yellow yarn.
11-14 rows: 20 Sc (20)
Black yarn.
15-16 rows: 20 Sc (20)
Yellow yarn.
17th row: 3 Sc, 3 Dec, 3 Sc, 4 İnc, 4 Sc (21)
Rows 18-19: 21 Sc (21)
20 row: 3 Sc, 3 İnc, 3 Sc, 4 Dec, 4 Sc (20)
Black yarn.
21 row: (8 Sc, Dec) x2 (18)
22 row: 18 Sc (18)
Yellow yarn.
23-24 rows: 18 Sc (18)
Fasten the thread, cut off. Fill the foot. Do not stuff the white part tightly.
Second handle
17th row: 4 Sc, 4 İnc, 3 Sc, 3 Dec, 3 Sc (21)
20 row: 4 Sc, 4 Dec, 3 Sc, 3 İnc, 3 Sc (20)
The rest of the rows are like the first.
Body
Yellow yarn.
1st row: 6 Sc in ring (6)
2nd row: 6 İnc (12)
3rd row: 3 Sc together with the left leg (see photo), Sc, İnc, Sc, 3 Sc together with the right leg, Sc, İnc, Sc (14)
We knit the legs like this: fold the top of the legs in half from toe to heel. With each sides will have 11 loops. We are looking for 3 central loops, i.e. from the edge we need pull back 4 loops and knit the next 3 with the body.
4th row: on the left leg: 3 Sc, İnc, 7 Sc, (İnc, 3 Sc) х2, on the body: İnc, 3 Sc, on the right leg: (İnc, 3 Sc) х2, 7 Sc, İnc, 3 Sc, on the body: Sc, İnc, put a marker (54 – incomplete row, missed 2 loops). Be sure to follow the marker further, it will go along center of the back.
5 row: Sc, İnc, 4 Sc, İnc, 17 Sc, İnc, 3 Sc, İnc, 17 Sc, İnc, 4 Sc, İnc, 2 Sc (60)
6-7 rows: 60 Sc (60)
8 row: 14 Sc, Dec, 28 Sc, Dec, 14 Sc (58)
9 row: 16 Sc, Dec, 22 Sc, Dec, 16 Sc (56)
10 row: 4 Sc, İnc, 46 Sc, İnc, 4 Sc (58)
11 row: 18 Sc, Dec, 18 Sc, Dec, 18 Sc (56)
12 row: 56 Sc
Row 13: 14 Sc, Dec, 24 Sc, Dec, 14 Sc (54)
Row 14: 18 Sc, Dec, 14 Sc, Dec, 18 Sc (52)
15 row: 3 Sc, Dec, 8 Sc, Dec, 22 Sc, Dec, 8 Sc, Dec, 3 Sc (48)
16 row: 6 Sc, Dec, 9 Sc, Dec, 10 Sc, Dec, 9 Sc, Dec, 6 Sc (44)
17 row: 3 Sc, Dec, 34 Sc, Dec, 3 Sc (42)
18 row: (5 Sc, Dec) х5, Sc, (4 Sc, Dec) * h (36)
19 row: (4 Sc) * h, 27 Sc, (5 Sc) * h (36)
20 row: (4 Sc) * h, 32 Sc (36)
Row 21: 4 Sc, Dec, 23 Sc, Dec, 3 Sc, Dec (33)
22 row: 33 Sc (33)
23 row: Sc, Dec, 25 Sc, Dec, Sc, Dec (30)
24 row: 30 Sc (30)
25 row: 6 Sc, 4 Sc with the left hand, 10 Sc, 4 Sc with the right hand, 3 Sc, (3
Sc) * h (30)
Tie the handles with the elbow back and slightly outward (see photo).
26 row: (3 Sc) * h, 2 Sc, Dec (1 loop from the body, 1 from the arm), 12 Sc in the arm, Dec (1 loop with torso, 1 from the arm), 8 Sc, Dec (1 loop from the torso, 1 from the arm), 12 Sc in the arm, Dec (1 loop from the trunk, 1 – from the arm), 2 Sc, (3 Sc) * h (46)
27 row: (3 Sc) * h, 43 Sc (46)
28 row: 5 Sc, Dec, 10 Sc, Dec, 8 Sc, Dec, 10 Sc, Dec, 5 Sc (42)
Row 29: (4 Sc, Dec) x3, 6 Sc, (Dec, 4 Sc) x3(36)
30 row: (4 Sc, Dec) x6 (30)
Row 31: (3 Sc, Dec) x6 (24)
32 row: (2 Sc, Dec) х6 (18)
Black yarn:
Rows 33-37: 18 Sc (18)
38 row: (Sc, Dec) х6 (12)
Row 39: 6 Dec (6)
Stuff the body as you knit (stuff the ass more tightly). Stuff your neck and chest tighter so that your head does not dangle.
Tail
White yarn.
1st row: 4 Sc in a ring
2nd row: 4 İnc (8)
3rd row: 8 Sc (8)
4th row: (1 Sc, İnc) x4 (12)
5 row: 12 Sc
6 row: (2 Sc, İnc) x4 (16)
7 row: 16 Sc
Black yarn.
8-9 rows: 16 Sc
Yellow yarn.
10 row: (7 Sc, İnc) x2 (18)
Rows 11-13: 18 Sc
Black yarn.
Row 14: (7 Sc, Dec) x2 (16)
15 row: 16 Sc
Yellow yarn.
16 row: (6 Sc, Dec) х2 (14)
17 row: 14 Sc
18 row: (5 Sc, Dec) х2 (12)
19 row: 12 Sc
Head
1st row: 6 Sc in ring (6)
2nd row: 6 İnc (12)
3rd row: (Sc, İnc) x6 (18)
4th row: (2 Sc, İnc) x6 (24)
5 row: (3 Sc, İnc) x6 (30)
6 row: (4 Sc, İnc) x6 (36)
7 row: (5 Sc, İnc) x6 (42)
8 row: (6 Sc, İnc) x6 (48)
9 row: (7 Sc, İnc) x6 (54)
Rows 10-11: 54 Sc, place a marker (54). We make sure that the marker goes further vertically.
12 row: 14 Sc, (9 Sc) * h, 31 Sc (54)
13 row: 13 Sc, (11 Sc) * h, 30 Sc (54)
14th row: 8 Sc, İnc, (17, İnc) x2, 9 Sc (57)
15-16 row: 57 Sc (57)
17 row: 2 Sc, (7 Sc) * h, 5 Sc, (13 Sc) * h, 5 Sc, (7 Sc) * h, 18 Sc (57)
18 row: 2 Sc, (7 Sc) * h, 4 Sc, (15 Sc) * h, 4 Sc, (7 Sc) * h, 18 Sc (57)
19-20 rows: 57 Sc (57)
21 row: 5 Sc, İnc, 14 Sc, İnc, 14 Sc, İnc, 5 Sc, İnc, 14 Sc, İnc (62)
22 row: Sc, (9 Sc) * h, 6 Sc, (13 Sc) * h, 6 Sc, (9 Sc) * h, 18 Sc (62)
23 row: Sc, (9 Sc) * h, 7 Sc, (11 Sc) * h, 7 Sc, (9 Sc) * h, 18 Sc (62)
24 row: (2 Sc, İnc) х3, 27 Sc, (İnc, 2 Sc) х3, 17 Sc (68)
25 row: 68 Sc (68)
26 row: (3 Sc, İnc) x2, 36 Sc, (İnc, 3 Sc) x2, 16 Sc (72)
27-28 rows: 72 Sc (72)
Row 29: (Sc, Dec) x6, 19 Sc, (Dec, Sc) x6, 17 Sc (60)
30 row: (2 Sc, Dec) х3, 19 Sc, (Dec, 2 Sc) х3, 17 Sc (54)
Now you don’t have to follow the marker.
Row 31: (7 Sc, Dec) x6 (48)
32 row: (6 Sc, Dec) x6 (42)
Row 33: (5 Sc, Dec) x6 (36)
34 row: (4 Sc, Dec) х6 (30)
35 row: (3 Sc, Dec) x6 (24)
36 row: (2 Sc, Dec) х6 (18)
Fasten the thread. Leave the thread for sewing.
Ears (2 pcs.)
White yarn:
1st row: 4 Sc in amigurumi ring (4)
2nd row: turn, Ch, 4 İnc (8)
3rd row: turn, Ch, (Sc, İnc) (12)
4th row: turn, Ch, (2 Sc, İnc) (16)
5 row: turn, Ch, (3 Sc, İnc) (20)
Change the yarn to black.
6 row: turn, Ch, (4 Sc, İnc) (24)
7 row: turn, Ch, (5 Sc, İnc) (28)
Rows 8-11: turn, Ch, 28 Sc (28)
12 row: turn, Ch, (5 Sc, Dec) x4 (24)
13th row: turn, Ch, (4 Sc, Dec) x4 (20)
14th row: turn, Ch, (3 Sc, Dec) x4 (16)
15 row: turn, Ch, (2 Sc, Dec) x4 (12)
16 row: turn, Ch, (Sc, Dec) x4 (8)
17th row: turn, Ch, 4 Dec (4)
Fasten the thread. Leave the thread for sewing.
Protein
White yarn:
1st row: 6 Sc in a ring
2nd row: 6 İnc (12)
3rd row: (Sc, İnc) x6 (18)
4th row: (2 Sc, İnc) x6 (24)
5 row: (3 Sc, İnc) x6 (30)
6 row: Hdc, İnc Dc, Sc, İnc Dc, Hdc, Sc, ss (9, incomplete row)
Fasten the thread, leave for sewing.
Pupils (2 pcs.)
Cast on black yarn 4 Ch.
1 row: in the second loop from the hook 2 Sc, 3 Sc in 1 loop, on the reverse side 1 Sc, İnc (8)
Fasten the thread, leave for sewing.
Eyebrows (2 pcs.)
Cast on black yarn 6 Ch.
1st row: in the second loop from the hook Sc, İnc, Sc, İnc, Sc (7) Trim the thread.
Nose
1st row: 6 Sc in a ring
2nd row: 6 İnc (12)
3rd row: (3 Sc, İnc) x3 (15)
4th row: 15 Sc (15)
5 row: (3 Sc, Dec) х3 (12)
6 row: 6 Dec
Muzzle 1
Cast on white yarn 13 Ch.
1 row: in the second loop from the hook 11 Sc, 3 Sc in 1 loop, 10 Sc, İnc (26)
2nd row: İnc, 10, 3 İnc, 10, 2 İnc (32)
3rd row: Sc, İnc, 9 Sc, İnc, (Sc, İnc) x3, 9 Sc, İnc, (Sc, İnc) x2 (40)
4th row: 2 Sc, İnc, 10 Sc, İnc, (2 Sc, İnc) x3, 10 Sc, İnc, (2 Sc, İnc) x2 (48)
5-6 rows: 48 Sc (48)
7 row: 3 Sc, İnc, 11 Sc, İnc, (3 Sc, İnc) x3, 11 Sc, İnc, (3 Sc, İnc) x2 (56)
Fasten the thread, leave for sewing.
Muzzle 2
White yarn
1st row: 6 Sc in a ring
2nd row: 6 İnc (12)
3rd row: (Sc, İnc) x6 (18)
4th row: (2 Sc, İnc) x6 (24)
5 row: 24 Sc (24)
6 row: (3 Sc, İnc) x6 (30)
7 row: 30 Sc (30)
Fasten the thread, leave for sewing
Hairstyle
Long
Cast on 10 Ch with yellow yarn.
1 row: in the second loop from the hook 9 Sc (9)
Fasten the thread, leave all three forelocks for sewing.
Short (2 pcs.)
Cast on 8 Ch with yellow yarn.
1 row: in the second loop from hook 7 Sc (7)
Cut off the thread.
Tum
White yarn.
1st row: 6 Sc in a ring
2nd row: 6 İnc (12)
3rd row: (1 Sc, İnc) x6 (18)
4th row: (Sc, İnc, Sc) x6 (24)
5 row: (3 Sc, İnc) x6 (30)
6 row: (2 Sc, İnc, 2 Sc) x6 (36)
7 row: (İnc, 5 Sc) x6 (42)
8 row: (5 Sc, İnc, Sc) x6 (48)
Fasten the thread. Leave the thread for sewing.
Assembly
1. We fill the tail with filler and sew it in the center of the back by about 11 13 rows of the torso.
2. Sew a white belly on the center of the belly. If you want it to be more convex, you can fill it. We embroider a black cross in the center.
3. On the hind and front paws, we make 3 fingers each with two constrictions. Take the needle with white thread, pierce the foot through and through and wrap the thread around the foot and again insert the needle into the same place. You can make a couple of turns for each finger for reliability.
4. Draw the white of the eye with a black thread (knot on the back side) so that he seemed to be divided into 2 halves. The upper point of the constriction is the fourth loop in the 7th squirrel row (Sc), the bottom point is the opposite side.
5. Sew the pupils to the squirrel as in the photo. And then we sew the protein to the head in the center. between the stripes. The squirrels should protrude beyond the black stripes above and below approximately
3 rows (see photo).
6. Now sew on the muzzle 1. Apply it directly under the eyes. Bottom edge it turns out right at the hole in the head. We pin it with pins, add under the bottom filler. And we begin to sew in a circle, continuing to add filler.
We make sure that it turns out symmetrically.
7. Lightly stuff the nose and sew in the center to the muzzle 2. The nose should be slightly flattened rather than round. To do this, when sewing on the nose, you can grab the top of the nose with a thread and pull it to the muzzle. Then muzzle 2 sew on top of the muzzle 1. Also, first, pin it with pins. We look position: muzzle 2 should be right under the eyes, bottom of muzzle 2 by about 1 a row below the center of the muzzle 1 (see photo). Sew on muzzle 2, stuff it in the process filler.
8. With the help of pins, we simulate the future smile of our tiger cub. Prick pins where the lower lip will go. Between my lip and muzzle 2 it turned out 3 rows. Knit along the line of the Sc pins. Do not loop too often, otherwise the lip will turn outward. I got 22 loops.
9. Knit 4 rows of Sc in pivoting rows.
10. We wrap the lip part inward, sew to Muzzle 1 along the set line loops, press the corners of the lower lip to Muzzle 2, sew them.
11. Cut out the details for our mouth from black and red felt. Black detail cut out by fitting to the shape of the mouth. Red detail (tongue) – a square with rounded corners. We glue them together with Moment Crystal glue. Glue the mouth in place with the same glue. We embroider the corners of the mouth with black thread.
12. Ears are lightly stuffed with filler so that they keep their shape. We sew them to the head in an arc (see photo). The sewing position is marked with a red line. Black Sew part of the ear with black thread, and white with white. Assembly sequence you can choose whichever is more convenient for you. I did it in different ways: first muzzle, then ears and vice versa.
13. Sew on eyebrows. There are 3 rows between the whites of the eye and the eyebrows. To the 1st row of the head we sew 3 forelocks. Twist them slightly on your finger so that they curl.
14. The last action: we put the head on the black neck until it stops. We do a little head tilt forward. From the back, the black neck will be visible 1-2 rows. Sew on the head. Our tiger cub is ready!
