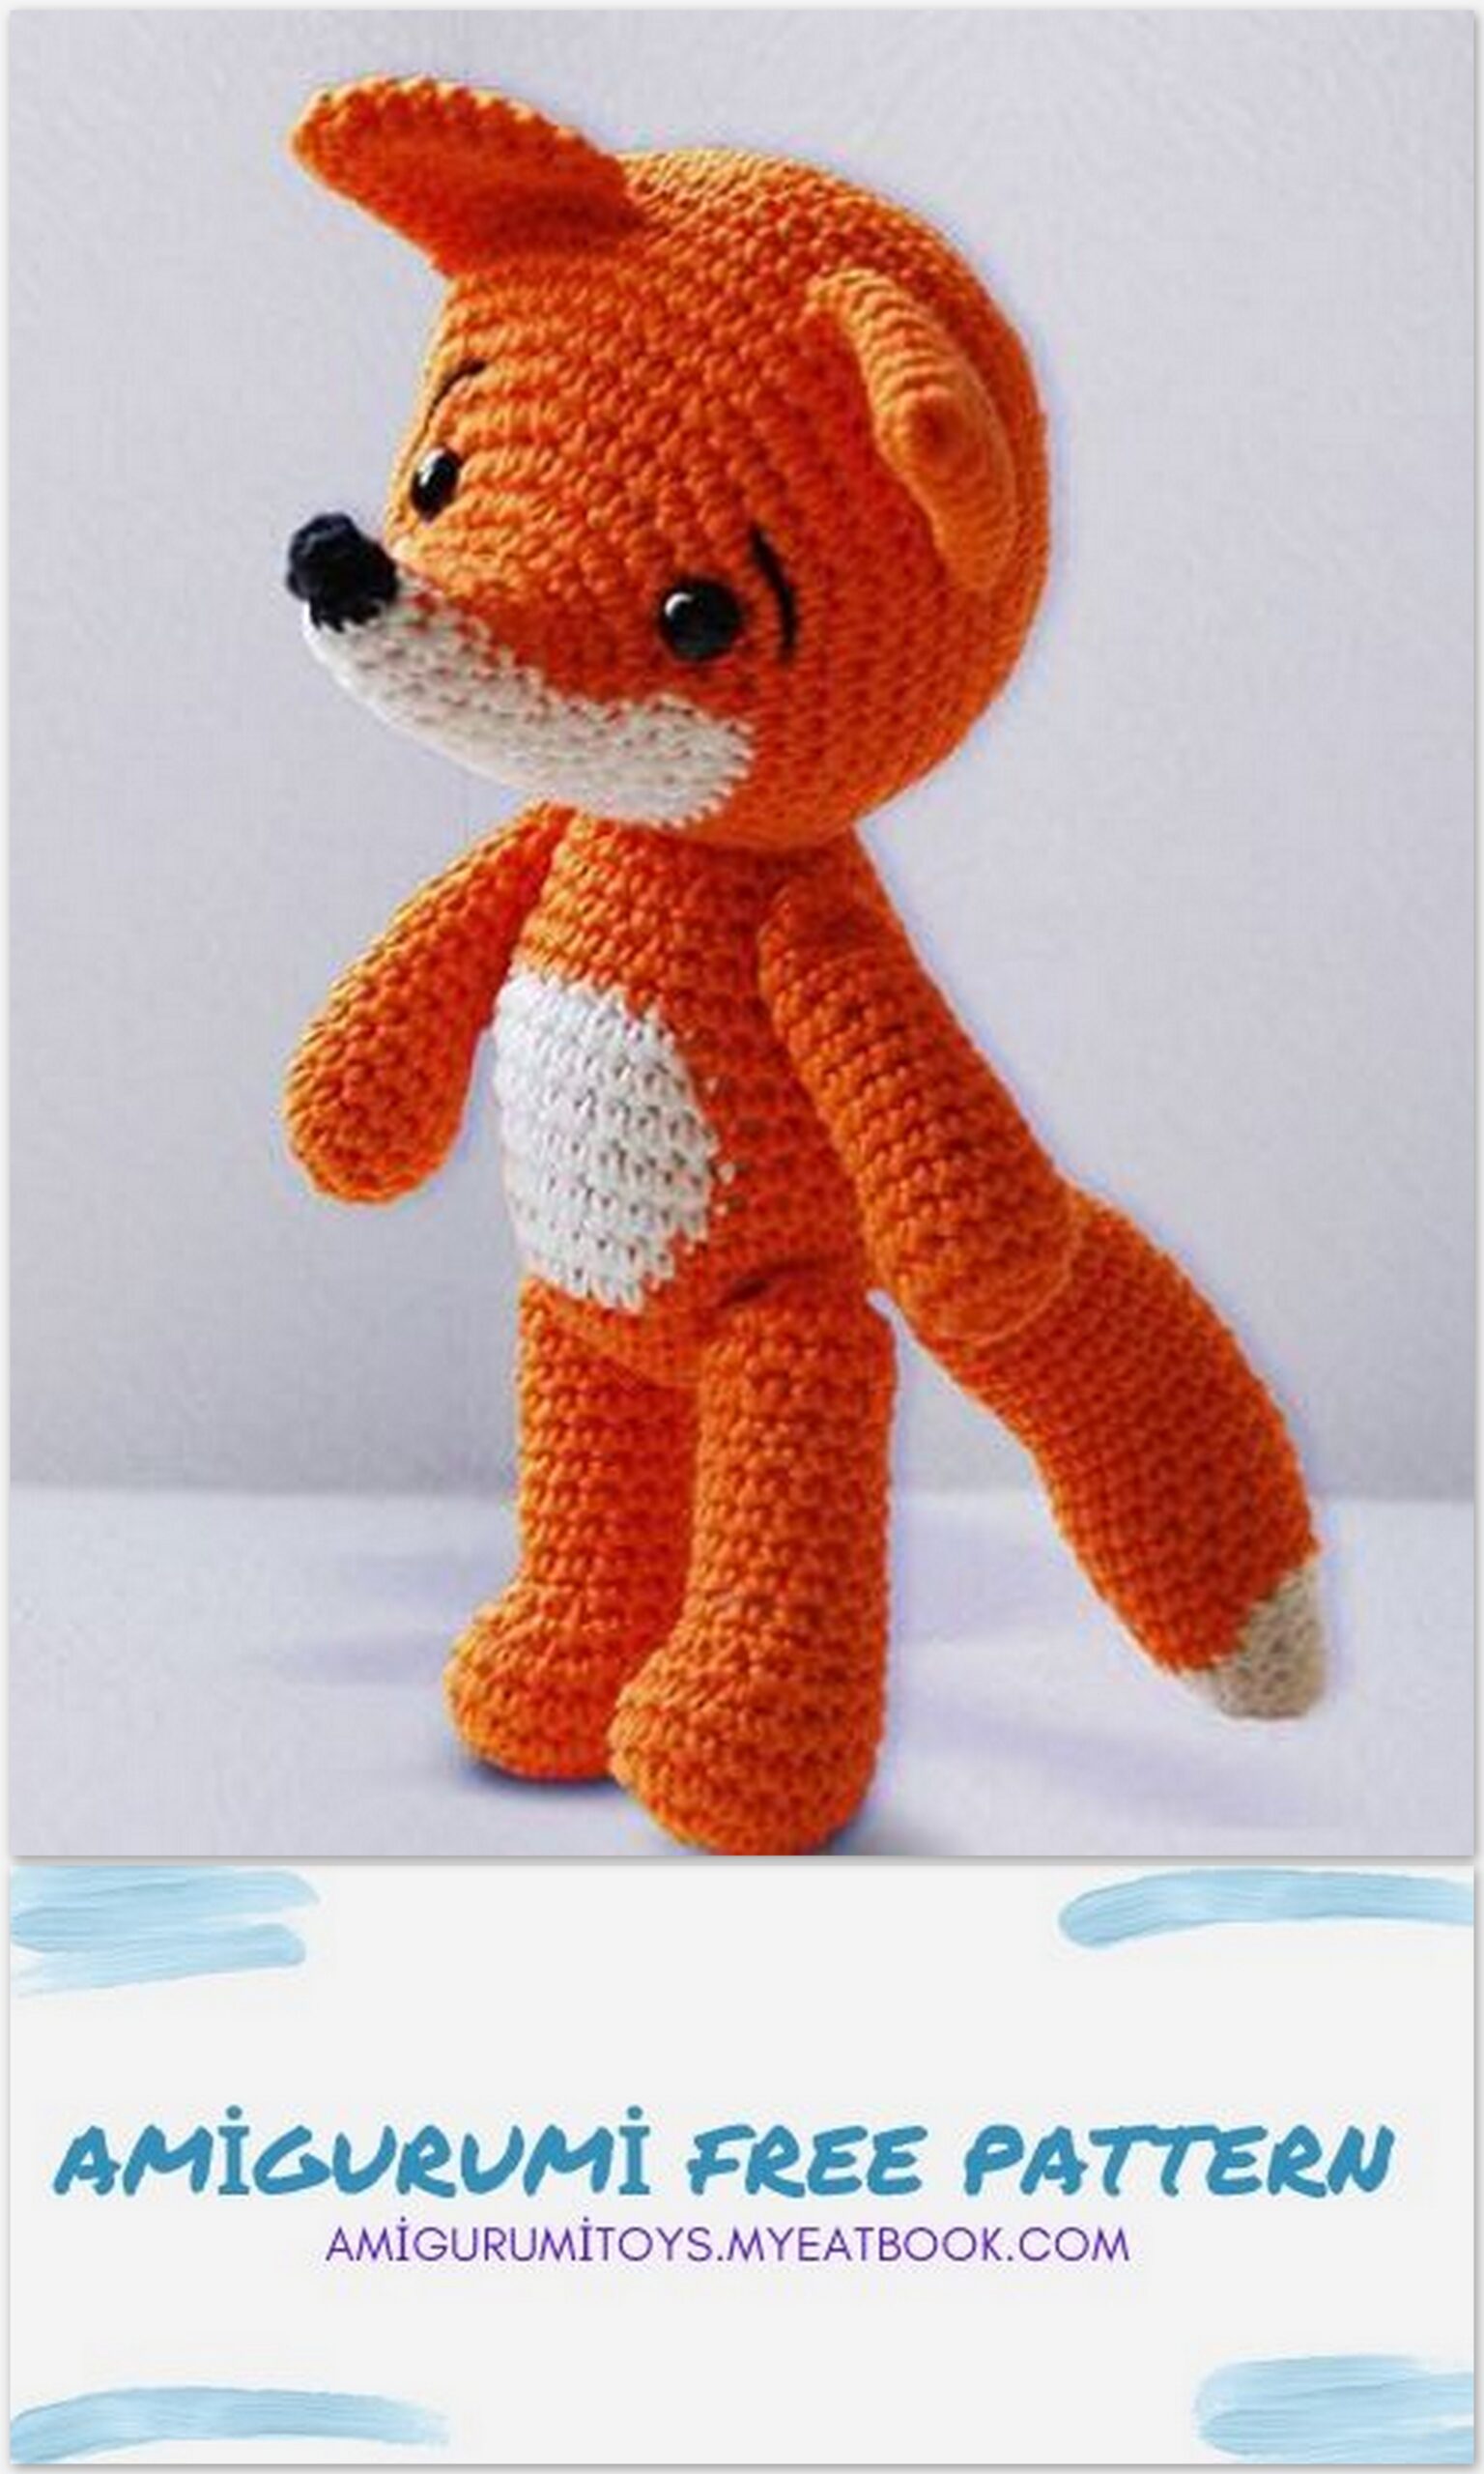
Amigurumi Lisa the fox Free Pattern
Lisa the fox
Legend
Ch – air loop
Sl-st – connecting post
Sc – single crochet
Dec – two Sc together
İnc – from one loop two Sc
Materials
– 2.5mm hook
– Cotton yarn:
orange (50 g), some white and black yarn
– filler for toys
– 2 small metal buttons on the leg.
– a pair of black eyes 8mm
– marker, stitching needle, scissors and pins
– pliers

Dimensions
When knitting with cotton yarn and crocheting 2.5mm, the toy turns out to be about 21cm
height.
Knitting density
Sc, 2.5mm crochet hook: 11 sts x 12 rows = 5 cm
Instructions
IMPORTANT NOTES:
1. Head and body parts are knitted in a circle, without twists. At the end of each
row Sl-st into the first loop of the row.
2. Always make the first column in the same as you did Sl-st
3. The lifting loop is not included in the post count.
4. In rows where knitting is in two colors, do not attach a new color to
the top of the column, and knitting half of it with a new thread.
Head
Starting from the nose / muzzle ring with amigurumi white yarn:
row 1: 8 Sc in the ring. Pull the tail to close the ring. Sl-st to the first loop of the row
row 2: 1Ch
TIP: Remove the hook from the loop and place the marker on the post where you start
Job. Move marker up as you knit
Continue row 2: Sc next 4 sts, switch to orange, Sc next 4 sts,
go white, sl-st (8)
NOTE: knit row 2 as follows: 1Ch, Sc in the column where Sl-st was made,
3Sc, finish the last (4th) Sc with orange thread (color change), 4 Sc,
finish the last (8th) Sc with white thread (color change again), skip Sl-st and 1Ch
of the previous row, knit Sl-st into the marked loop. Work in this manner.
Row 3: 1Ch (see figure 1), (1Sc, İnc) – 2 times, switch to orange, (see figure 2) (1Sc, İnc) –
2 times, go white, sl-st (12)
Every time at the beginning of the row
After 1Ch is done
remove the hook and place
marker in the loop.
Row 4: 1Ch, 6Sc, switch to orange, 6 Sc, switch to white, Sl-st (12)
Row 5: 1Ch, (2Sc, İnc) – 2 times, orange (2 Sc, İnc) – 2 times, white, Sl-st (16)
Row 6: 1Ch, 8Sc, orange, 8 Sc, white, Sl-st (16)
Row 7: 1 Ch (see figure 3), (3Sc, İnc) – 2 times, orange, (3Sc, İnc) – 2 times, white, Sl-st (20)
Row 8: 1Ch, 10Sc, orange, 10Sc, white, Sl-st (20)
Row 9: 1Ch, (Sc, İnc) – 5 times, orange, (Sc, İnc) – 5 times, white, Sl-st (30)
Row 10: 1Ch, 15Sc, orange, 15Sc, white, Sl-st (30)
Row 11: 1Ch (2Sc, İnc) – 5 times, orange, (2Sc, İnc) – 5 times, white, Sl-st (40)
Cut the blooming thread, further knitting is orange
Row 12: 1 Ch (see figure 4), 20Sc, (3Sc, İnc) – 5 times, Sl-st (45)
Row 13: 1 Ch, 20Sc, (4Sc, İnc) – 5 times, Sl-st (50)
Row 14: 1Ch, (4Sc, İnc) in a circle, Sl-st (60)
Row 15-18: 1 Ch (see figure 5), 60Sc (60)
If you are using ready-made eyes, then at this stage they can already be attached. Between
eyes 10Sc, place them between 10 and 11 rows.
Row 19: 1Ch, (13Sc, Dec) – 4 times, Sl-st (56)
Row 20: 1 Ch, 56 Sc (56)
Row 21: 1Ch, (5Sc, Dec) in a circle, Sl-st (48)
Row 22: 1Ch, 48Sc
Row 23: 1Ch, (4Sc, Dec) in a circle, Sl-st (40)
Row 24: 1Ch, 40Sc, Sl-st
Row 25: 1Ch, (3Sc, Dec) in a circle, Sl-st (32)
Row 26: 1 Ch, 32 Sc, Sl-st
Row 27: 1 Ch, (2Sc, Dec) in a circle, Sl-st (24)
Row 28: 1Ch 24Sc (fig. 6)
Lightly fill the muzzle and shape it with your fingers, giving the desired shape.
Pay attention that the muzzle does not twist.
Row 29: 1Ch, (Sc, Dec) in a circle, Sl-st (16)
Stuff your head
Row 30: 1Ch (Dec) in a circle, Sl-st (8)
Row 31: 1Ch, (Dec) in a circle, Sl-st (4)
Break the thread. Pull off the 4Sc with a needle and hide the tip.
Tip: The muzzle can curl a little, you can gently turn it clockwise
arrow giving the desired position.

Ears (2 children)
Knit in a spiral, without Sl-st and lifting loops. Orange yarn.
Row 1: 6Sc in the amigurumi ring.
Row2: (2Sc, İnc) in a circle (8)
Row 3: (3Sc, İnc) in a circle (10)
Row 4: (4Sc, İnc) in a circle (12)
Row 5: (5Sc, İnc) in a circle (14)
Row 6: (6Sc, İnc) in a circle (16)
Row 7: (7Sc, İnc) in a circle (18)
Row 8: (8Sc, İnc) in a circle (20)
Connect the ends of the ear and knit 10Sc by grasping both halves.
Fasten the thread, leaving the sewing tip.
Nose
Knitting goes in a spiral, without Sl-st and lifting loops. Black yarn:
Row 1: 2Ch, 4 Sc into second loop from hook (4)
Row2: (Sc, İnc) in a circle (6)
Row 3: Sc in each st (6)
Cut the thread leaving the sewing tip.
Pin all parts of the head together to see how it looks.
Body
Note: Knitting goes in a circle, no twists. At the end of each row, join with
using Sl-st in the first column. Always do the first column to column in which Sl-st was.
Knit with orange yarn:
Row 1: 6 Sc in ring (6)
Row 2: 1 Ch (remember to mark the loop), İnc in a circle, Sl-st (12)
Row 3: 1Ch, (Sc, İnc) in a circle, Sl-st (18)
Row 4: 1Ch, (2 Sc, İnc) in a circle, Sl-st (24)
Row 5: 1Ch, (3 Sc, İnc) in a circle, Sl-st (30)
Row 6: 1Ch, (4 Sc, İnc) in a circle, Sl-st (36)
Row 7: 1Ch, 14Sc, switch to white, 8Sc, switch to orange, 14Sc, Sl-st (36)
(see figure 11)
Tip: when working with orange yarn, skip white yarn from the inside
knitting knitting.
Row 8: 1Ch, 13Sc, white, 10Sc, orange, 13Sc, Sl-st (36)
Row 9-11: 1Ch, 12Sc, white, 12Sc, orange, 12Sc, Sl-st (36)
Row 12: 1Ch, 13Sc, white, 10Sc, orange, 13Sc, Sl-st (36)
Row13: 1Ch, 14Sc, white, 8Sc, orange, 14Sc, Sl-st (36)
(fig. 12-13)
Cut off white yarn, then knit only orange
Row14: 1Ch, (4Sc, Dec) in a circle, Sl-st (30)
Row15: 1Ch, 30Sc, Sl-st
Row 16: 1Ch, (3Sc, Dec) in a circle, Sl-st (24)
Row17: 1Ch, 24Sc, Sl-st
Row 18: 1Ch, (2Sc, Dec) in a circle, Sl-st (18)
Row 19: 1Ch, 18Sc, Sl-st
Row 20: 1Ch (Sc, Dec) in a circle, Sl-st (12)
Cut the thread, leaving the sewing tip.
Hand (2det)
Knitting is in a spiral. Orange yarn
Row 1: 6Sc in ring
Row2: İnc in a circle (12)
Row 3: (3Sc, İnc) – 3 times (15)
Row 4-6: 15Sc
Row 7: (Dec) – 3 times, 9 Sc (12)
Row 8-14: 12Sc
Fill your hand
Row 15: Dec – in a circle (6)
Cut the thread. Pull off remaining loops with a needle and tighten firmly.
Leg (2 children)
Knitting in a spiral, orange yarn
Row 1: 6Ch, Sc in 2nd loop from hook. 3Sc, 3Sc into the last loop. On the back side
chains 3Sc, 2 Sc in the last loop (12)
Row2: İnc, 3Sc, İnc – 3 times, 3Sc, İnc – 2 times (18)
Row 3: Sc, İnc, 4Sc, İnc, 3Sc, İnc, 5Sc, İnc, Sc (22)
Row 4-5: 22Sc
Row 6: 6Sc, (Dec) – 2 times, 2Sc, Dec – 2 times, 6Sc (18)
Stuff your leg
Row 7: 5Sc, Dec – 4 times, 5Sc (14)
Row 8-19: 14Sc
Row 20: (5Sc, Dec) in a circle (12)
Stuff your leg. Insert a small button with the ponytail outward, on the inside of your leg.
Between 19 and 20 row.
The fox has left and right legs, so be careful and stick the button on
left side in one leg and on the right side in the other leg.
Tip: so that the tail of the button does not fall inside the leg, you can pass it through it
a pin, or a piece of thread.
Row 21: Dec – in a circle (6)
Cut the thread, close the remaining loops with a needle and pull everything together properly.
Tail
Knitting is in a spiral. White yarn:
Row 1: 6Sc in ring
Row2: (1Sc, İnc) in a circle (9)
Row 3: 9Sc
Row 4: (2Sc, İnc) in a circle (12)
Row 5: (3Sc, İnc) in a circle (15)
Continue knitting with orange yarn, cut off white
Row 6: (4Sc, İnc) in a circle (18)
Row7: 18Sc
Row 8 (5Sc, İnc) in a circle (21)
Row9-23: 21Sc
Row 24: (5Sc, Dec) in a circle (18)
Row25: 18Sc
Row 26: (4Sc, Dec) in a circle (15)
Row27: 15Sc
Row 28: (3Sc, Dec) in a circle (12)
Row29: 12Sc
Stuff the tail.
Row 30: (2Sc, Dec) in a circle (9)
Cut the thread, leaving the tail for sewing, use a needle to pull off the remaining
loops. Gently flatten the tail, giving it a curved shape.
Assembly and finishing
Sew on the ears
Place the ears symmetrically on each side of the head. Pin their edges between 16 and 17
in rows. Sew on.
Fig. 19 Fig. 20
Sew on eyes
There are 10 loops between the eyes. Sew on eyes between 10 and 11 rows
Sew on the eyes using orange yarn and a long needle.
Insert the needle into the base of the head and withdraw from the point of the first eye, through the eye, through the same
the place where the thread came out, and bring it out at the point of the second eye, pass it through the eye and
through the place of withdrawal, bring to the base of the head.
Tie the ends of the threads, pulling the eyes. Hide the tips in the head.
Sew on the nose
Place the nose on the tip of the muzzle and sew with the left ponytail.
Sew on the head
Position the head as desired and sew it to the last row of the body.
TIP: If the head is not well balanced, sew it again, but this time to the 19th row
body. Use the same method if you want to tilt your head a little. In this case
one side of the head is sewn to the 20th row of the body, and the other to the 19th or 18th row of the body.
Sew on hands
Sew the arms to the body as follows:
With a long needle and orange yarn, leave a long tip, insert the needle into the upper
the inner part of the hand (point a), bring out the outside of the hand and enter into point b. Carry through
body between 15 and 16 rows, withdraw at a point from the second hand from the inside, and enter into
point d, and back to the body. Tie the ends of the threads tightly, pressing the paws to the body. Tips
Pass the yarn through the body several times, cut off the excess.
Sew on legs
Sew on the legs with a long needle and orange thread. Pull the thread through the loop
buttons, half its length, and tie.
Insert both threads into the needle and pull through the body between rows 5 and 6.
If it is difficult to pull both strands through the body, use pliers to help
you pull out the needle.
Insert the threads one by one into the buttonhole on the other leg, so that they come out
whether in
opposite directions.
Tie the ends, pass the thread through the body several times, trim off the excess.
Sew on the tail
Pin the tail in the position you like (approximately between 4 and 9 rows
body) and sew it on.