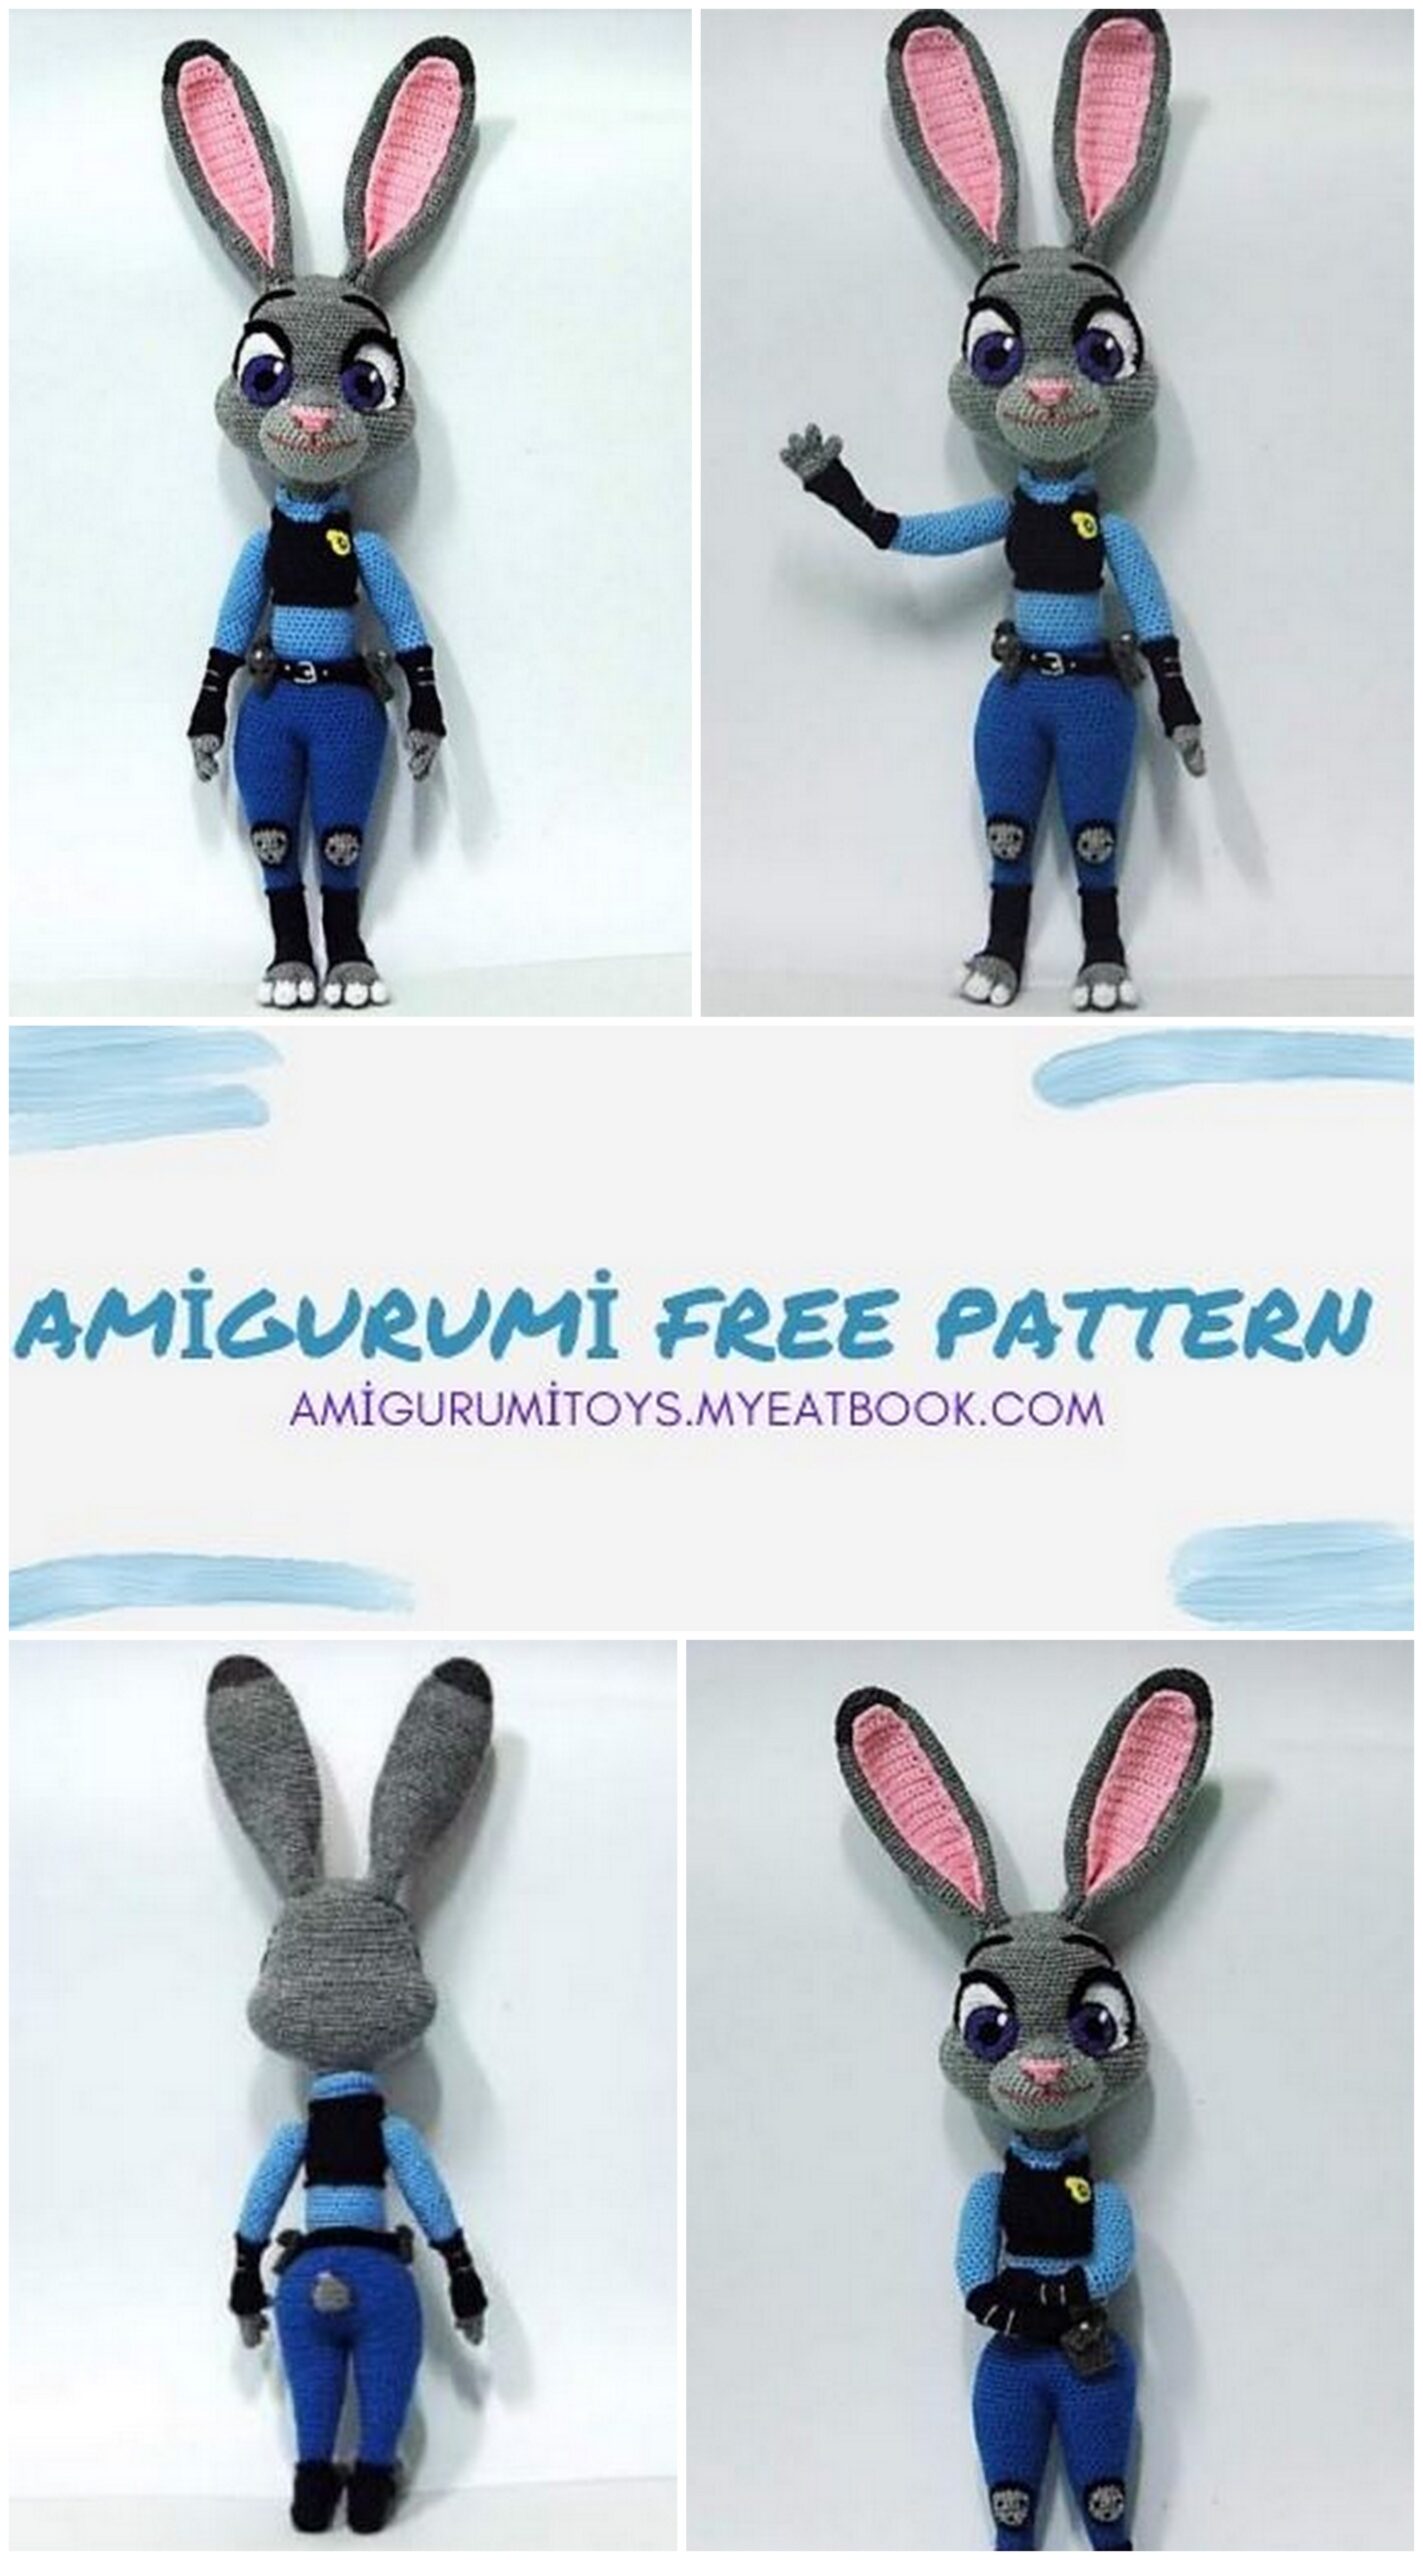
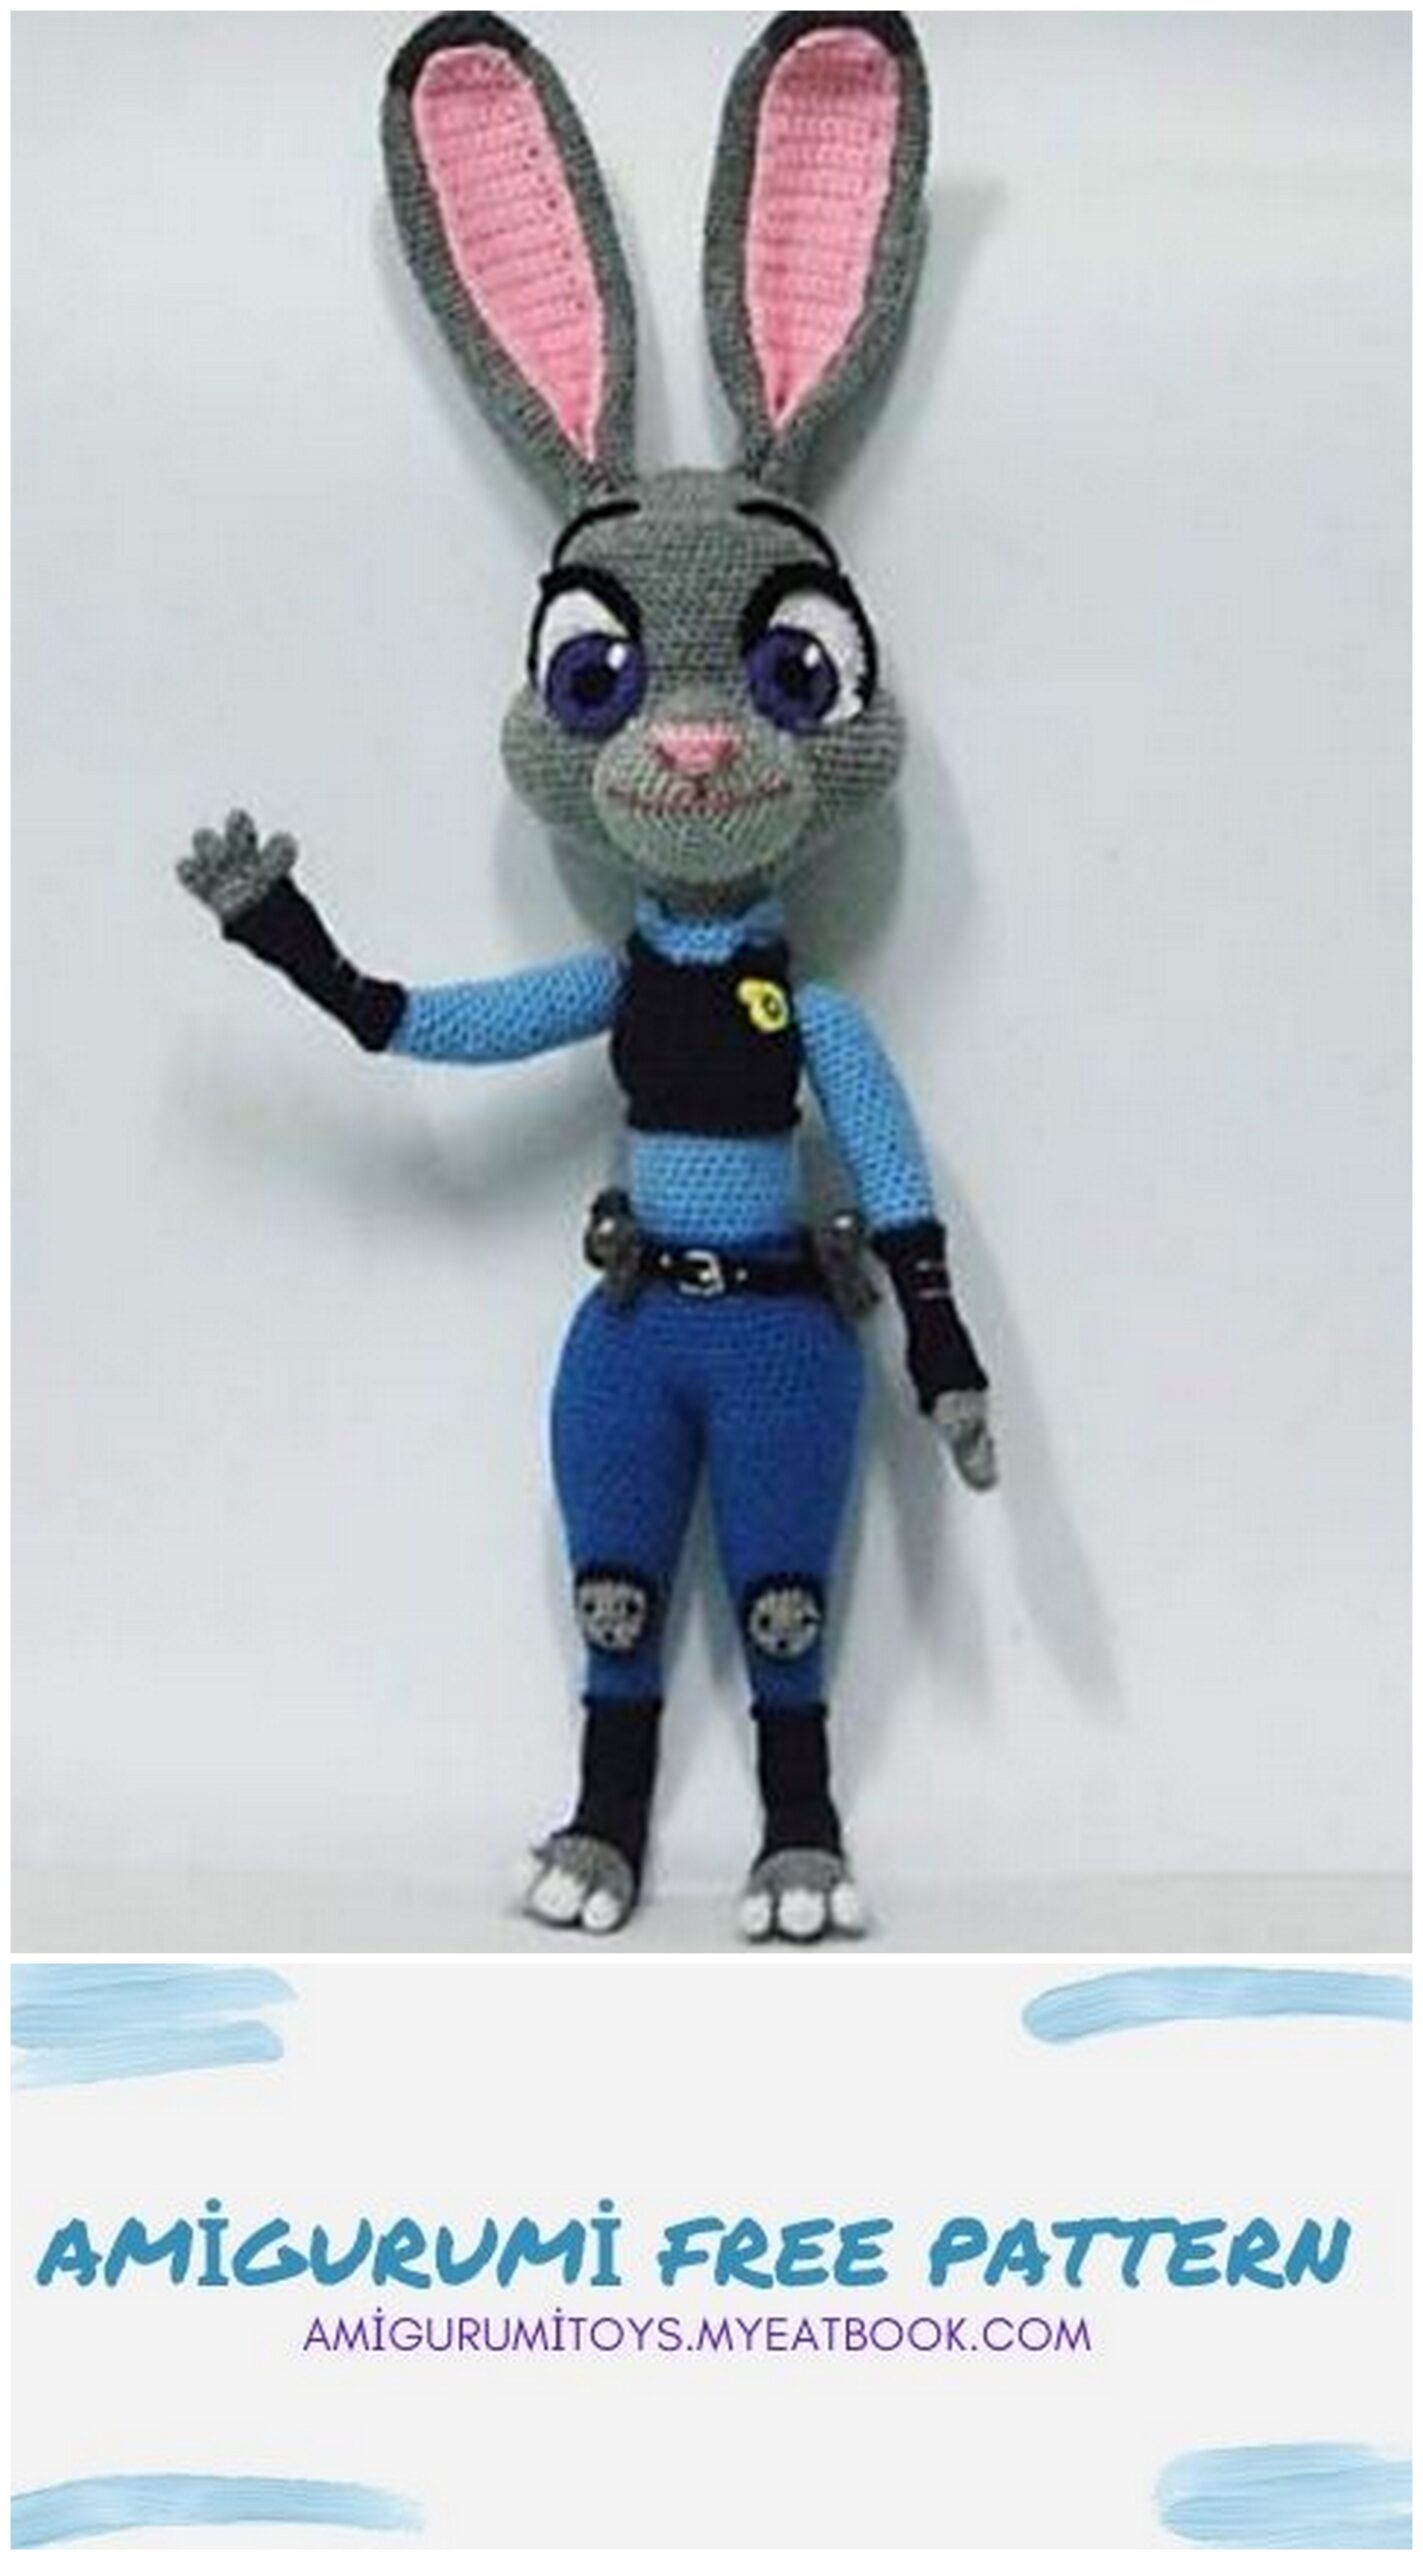
Amigurumi Bunny Free Pattern Size: 52cm
Difficulty: High
Time: 10 h
Crochet: 2-3mm
Thank you very much for purchasing our circuit.
We hope you enjoy this knitting!
MATERIALS:
– Lana different colors: white, black, very light gray, light gray, gray, purple, pink, blue, light blue, dark blue, yellow, reddish brown.
– Wool thickness: 3-4 mm.
– Crochet needles matching the thickness of the wool.
– Wool sewing needles.
– Sintepon for stuffing.

Legend:
SC – Pb (punto bajo) – single crochet
İNC – Aum (aumentar / aumento) – increase
DEC – Dism (disminuir / disminución) – decrease
MR – amigurumi ring.
CH – air loop Translated by Olga Podnebesova

LEGS (x2)
dark blue
1. MR of 6 SC.
2.INC x 6 (12).
3.12 SC (12).
4. 12 SC behind the back walls of the hinge (12).
We leave the front walls of the loop free, sew the foot to them.
5 – 11.12 SC as usual on both tabs (12).
12. Change the thread to blue, 12 SC each behind the back walls of the loop (12).
Then knit a sandal lapel along the free loops.
13-16.12 SC in each loop as usual (12).
17. (3 SC, İNC) repeat to the end (15).
18-19.15 SC (15).
20. (4 SC, İNC) repeat (18).
21-23.18 SC (18).
24. (5 SC, İNC) repeat (21).
25-27.21 SC (21).
28. (6 SC, İNC) repeat (24).
29.31.24 SC (24).
32. (7 SC, İNC) repeat (27).
33 – 35.27 SC (27).
36. (8 SC, İNC) repeat (30).
One leg is finished, we fix the thread, tear it off, we knit the second leg in the same way. We do not break the thread on the second leg, we begin to connect the legs:
Place one foot next to the other and mark the center point between them.
Work SC in each loop to mark point on first leg.
Connect 1SC to the second leg, knit to the mark point, connect to the first leg, knit to mark (60).
If a noticeable hole has come out at the connection point, then we sew the hole with a needle.
BODY:
1. When joining the legs, we got 60 SC.
2.60 SC (60).
3. Divide the knitting into two equal pieces of 30 SC (front and back), place markers on the sides to knit the thighs and buttocks.
We knit to the first mark 1 SC in each loop, from the first mark to the next we knit (4 SC, İNC) x 6 times, and from the second mark to the mark of the beginning of the row again 1 SC in each loop (66).
4. Now we have 36 SC on one side (butt) and 30 SC on the other (tummy). On the butt side, knit (5 SC, İNC) x 6 times. On the tummy 30 SC (72).
5. In the pope we now have 42 SC, we no longer make increases there, we just knit the columns of SC, now we change it on the tummy, where there is still 30 SC.
Knit across the belly (3SC, DEC) x 6 times. Here we see that the marker for the beginning of the row divides the belly into 2 parts. The solution is simple: In order to know how to knit, we count from the end, i.e. from the left side mark, 2 SC will be a decrease and 3SC columns (66).
6. Now we have 24 SC on the side of the tummy, along which we knit (2 SC, DEC) x 6 times, on the butt 42 SC, as before (60).
7-1060 SC (60).
As we knit, we rearrange the side dividing marks higher.
11. Now shrink the side of the butt where we had 42 SC.
Knit along the bottom (5 SC, DEC) x 6 times. On the tummy, knit SC in each loop (54).
12. Now we have 36 SC on the pope.
We knit along them (4 SC, DEC) x 6 times, along the rest of SC in each loop (48).
13. Now on the side of the priests 30 SC, along them we knit like this (3 SC, DEC) x6 times, along the rest of the SC in each loop (42).
14. On the side of the butt 24 SC, on which we knit (2 SC, DEC) x6 times, on the other side SC in each loop (36).
15. Side markers can be removed, leaving only the mark for the beginning of the row. Knit (4 SC, DEC) x repeat (30).
16 – 18.1 SC in each loop (30).
19. Change the thread to light blue, knit at the back loop 30 SC (30). Here we will knit a lapel on the pants.
20 – 28.30 SC in each loop as usual (30). Translation by Olga Podnebesova
29. Change the thread to dark blue, 30 SC (30).
30. Knit 30 SC at the back walls of the loop (30). Let’s go back and knit a vest in them.
31. We begin to knit the chest. Divide the front part in half and put a mark, we get 6 SC on one side, and 5 SC on the other.
Thus, on the chest, along with the posts where the marks are, we should get 12 SC, in them we knit (1 SC, İNC) x 6 times. The remainder of the SC in each loop.
32. Now on the chest 18 SC. We knit in them (2 SC, İNC) x 6 times. For the rest of the SC in each loop (42). If counted backwards across the chest to the start of the row mark, 37 SC should come out.
33 – 36. SC in each loop (42).
37. Now we reduce the breast. On the chest we have 24 SC, in them we knit (2 SC, DEC) x 6 times. Over the rest of the SC in each loop (36).
38. Now on the chest, between marks 18 SC, in them we knit (1 SC, DEC) x 6 times, the rest of the SC in each loop (30).
39 – 42. SC in each loop (30).
43. Change the thread to light blue, knit at the back loop SC into each loop (30). Then we will complete the vest in free loops.
44.1 sc in each loop as usual (30).
45. (3 SC, DEC) repeat (24).
46. SC for the back stitch in a circle (24), later we will return to the free stitches lam to finish the shirt collar.
We have finished the body.
Translation by Olga Podnebesova
Hands (x2)
Light gray
Thumb:
1.MR of 6 SC (6).
2 – 4.1 SC in each loop (6).
Palm fingers (x3):
1.MR of 4 SC (4).
2 – 5.1 SC in each loop (4).
When we have tied two fingers, we fix the thread on them and break it off, on the third we do not break the thread, we begin to connect the fingers:
1. We knit 1 SC on the first finger, connect 1 loop of the first and 1 loop of the second finger, 1 SC along the second, loop the second and third fingers together, 3
SC on the third finger, 1SC, 1SC on the second, 1SC,
2 SC. (3 fingers x 4 SC), (12).
2.1 SC in each loop (12).
3. (3 SC, İNC) repeat (15).
4.1 SC in each loop (15).
5. Change to dark blue, SC in a circle (15).
6. SC behind the back walls in a circle (15). We’ll come back later to knit a glove.
7 – 8.1 SC in each loop (15).
9. (3 SC, DEC) repeat (12).
10. (2 SC, DEC) repeat (9).
11 – 16.1 SC in each loop (9).
17. (2 SC, İNC) repeat (12).
18.1 SC in each loop (12).
19. Change to light blue, knit by the back walls of the loop (12). We’ll go back to the loose loops to complete the glove.
Translation by Olga Podnebesova
20 – 25.1 SC in each stitch (12).
26. (3 SC, İNC) repeat (15).
27 – 40.1 SC in each loop (15).
41. (3 SC, DEC) repeat (12).
42. DEC to the end (6).
We fix the thread, if necessary, sew up the hole with a needle, hide the thread.
Feet sandal rims:
dark blue
1. We start with hind legs, 11 row, knit on free
loops down (12).
2.1 SC in each loop (12).
Fasten, cut the thread.
Pants:
We knit with a blue thread in the 19th row, along the free loops down
30 SC (30). Fasten, cut the thread.
Vest:
1. We start on the 30th row of the body, with a dark blue thread from the back in a circle of 30 SC (30). We knit up, along the bottom.
2.1 SC in each loop (30). Fasten, cut the thread.
Translation by Olga Podnebesova
Neck vest:
dark blue
1. Start with the 43rd row of the body, and knit in free loops up. Mark 3 SC in the middle of the chest, place the marks, knit in straight-back rows from the mark, along the back to the mark, 27 SC, air loop (27).
2. Turn, 27 SC (27).
Fasten, cut the thread.
Collar:
Light blue
1. We start with the 46th row of the body, behind the front walls of the loop (the head will be sewn on the back) and also mark 3 SC on the neck in front with marks, knit in straight and reverse rows, from the mark, along the neck, to mark 21 SC, air loop , turn (21).
2 – 3. Decrease in each row by 1 SC, (20) and (19). Fasten, cut the thread. For the remaining 24 SC 46 rows, the head will be sewn.
glove:
dark blue
1. We start with the 6th row of the hand, and
knit by free loops upwards 15 SC (15).
2.1 SC in each loop (15).
Fasten, cut the thread.
1. Begin with row 19 of the arm and knit upward with 12 SC (12).
2.1 SC in each loop (12).
Fasten, cut the thread.
We embroider two gray stripes on the glove.
HEAD
Light gray
1.MR of 6 SC (6).
2.6 İNC (12).
3. “1 SC, İNC” repeat (18).
4. “2 SC, İNC” repeat (24).
5. “3 SC, İNC” repeat (30).
6. “4 SC, İNC” repeat (36).
7. “5 SC, İNC” repeat (42).
8. “6 SC, İNC” repeat (48).
9. “7 SC, İNC” repeat (54).
10. “8 SC, İNC” repeat (60).
11 – 24.1 SC in each loop (60).
25. “2 SC, İNC” 3 times, 24 SC, “2 SC, İNC” 3 times, 1 SC in each loop, then in a circle (66).
26. “1 SC, İNC” 6 times, 24 SC, “1 SC, İNC” 6 times, 1 SC in each loop, then in a circle (78).
27. “2 SC, İNC” 6 times, 24 SC, “2 SC, İNC” 6 times, 1 SC in each loop, then in a circle (90).
28 – 30.1 SC in each loop (90).
31.2 SC, (2 SC, DEC) 6 times, 24 SC, (2 SC, DEC) 6 times, SC in each loop further in a circle (78).
32 – 33, 1 SC in each loop (78).
34.3 SC, (1 SC, DEC) 6 times, 24 SC, (1 SC, DEC) 6 times, then SC in each loop (66).
35 – 36. SC in each loop (66).
37.4 SC (2 SC, DEC) 3 times, 24 SC, (2 SC, DEC) 3 times, SC in each loop (60).
38. “8 SC, DEC” repeat (54).
39. “7 SC, DEC” repeat (48).
40. “6 SC, DEC” repeat (42).
41. “5 SC, DEC” repeat (36).
42. “4 SC, DEC” repeat (30).
43. “3 SC, DEC” repeat (24).
44 – 47. SC in each loop (24).
Fasten, cut the thread.
Paws (x2)
Side toes (x2):
White:
1.MR of 6 SC (6).
2. SC in each loop (6).
3. Change the thread to light gray, SC in each loop (6).
4.1 SC in each loop (6). Fasten, cut the thread.
We do not cut the thread on one finger, we will connect it with the middle one.
Center finger: white
1. MR of 8 SC.
2. SC in each loop (8).
3. Change to light gray (8).
4. SC in each loop (8).
Fasten, cut the thread.
We leave one side of the fingers without off to start attaching to
fingers:
1. 1SC of the first finger is knitted together with 1 SC of the middle finger, 3 SC along the middle finger, 1 SC of the middle + 1 SC of the extreme, 5 SC at the extreme, 1 SC, 3SC, 1 SC, 5 SC. (twenty).
2 – 5. SC in each pet