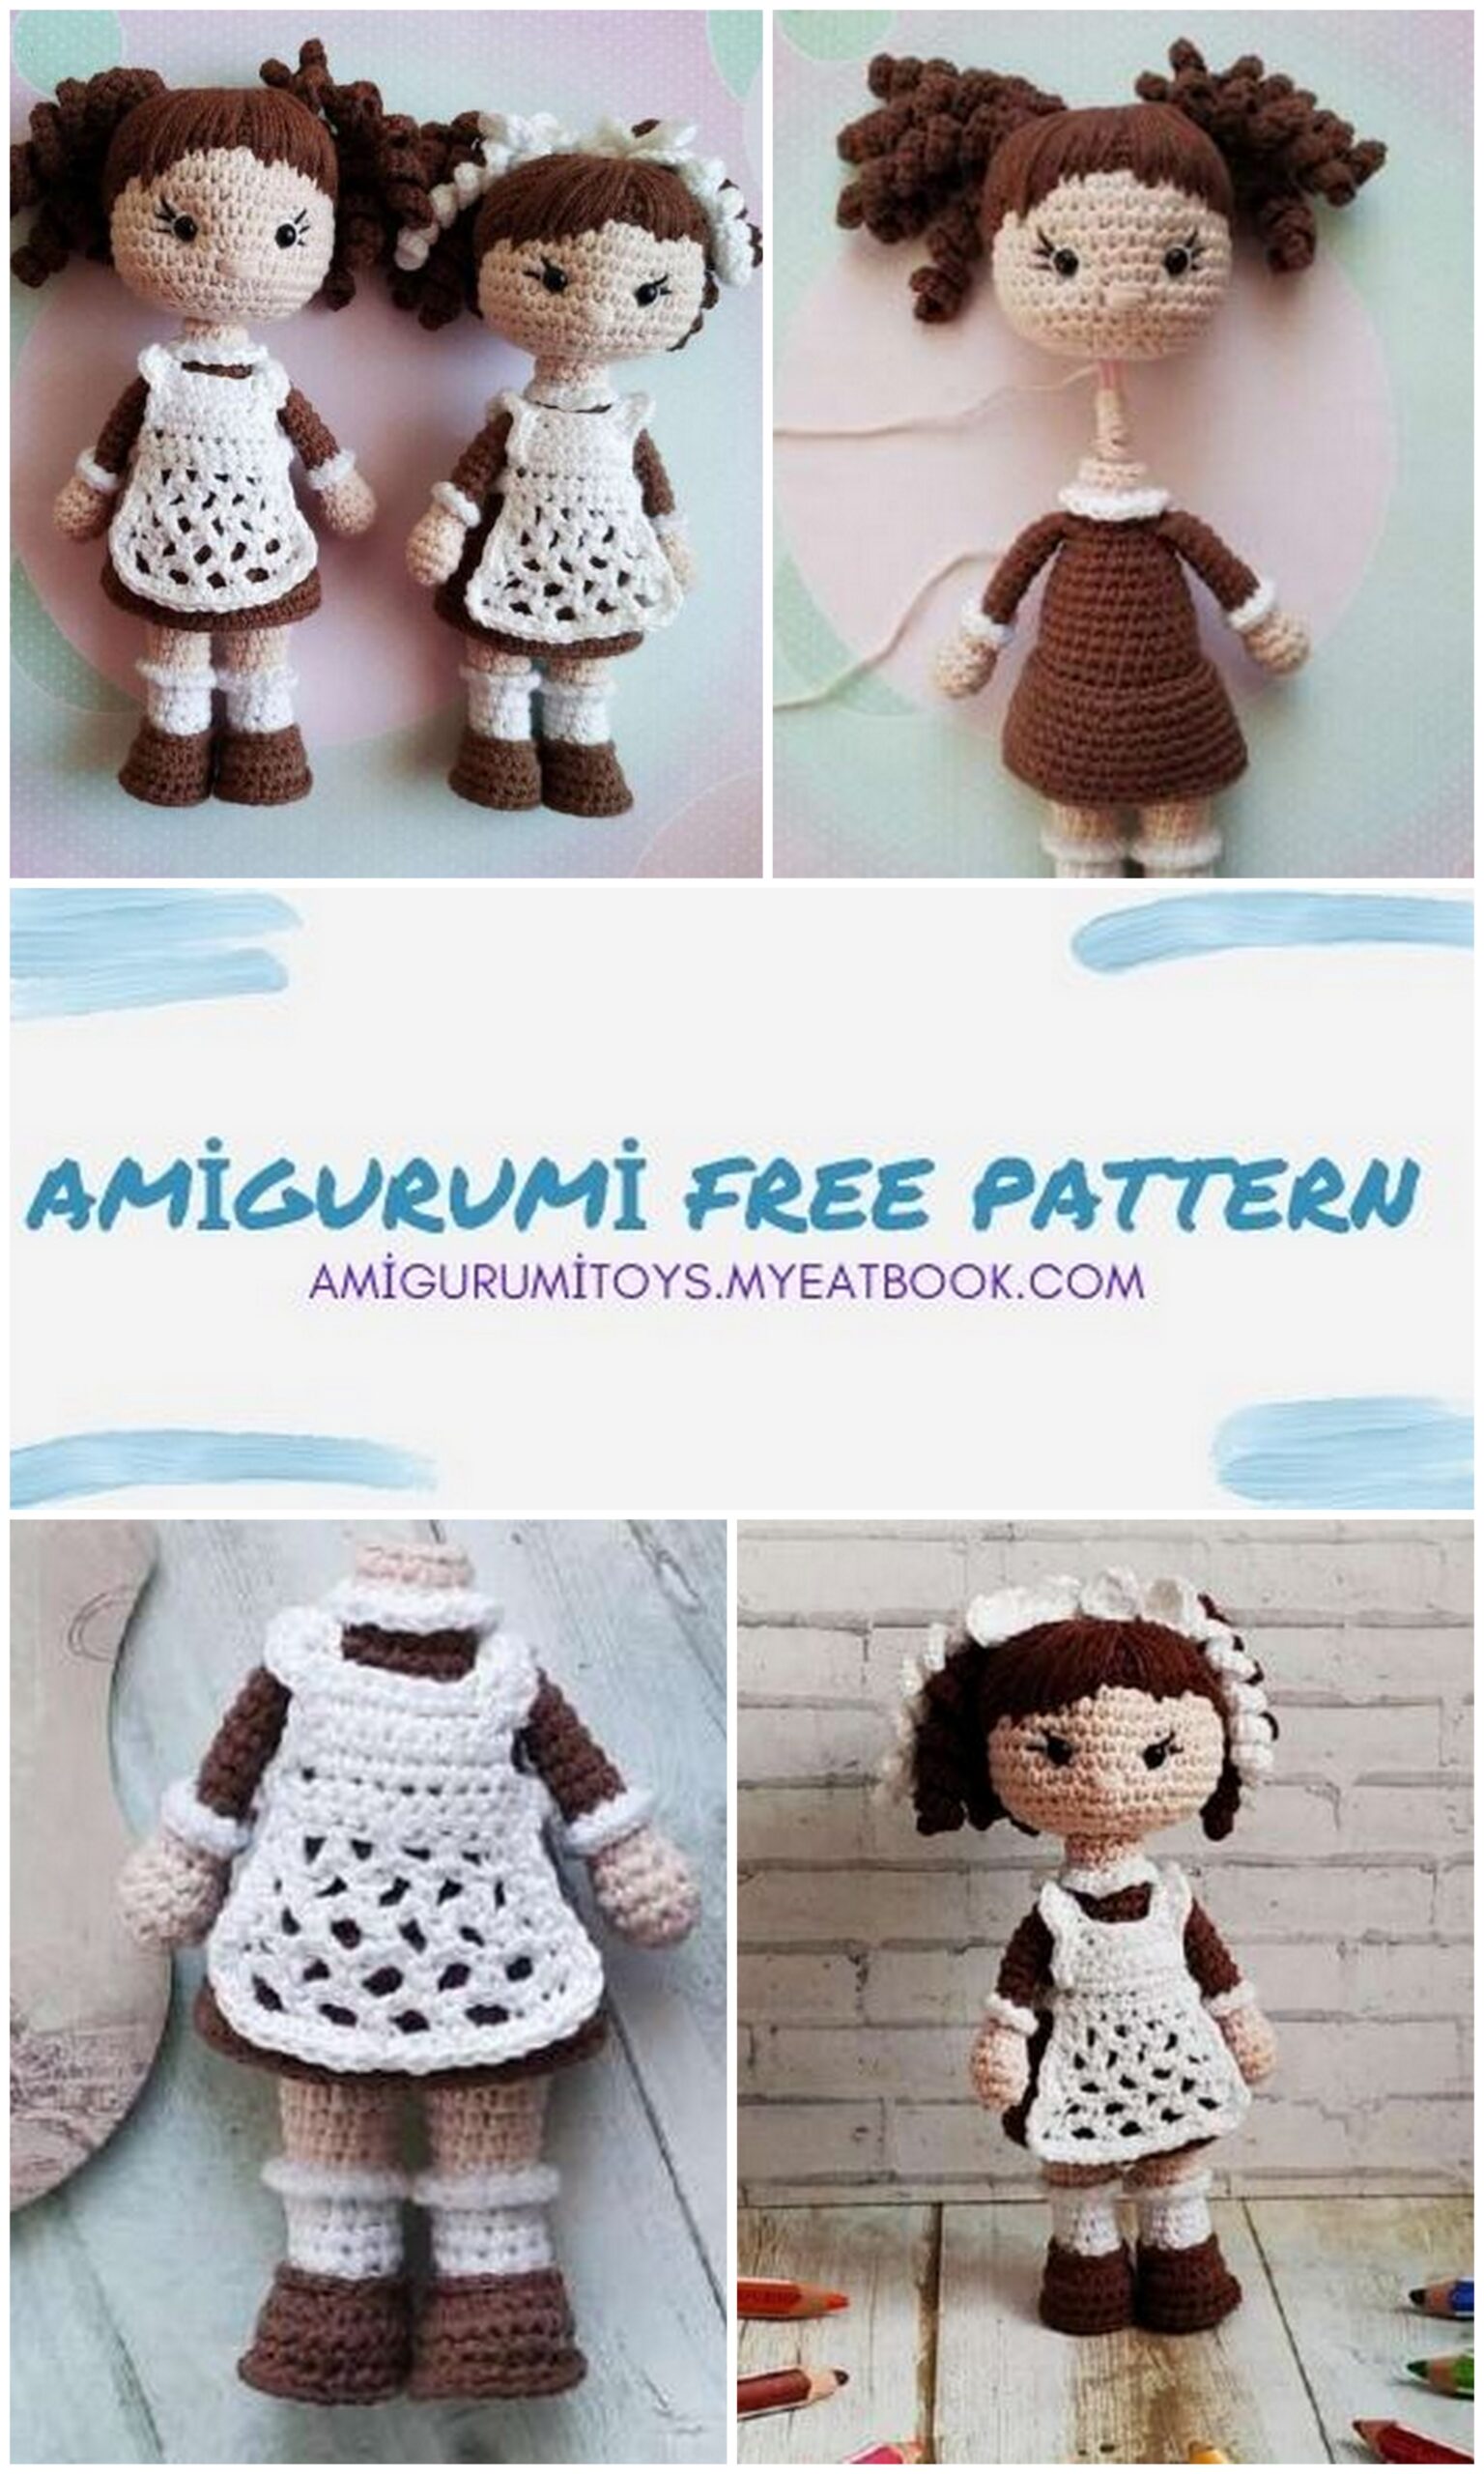
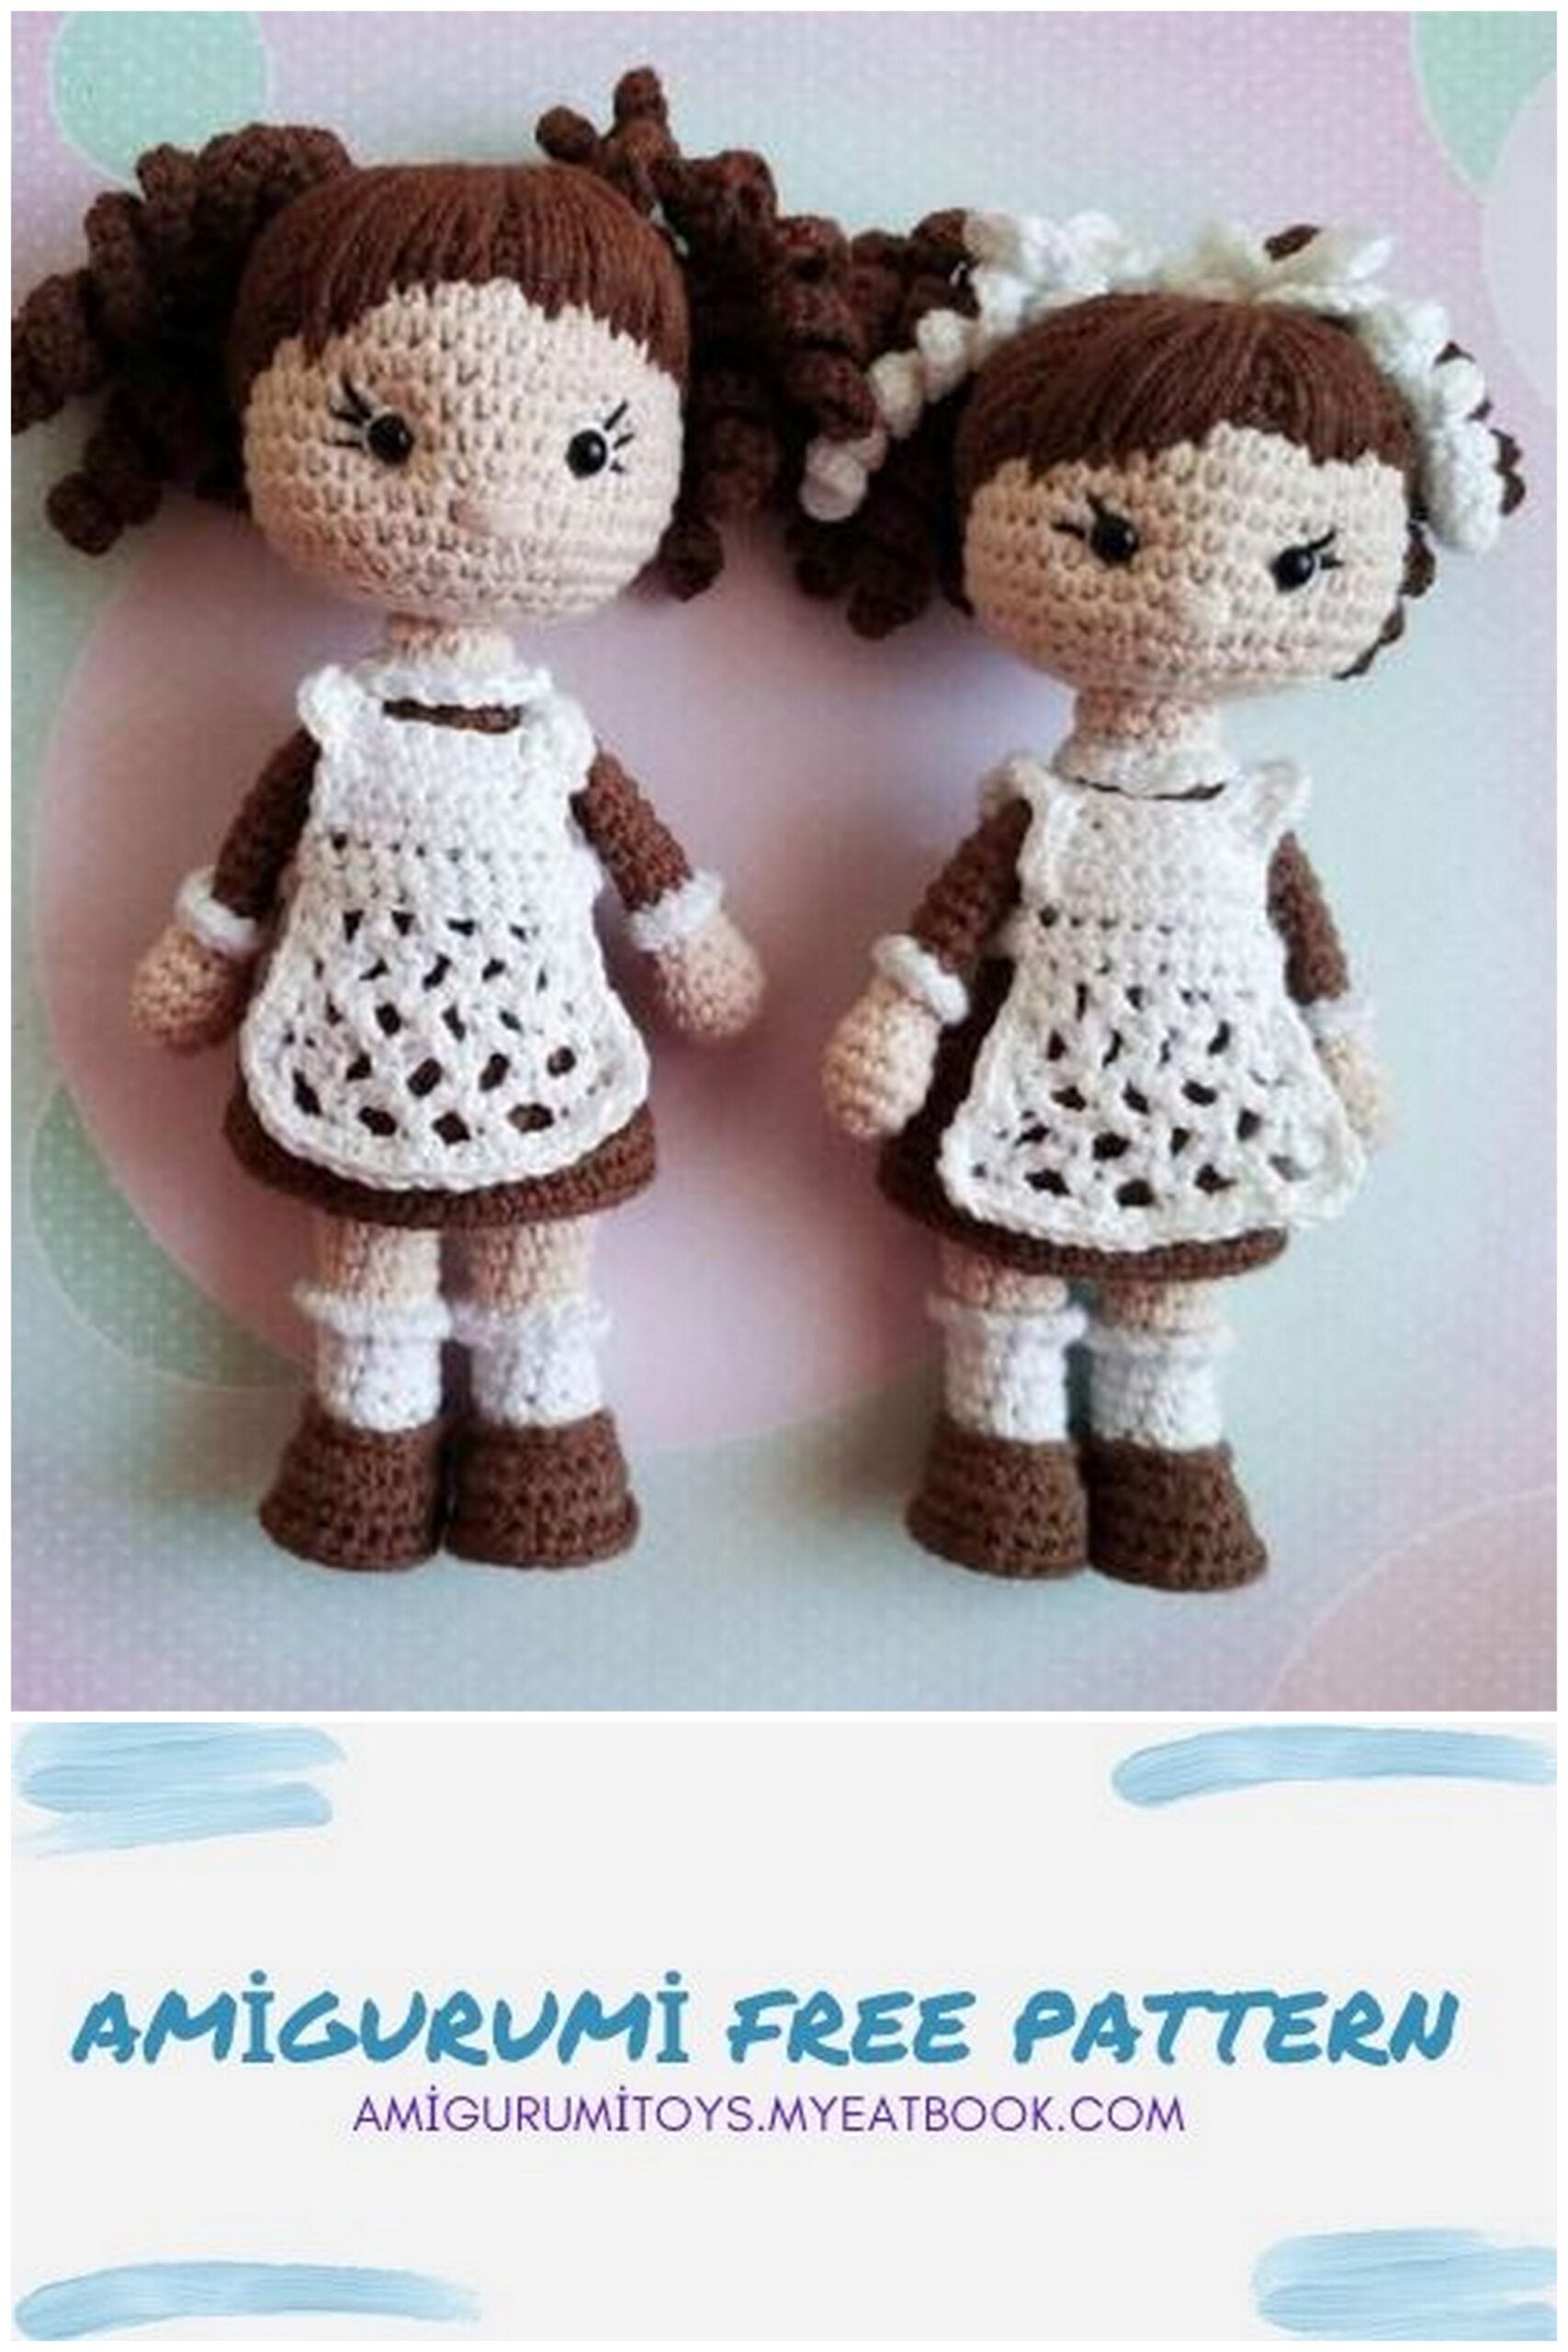
First grader Nastyusha
Required materials and tools:
-Yarn for knitting a doll – semi-cotton ALIZE Cotton Gold yarn composition:
(Cotton-55%, Acrylic-45%, 330 m in 100 g)
(you can take YarnArt Jeans (composition: Cotton-55%, Acrylic-45%, 160 m in 50 g)
-For the body color No. 382 beige, color 67 is possible
-For clothes – brown color # 493.
-For shoes – brown No. 493 and white (for socks)
-For an apron – there should be a thinner yarn, for example Gazal Cotton yarn
Baby (cotton – 60%, acrylic – 40%, 165 m in 50 g) white color
you can use Alize Foreve (100% microfiber acrylic, 300 m in 50 g)
-For Alize Cotton Gold wig or Yarn Art Jeans any color you like.
My first grader has a wig knitted from yarn Yarn Art Jeans No. 40
(Brown)
Hook number 2
-black thread for eyelash embroidery
filler – holofiber
– eyes on a secure mount 6 mm
– sewing needles, scissors, pins, knitting marker (you can just thread in a contrasting color)
– plastic cover for insoles.
You can use any yarn.
The main thing is that the yarn is suitable in texture and thickness.
The color scheme of your doll may also be different.

Legend:
sc – single crochet
ch – air loop
inc – increase
dec – decrease
DC – column with one crochet
TR – a column with two crochets,
HDC – half double crochet
sl-st – connecting post
Ps – offset loop (knit with ordinary single crochet posts)
(…) – the number in brackets means the number of loops in a row
(…) * X – repeat X times indicated in brackets
All parts are knitted in a spiral, and stuffed in the knitting process. If you do not need to fill something, or do not fill it to the end, I will additionally indicate.
The color change takes place in the last loop of the row.
HANDLES (2pcs):
We knit with beige (flesh) yarn.
1st row: 6 sc into magic ring (6)
2nd row: 6 increments (12)
3-4 rows: 12 sc (12)
5 row: (1 sc, dec) * 4 (8)
6 row: 8 sc
Change color to white:
7 row: 8 sc
Fill lightly with holofiber. There is no need to fill further, otherwise the handle will bulge.
Change color to brown:
8 row: behind the back walls (half loops) 8 sc
9-15 rows: 8 sc
Row 16: Fold handle in half, knit 4 sc together.
fasten the thread, cut off.
We return to the 8th row. Knit with white yarn for the front walls (half loops) as follows: 1 sc, 1 ch., Repeat to the end of the row. Fasten the thread, cut, hide the ends.


BOOTS (2 pcs):
➡ Knit with brown thread:
1 row: 5 ch., From the second loop from the hook: 3 sc, in one loop 3 sc, on the second side of the chain 2 sc, 1 inc. (10)
2nd row: 1 inc, 2 sc, 3 inc, 2sc, 2 inc. (sixteen)
3rd row: 1 inc, 3 sc, (1 sc, 1 inc) * 3, 6 sc (20)
4 row: for the back walls (half loops), knit 20 sc
5 row: 20 sc
6 row: 8 sc, 3 dec, 6 sc (17)
➡Change the color to white
7 row: behind the back walls (half loops) with a thread of white
colors (color of socks): 6 sc, 3 dec, 5 sc (14)
➡At this stage, you need to insert the insoles.
(Cut the insoles out of plastic. They are easy to make ..
First, I make a sample from cardboard. Attach the sole, circle, cut, then adjust to the desired size, constantly trying on)
➡ Next, we knit with insoles inside. After 8-10 rows, it will be difficult to insert.
➡ You also need to fill the legs with filler. As you knit, we gradually stuff very tightly!
8 row: 5 sc, 2 dec., 5 sc, (12)
9-11 rows: 12 sc
Back to row 4:
knit 20 sc for the front walls with brown thread. Fasten the thread, cut off, hide the ends.
Back to row 7:
knit 17 sl-st behind the front walls with brown thread. Fasten the thread, cut off, hide the ends.
LEGS (2 pcs)
➡Change the thread to beige (body color)
12 row: behind the back walls (half loops) 12 sc
Rows 13-15: 12 sc
4 sc off-center, 1 sec
Fasten and cut the thread
(in this place we will connect with the second leg).
➡ We knit the 2nd leg in the same way, but we do not cut the thread.
And knit 11 sc to offset to the middle of the leg.
➡Return to row 12.
Knit with white thread for the front walls
as follows: 1 sc, 1 ch. So until the end of the row. Fasten the thread, cut, hide the ends.
BODY
➡Body knitting
We continue to knit with beige yarn.
We connect the legs into the body, starting from the second leg:
1 ch., 12 sc in the first leg, then 1 sc in ch.,
12 sc on second leg, 1 sc. (26 sc). Here
we put a marker – this will now be the beginning of knitting the body.
1st row: 10 sc, 1 inc., 3 sc, 1 inc., 11 sc (28)
Rows 2-6: 28 sc
Knit 15 sc, these are the offset sts. Now the beginning of the row will be at the back, because we will be making a color change.
➡Change thread color to brown:
7 row: 28 sc
8 row: behind the back walls (half loops) 28 sc
9 row: 28 sc
10 row: 6 sc, 1 dec., 12 sc, 1 dec., 6 sc (26)
11 row: 26 sc
12 row: 6 sc, 1 dec., 11 sc, 1 dec., 5 sc (24)
13 row: 24 sc.
14 row: (4 sc, dec) * 4 (20)
15 row: 20 sc
16 row: (3 sc, dec) * 4 (16)
Now we knit pens
(we knit the handles together with the body loops, threading the hook first through the handle loop, then through the body loop)
17 row: 4 sc, 4 sc (with handle), 4 sc, 4 sc (with handle) (16)
Row 18: you need to make 2 decreases, one in front, the second behind, as follows: 1 sc, 1 dec., 6 sc, 1 dec., 5 sc (14)
➡Change thread color to white:
19 row: 14 sc
➡Change thread color to beige:
20 row: behind the back walls (half loops) 14 sc
21 row: you need to make 2 decreases, one in front, the second behind, we get 12 sc
Fasten and cut the thread, leaving a tail for sewing on the heads
Dress.
We return to the 8th row of the body. For the front walls (half loops), knit with a brown thread:
1st row: 28 sc
2nd row: (1 inc., 2 sc,) * 9, 1 inc. (38).
3-8 rows – 38 sc.
You can tie the last 8 row with crustaceans
step or as follows: 1 sc, 1 ch
(repeat this to the end of the row).
Collar
We return to the 20th row of the body. With a white thread for the front walls (half loops), knit as follows: 1 sc, 1 ch. Thus, knit for the end of the row.
Apron
Knit with white thread. First, we knit a belt.
Dial 35 ch.
Starting at 6th st from hook, knit 29 sc.
Fasten the thread, cut off, leaving the tail for sewing on the button.
Apron:
Mark the middle 11 sts.
1st row: cast on 11 sc, 1 pp, turn
2 row: 1 sc, (3 ch. Skip 1 loop of the previous row, 1 sc) * repeat 4 times, 1 sc, 1 pp, turn
(arches are formed)
Then we knit, forming the second row of arches.
Be sure to knit a single crochet into the middle loop of the arch.
3 row: 1 sc, 3 ch., Skip 1 loop of the previous row, 1 sc, (3 ch. Skip 3 loops of the previous row, 1 sc) * repeat 3 times, 1 sc, 1 pp.
4 row: 1 sc, 3 ch., Skip 1 loop of the previous row, 1 sc, (3 ch. Skip 3 loops of the previous row, 1 sc) * repeat 3 times, 1 ch., Skip 1 sc of the previous row, 1 sc, 1 pp 5.6 rows as row 4.
Fasten the thread, cut
Now we tie the sides and bottom of the apron.
To do this, you need to attach the thread to the side of the apron (on the front side of the apron).
We tie sc first on the right, then we tie the bottom, then the left side of the apron.
Knitting sc, knit in the end of the thread from the previous row. Thus, we hide the ponytails of the thread.
We knit the upper part of the apron. Mark the middle 9 sts.
1 row 9 sc, turn
2nd row: 8 sc, turn
3rd row: 7 sc, turn
4th row: 6 sc, turn.
Do not make a lifting loop at the end of the row, but start the row from the second loop from the hook. Thus, knitting is reduced.
For the straps, dial 12 ch., From the second loop from the hook we knit 11 sc, continue knitting along the sidewall of the upper part of the apron (for this, we begin to knit the row on the side of the sidewall of the upper part of the apron)
Fasten the thread, cut off.
Now we tie the straps.
We attach the thread at the beginning of the strap.
We tie it with scallops. You should get 3 scallops.
We knit festoons as follows:
* 1 sc, skip 1 loop of the previous row,
5 sc in one loop, skip 1 loop * repeat from * to *
Sew the straps on the back to the belt. Sew on a button.
The apron is ready!
The number of rows when knitting an apron and the number of loops in the straps may be different for you. Try on the doll while knitting.
Head, tightening, face shaping
I offer two options for knitting a head – small and slightly larger.
Option 1. The head is small. Knit in a spiral in beige.
1st row: 6 sc in CA
2nd row: 6 inc (12)
3rd row: (1 sc, inc) * 6 (18)
4th row: (2 sc, inc) * 6 (24)
5 row: (3 sc, inc) * 6 (30)
6 row: (4 sc, inc) * 6 (36)
7 row: (5 sc, inc) * 6 (42)
8-12 rows: 42 sc
13 row: (5 sc, dec) * 6 (36)
14th row: 3 sc, dec, (4 sc, dec) * 5, 1 sc (30)
15 row: (3 sc, dec) * 6 (24)
16 row: 1 sc, (2 sc, dec) * 5, 1 sc (18)
17 row: (1 sc, dec) * 6 (12)
Fasten the thread, cut, leaving a tail for sewing the head to the body.
After row 15, you need to insert 6 mm eyes on a secure attachment between 9 and 10 rows at a distance of 5-6 sc columns between them (pictured). You choose the distance between the eyes that you like.
Fill your head very tightly with holofiber.
✅2 option .. Bigger head. Up to 7 row
we also knit as 1 head option.
Knit in a spiral beige.
8-15 rows: 42 sc
16 row: (5 sc, dec) * 6 (36)
17 row: 3 sc, dec, (4 sc, dec) * 5, 1 sc (30)
18 row: (3 sc, dec) * 6 (24)
19 row: 1 sc, (2 sc, dec) * 5, 1 sc (18)
20 row: (1 sc, dec) * 6 (12)
Fasten the thread, cut, leaving a tail for sewing the head to the body.
After row 18, you need to insert 6 mm eyes on a secure attachment between 12 and 13 rows at a distance of 6-7 sc posts between them (pictured).
You choose the distance between the eyes that you like.
Fill your head very tightly with holofiber
We make a tightening.
Be sure to tighten your eyes. Pull the thread and hide it under the eyes so that it is not visible. Even if you do not have visible pits in the eye area, the tightening still does its job – the face is tightened, an imitation of the cheeks appears.
Do not neglect this step.
How to make a tightening?
We take a beige thread, which was used to knit the head. Insert the needle into the open hole, draw it out in the lower left corner of the eye. Next, we introduce a needle with an opposing floor On the right side of the eye, we take it out into the hole We get two tails until we remove them. We do the same with the second eye.
✅✅Now we tie the ends of the threads (separately from each eye) with one knot and begin to pull. When we like the resulting pits, tie a few more knots. Then connect the threads from two eyes, tie a knot. So we will fix our ties and they will not bloom over time.
➡Watch an example of a head bind on the video https://vk.com/videos180190787?z=video-180190787_456 ..
We embroider eyelashes, nose.
Before embroidering the cilia, you need to make the white of the eyes. Embroider with white thread in one stitch from the middle of the upper part of the eye to the middle of the lower part of the eye, tighten slightly.
Cilia embroider with black thread.
Can be sewn with two stitches, can be sewn with three stitches.
We embroider the nose with the color of the body with small stitches. Pre-mark with a needle the place of the embroidery of the nose (pictured)
We knit the wig with the thread chosen for the hair.
Wig. Option 1 (for a small head)
1st row: 6 sc in CA
2nd row: 6 inc (12)
3rd row: (1 sc, inc) * 6 (18)
4th row: 1 sc, inc, (2 sc, inc) * 5, 1 sc (24)
5 row: (3 sc, inc) * 6 (30)
6 row: 2 sc, inc, (4 sc, inc) * 5, 2 sc (36)
7 row: (5 sc, inc) * 6 (42)
8-11 rows: 42 sc
12 row: (5 sc, kill) * 6 (36)
Fasten the thread, cut, leaving a ponytail for sewing the wig to the head.
Wig. Option 2 (for a bigger head)
1st row: 6 sc in CA
2nd row: 6 inc (12)
3rd row: (1 sc, inc) * 6 (18)
4th row: 1 sc, inc, (2 sc, inc) * 5, 1 sc (24)
5 row: (3 sc, inc) * 6 (30)
6 row: 2 sc, inc, (4 sc, inc) * 5, 2 sc (36)
7 row: (5 sc, inc) * 6 (42)
8-13 rows: 42 sc
14th row: (5 sc, dec) * 6 (36)
Fasten the thread, cut, leaving a ponytail for sewing the wig to the head.
Sew the wig to the head. The photo shows how to do this.
Leave room for bangs in the front.
It is necessary to pin with needles and sew with a brown thread (the color of a wig) to the head
Now we knit ponytails.
Each ponytail consists of five curls.
We mark with needles the location of the tails, approximately between 4 and 5 rows in the center of the head.
We attach the thread (wig color) to the marked place (we start the hook in the aisle).
Cast on 30 ch., From the second loop from the hook, knit 2 sc in each loop.
We knit the last single crochet into the first loop (the beginning of the curl).
Now we insert the hook into the adjacent loop, we knit a curl in the same way as the first.
Thus, we knit 5 curls.
Twist the resulting knitted strips from the end to the beginning, thus a curl is obtained.
We knit the second tail in the same way.
We embroider bangs. To do this, with the same thread using a needle, we make large
stitches from the center of the bangs to the edge of the wig, going slightly beyond it.
first embroider one part of the bangs (left), then the second (right)
We connect the head to the body.
You need to insert cotton swabs between the head and neck, having previously wrapped three sticks with thread. Along the edges of the sticks must be cut, leaving the desired length.
Now with a blind stitch, seizing the last row of the head with a stitch, then we make a stitch along the last row of the neck, sew on the head.
How to sew a head can be found here https://vk.com/video180190787_456239032
Bows
We knit in white. It is desirable with a thread thinner than the doll was knitted. For example, Gazal Baby Cotton.
Making an amigurumi ring:
1) 1sc, 4 ch., 4 columns with two crochets, 4 ch., Sc (the first part of the bow turned out)
2) 1sc, 4 ch., 4 double crochets, 4 ch., Sc, sl-st.
Fasten the thread, leave the tails in order to wrap the middle of the bow and then sew to the elastic band.
Tie 4 pendants in white as follows: 22 ch., Starting from the second loop from the hook, knit 2dc in each loop.
Sew 2 pendants to the bow. Next, sew a rubber band or a base for a hair clip.
You can just leave the strings, which then tie around the ponytails.
Everything! The bows are ready! We attach to the ponytails!