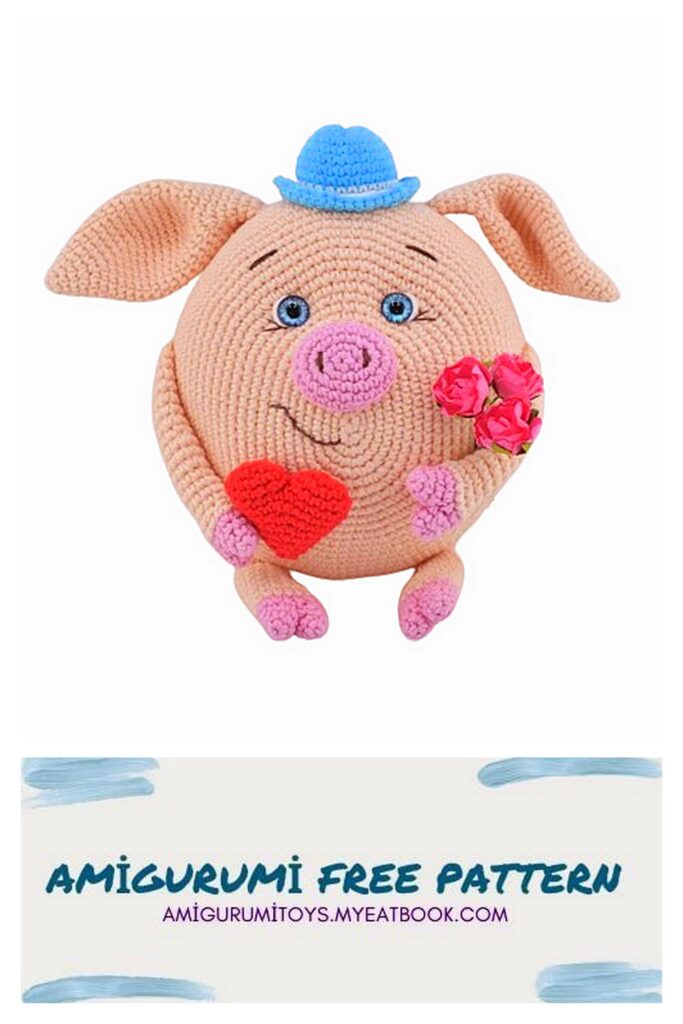
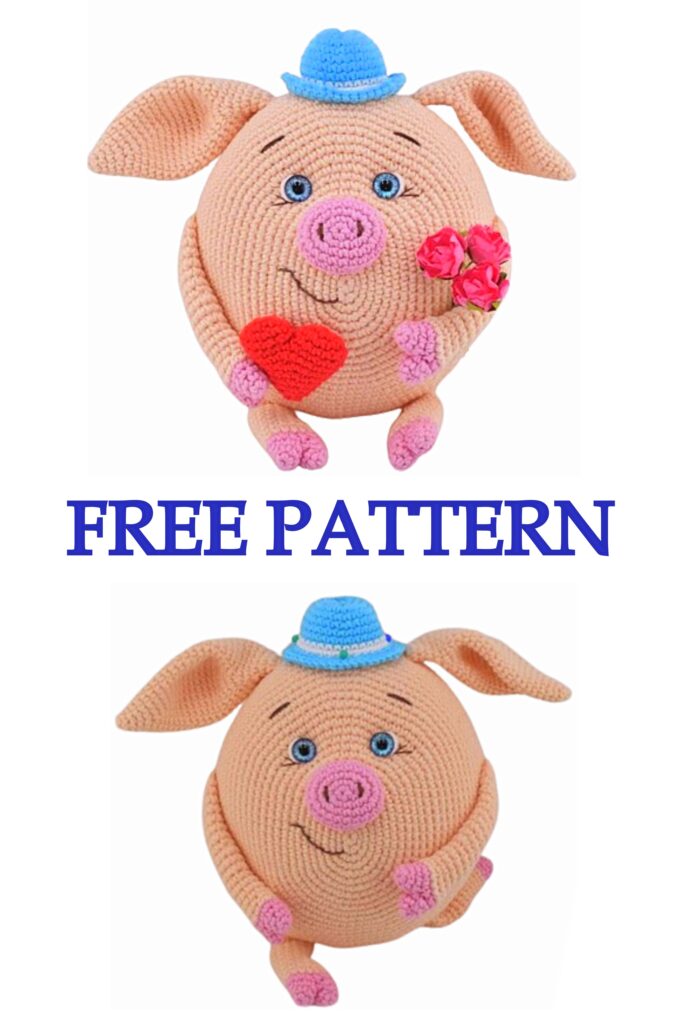
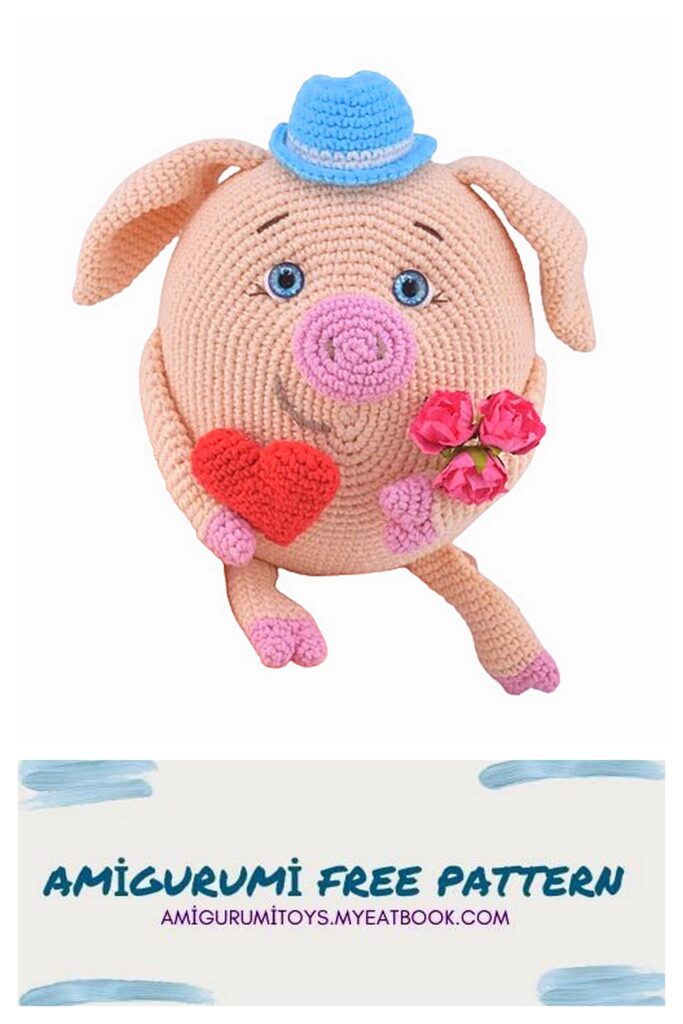
Today, we’re bringing you a free Piglet knitting pattern. With this pattern, you can easily knit a cute little Piglet figure. You can have an enjoyable time for yourself and prepare a wonderful gift for your loved ones. Now, it’s time to step into Piglet’s cute world!
Necessary materials:
1. yarn YarnArt JEANS color light peach No. 73 – 2 pcs.
2. yarn YarnArt JEANS color pink No. 36 less skein
3. yarn YarnArt JEANS color turquoise No. 33 less skein
4. yarn YarnArt JEANS color white No. 62 less skein
5. yarn YarnArt JEANS color red No. 26 less skein
6. yarn VITA cotton PELICAN color brown No. 3973 for shaping eyebrows, eyelashes, mouth
7. hook suitable for size No. 1.75
8. eyes 12 mm
9. filler
10. big needle
11. glue Moment Crystal
LEGEND
. MR – amigurumi ring
. Ch – air loop
. Sc – single crochet
. İnc – increase (2 Sc in one loop)
. Dec – decrease (2 Sc knit together)
. Sl-st – connecting post
When using the above materials, the size of the finished toy
17 cm.
Ears (2 pcs)
1 row 4 Sc in MR
Row 2 (1 Sc, İnc)*2 = 6
Row 3 (1 Sc, İnc)*3 = 9
Row 4 (2 Sc, İnc)*3 = 12
5 row (5 Sc, İnc)*2 =14
Row 6 (6 Sc, İnc)*2 =16
Row 7 (7 Sc, İnc)*2 = 18
Row 8 (8 Sc, İnc)*2 = 20
Row 9 (9 Sc, İnc)*2 = 22
Row 10 (10 Sc, inc)*2 = 24
Row 11 (11 Sc, İnc)*2 = 26
Row 12 (12 Sc, inc)*2 = 28
13-18 row 28 Sc (6 rows)
Row 19 10 Sc, 4 Dec, 10 Sc = 24
20 row 10 Sc, 2 Dec, 10 Sc = 22
21 row 9 Sc, 2 Dec, 9 Sc = 20
22 row 8 Sc, 2 Dec, 8 Sc = 18
23 row 8 Sc, Dec, 8 Sc = 17
24 row 7 Sc, Dec, 8 Sc = 16
Row 25 (2 Sc, Dec)*4 = 12
26 row 12 Sc
We cut the thread and fasten it.
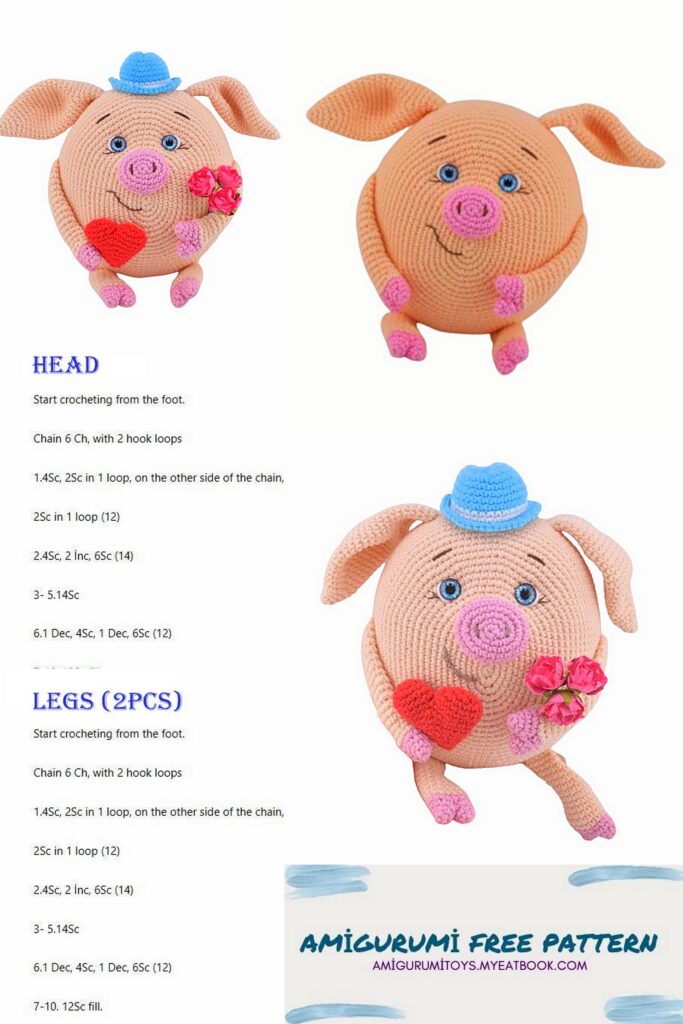
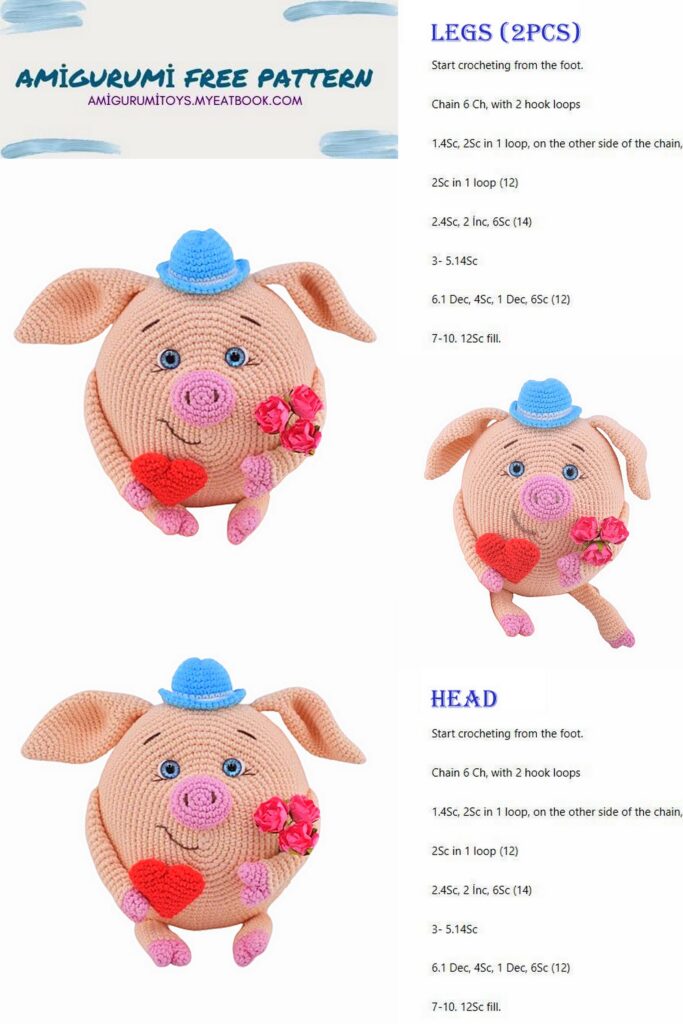
Legs
Left
First we knit the hoof with pink yarn
1 row 5 Sc in MR
Row 2 1 Sc, İnc, 2 Sc, İnc = 7
Row 3 3 Sc, inc, 2 Sc, inc = 9
Cut the thread and fasten it
We knit the second part in the same way, only we do not cut the thread.
We apply the two parts to each other and connect them by knitting 3 Sc, grabbing the loops of both parts. Transfer the marker to the first stitch of the 4th row 4th row (3 Sc, İnc)*3 = 15
Change the thread to the main one
5-6 row 15 Sc (2 rows)
Increases and decreases should be located along the edges of the leg. Adjust if necessary with offset loops.
Row 7 3 Sc, Dec, 10 Sc = 14
8 row 3 Sc, Dec, 9 Sc = 13
Row 9 3 Sc, Dec, 8 Sc = 12
10-11 row 12 Sc (2 rows)
12 row 3 Sc, İnc, 4 Sc, Dec, 2 Sc = 12
13 row 3 Sc, İnc, 5 Sc, Dec, 1 Sc = 12
14 row 4 Sc, İnc, 5 Sc, Dec = 12+1 Ch
15 row 10 Sc, Dec = 11
16 row 9 Sc, Dec = 10
We stuff the legs halfway, fold them in half and knit 5 Sc.
We cut the thread and fasten it.
Right leg
We knit the hoof, just like the left leg.
5-6 row 15 Sc (2 rows)
Increases and decreases should be located along the edges of the leg. Adjust if necessary with offset loops.
Row 7 10 Sc, Dec, 3 Sc = 14
8 row 10 Sc, Dec, 2 Sc = 13
Row 9 10 Sc, Dec, 1 Sc = 12
10-11 row 12 Sc (2 rows)
12 row 4 Sc, Dec, 5 Sc, inc = 12
Row 13 3 Sc, Dec, 5 Sc, Inc, 1 Sc = 12
Row 14 3 Sc, Dec, 5 Sc, Inc, 1 Sc = 12
15 row 3 Sc, Dec, 7 Sc = 11
Row 16 2 Sc, Dec, 7 Sc = 10 + 3 Sc
We stuff the legs halfway, fold them in half and knit 5 Sc.
We cut the thread and fasten it.
Hands
Right
We knit the hoof in the same way as the leg
After the 4th row, change the thread to the main one
5 row 15 Sc
Row 6 (3 Sc, Dec)*3 = 12
7-10 row 12 Sc (4 rows)
Decreases and increases should be located along the edges of the handle. Adjust if necessary with offset loops.
Row 11 2 Sc, 2 Dec, 3 Sc, 2 Inc, 1 Sc = 12
12 row 12 Sc
Row 13 1 Sc, 2 Dec, 3 Sc, 2 İnc, 2 Sc = 12
Row 14 (4 Sc, Dec)*2 = 10
Row 15 2 Dec, 3 Sc, 2 Inc, 1 Sc = 10
16 row 10 Sc
Row 17 2 Dec, 2 Sc, 2 inc, 2 Sc = 10
18 row Dec, 4 Sc, İnc, 3 Sc = 10
Row 19 Dec, 4 Sc, İnc, 3 Sc = 10 + 1 Ch.
20 row 4 Sc, inc, 3 Sc, Dec = 10
21 row 10 Sc
We stuff the handles halfway, fold them in half and knit 5 Sc.
We cut the thread and fasten it.

Left
From the 1st to the 10th row we knit the same as the right one.
Decreases and increases should be located along the edges of the handle. Adjust if necessary with offset loops.
Row 11 3 Sc, 2 Inc, 3 Sc, 2 Dec = 12
Row 12 12 Sc + 2 Ch.
Row 13 2 Sc, 2 Inc, 4 Sc, 2 Dec = 12
Row 14 (4 Sc, Dec)*2 = 10 + 2 Ch.
Row 15 2 Sc, 2 Inc, 2 Sc, 2 Dec = 10
Row 16 10 Sc +1 Ch.
Row 17 2 Sc, 2 İnc, 2 Sc, 2 Dec = 10 + 1 Ch.
18 row 3 Sc, inc, 4 Sc, Dec = 10
19 row 3 Sc, İnc, 4 Sc, Dec = 10 + 1 Ch.
20 row 3 Sc, İnc, 4 Sc, Dec = 10
21 row 10 Sc
We stuff the handles halfway, fold them in half and knit 5 Sc.
We cut the thread and fasten it.
Piglet
We knit with pink yarn.
1 row 6 Sc in MR
Row 2 4 Sc in one loop, 2 Sc, 4 Sc in one loop, 2 Sc = 12
Row 3 1 Sc, 3 İnc, 3 Sc, 3 İnc, 2 Sc = 18
4 row 2 Sc, 3 İnc, 6 Sc, 3 İnc, 4 Sc = 24
5 row 24 Sc
Row 6 24 Sc we knit behind the back p/p
Row 7 (2 Sc, Dec)*6 = 18 Sc we knit behind the back p/p
Row 8 (1 Sc, Dec)*6 = 12
Add a little filler.
Row 9 6 Dec = 6 8
We cut the thread, tighten the hole, fasten it and hide it.
Using brown thread (Vita cotton PELICAN) we embroider the nostrils between 2 and 3
in rows, make 3-4 stitches through the patch.
Tail
We knit with pink yarn.
We cast on 12 Ch and from the third from the hook we knit 2 Hdc into each loop.
We cut the thread and fasten it.
Body
1 row 6 Sc in MR
Row 2 4 Sc in one loop, 2 Sc, 4 Sc in one loop, 2 Sc = 12
Row 3 1 Sc, 3 İnc, 3 Sc, 3 İnc, 2 Sc = 18
4 row 2 Sc, 3 İnc, 6 Sc, 3 İnc, 4 Sc = 24
Row 5 2 Sc, (1 Sc, İnc)*3, 6 Sc, (1 Sc, İnc)*3, 4 Sc = 30
Row 6 2 Sc, (2 Sc, İnc)*3, 6 Sc, (2 Sc, İnc)*3, 4 Sc = 36
Row 7 3 Sc, (3 Sc, inc)*3, 6 Sc, (3 Sc, inc)*3, 3 Sc = 42
8 row 5 Sc, İnc, (4 Sc, İnc)*2, 10 Sc, İnc, (4 Sc, İnc)*2, 5 Sc = 48
Row 9 3 Sc, (5 Sc, inc)*3, 6 Sc, (5 Sc, inc)*3, 3 Sc = 54
Row 10 (6 Sc, inc)*3, 12 Sc, inc, (6 Sc, inc)*2, 6 Sc = 60
Row 11 3 Sc, (7 Sc, inc)*3, 6 Sc, (7 Sc, inc)*3, 3 Sc = 66 +1 Ch.
12 row 6 Sc, İnc, (8 Sc, İnc)*2, 14 Sc, İnc, (8 Sc, İnc)*2, 8 Sc = 72
If you are using the eyes on a safety mount, insert them between
11 and 12 rows, distance between attachment points 11 Sc.
Row 13 4 Sc, (8 Sc, inc)*3, 8 Sc, (8 Sc, inc)*3, 6 Sc = 78
Row 14 8 Sc, inc, (9 Sc, inc)*2, 18 Sc, inc, (9 Sc, inc)*2, 10 Sc = 84
Row 15 15 Sc, inc, (10 Sc, inc)*2, 16 Sc, inc, (10 Sc, inc)*2, 7 Sc = 90
16 row 11 Sc, İnc, 9 Sc, İnc, 10 Sc, İnc, 22 Sc, İnc, (10 Sc, İnc)*2, 12 Sc = 96
Row 17 17 Sc, inc, (12 Sc, inc)*2, 18 Sc, inc, (12 Sc, inc)*2, 7 Sc = 102
18 row 12 Sc, inc, (12 Sc, inc)*2, 23 Sc, inc, (12 Sc, inc)*2, 13 Sc = 108
Row 19 21 Sc, inc, (12 Sc, inc)*2, 14 Sc, inc, (12 Sc, inc)*2, 19 Sc = 114
Row 20 14 Sc, inc, (13 Sc, inc)*2, 28 Sc, inc, (13 Sc, inc)*2, 14 Sc = 120
21-24 row 120 Sc (4 rows). After the 24th row we knit 2 Ch. In the next row we knit the legs and arms.
25 row 19 Sc, 5 Sc with left leg, 13 Sc, 5 Sc with right leg, 19 Sc, 5 Sc with right hand, 49 Sc, 5 Sc with left hand = 120
We check whether the legs and arms are tied symmetrically. Adjust if necessary with offset loops.
26-32 row 120 Sc (7 rows)
Row 33 (18 Sc, Dec)*6 = 114
Row 34 21 Sc, Dec, (12 Sc, Dec)*2, 14 Sc, Dec, (12 Sc, Dec)*2, 19 Sc = 108
Row 35 (16 Sc, Dec)*6 = 102
In the next row we knit the tail.
Row 36 17 Sc, Dec, 9 Sc, 3 Sc with tail, Dec, 12 Sc, Dec, 18 Sc, Dec, (12 Sc, Dec)*2, 7 Sc = 96
Check whether the tail is tied evenly; if necessary, adjust with offset loops.
Row 37 (14 Sc, Dec)*6 = 90
Row 38 15 Sc, Dec, (10 Sc, Dec)*2, 16 Sc, Dec, (10 Sc, Dec)*2, 7 Sc = 84
Row 39 (12 Sc, Dec)*6 = 78
Stuff as you knit. It should be an oval.
Row 40 4 Sc, (8 Sc, Dec)*3, 8 Sc, (8 Sc, Dec)*3, 6 Sc = 72
41 rows (10 Sc, Dec)*6 = 66
42 row 3 Sc, (7 Sc, Dec)*3, 6 Sc, (7 Sc, Dec)*3, 3 Sc = 60
Row 43 (8 Sc, Dec)*6 = 54
44 row 3 Sc, (5 Sc, Dec)*3, 6 Sc, (5 Sc, Dec)*3, 3 Sc = 48
Row 45 (6 Sc, Dec)*6 = 42
46 row 3 Sc, (3 Sc, Dec)*3, 6 Sc, (3 Sc, Dec)*3, 3 Sc = 36
47 row 2 Sc, (2 Sc, Dec)*3, 6 Sc, (2 Sc, Dec)*3, 4 Sc = 30
48 row 2 Sc, (1 Sc, Dec)*3, 6 Sc, (1 Sc, Dec)*3, 4 Sc = 24
49 row 2 Sc, 3 Dec, 6 Sc, 3 Dec, 4 Sc = 18
Row 50 1 Sc, 3 Dec, 3 Sc, 3 Dec, 2 Sc = 12
51 row 6 Dec
We don’t tighten the hole yet.
Assembly and design
Use pins to mark the location of the eyes. The pins should be placed between rows 11 and 12 and between pins 11 Sc. We put additional pins to determine the center. We fold the ears as shown in the photo.
We attach the ears to the head and secure with pins. The ears are placed from row 25 and between the ears of 16 Sc. We sew the ears with a thin thread in the color of the body, first along the top, then along the bottom. We fasten the threads and hide them.
We make tightening for the eyes.
Take a long needle and a long thread in the same color as the body.
We insert the needle into the hole left and bring it into the right eye, slightly stepping back from the pin to the right. We insert the needle into the right eye, slightly moving away from the pin to the left, and insert it into the hole.
We insert the needle into the hole left and bring it into the left eye, slightly stepping back from the pin to the left. We insert the needle into the left eye, slightly moving away from the pin to the right, and bring it out into the hole.
We tighten both threads; if necessary, you can tighten it again.
We tie the threads together, cut them off and hide them.
Glue on the eyes.
We place the patch, the upper part should be between the 8th and 9th rows. Sew with a thin pink thread behind the remaining half-loops of the 7th row.
We embroider the whites with white thread (I have Yarnard jeans plus).
We embroider the rays of a smile near the eyes with brown thread (Vita cotton PELICAN). 15
We embroider the eyebrows with brown thread in three stitches (Vita cotton PELICAN).
First we lay out the smile with a thread, then we repeat this contour
with pins. We pass with a thin brown thread (Vita cotton PELICAN), making stitches from pin to pin and in the opposite direction, bringing the needle to the same points. I eat it from top to bottom, bringing the needle under the stitch. For each stitch there are 2 or 3 twists.
Thanks to this, the smile line will be smooth. We take the thread into the hole left, tie it and hide it.
We hide all the threads in the hole left; if necessary, add filler and tighten the hole. We fasten the thread and hide it.
We place our hands on the body. The left hand goes slightly lower than the right.
We fix it with pins and sew it to the body with a thin thread in the color of the body after the hoof. We tie the threads together and hide them.
Hat
To make sure there was a recess in the hat, I hemmed it on the back side, 0.5-0.7 cm from the edge.
We try on the hat and secure it with pins. Sew to the thin head
thread in the color of the body and put the filler inside so that it
kept its shape. We tie the threads together and hide them. 18
heart
We knit with red yarn.
1 row 6 Sc in MR
Row 2 4 Sc in one loop, 2 Sc, 4 Sc in one loop, 2 Sc = 12
Row 3 (3 Sc, İnc)*3 = 15
We cut the thread and fasten it.
We knit another half, but do not cut the thread, but knit an additional 3 loops.
We apply the two parts to each other and connect them by knitting 1 Sc, grabbing the loops of both parts. Transfer the marker to the first stitch of the 4th row.
Row 4 (5 Sc, Dec)*4 = 24
5 row 24 Sc
Row 6 3 Sc, Dec, (6 Sc, Dec)*2, 3 Sc = 21
Row 7 (5 Sc, Dec)*3 = 18
Row 8 2 Sc, Dec, (4 Sc, Dec)*2, 2 Sc = 15
Row 9 (3 Sc, Dec)*3 = 12
Stuff it lightly.
Row 10 1 Sc, Dec, (2 Sc, Dec)*2, 1 Sc = 9
Row 11 (1 Sc, Dec)*3 = 6
We cut the thread and tighten the hole, fasten it, hide it.
We sew the heart to the body with a thin thread.