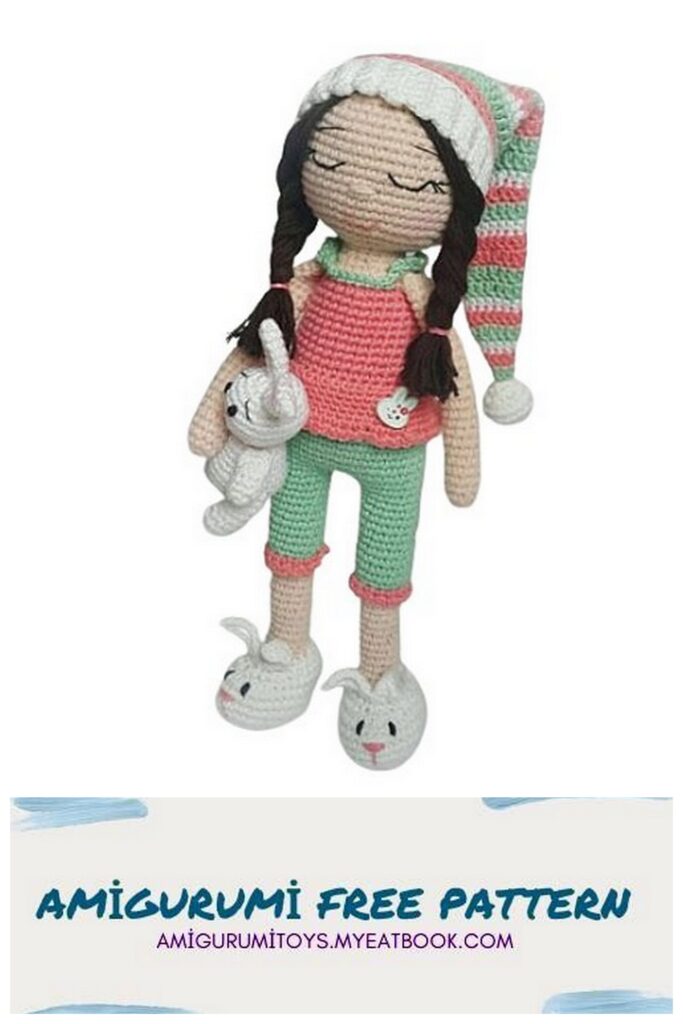
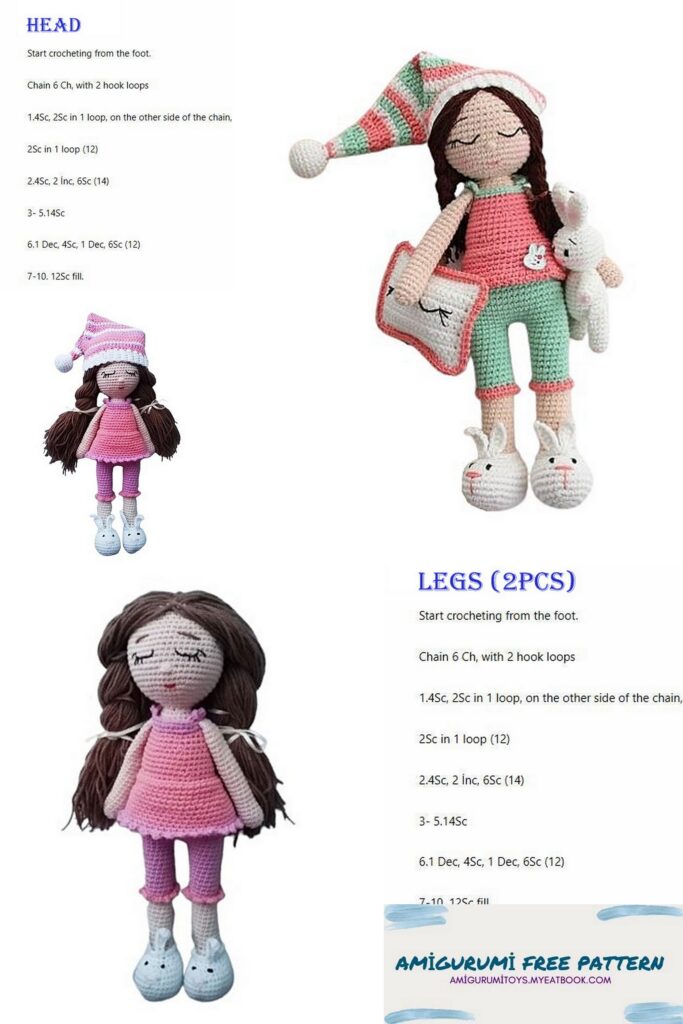
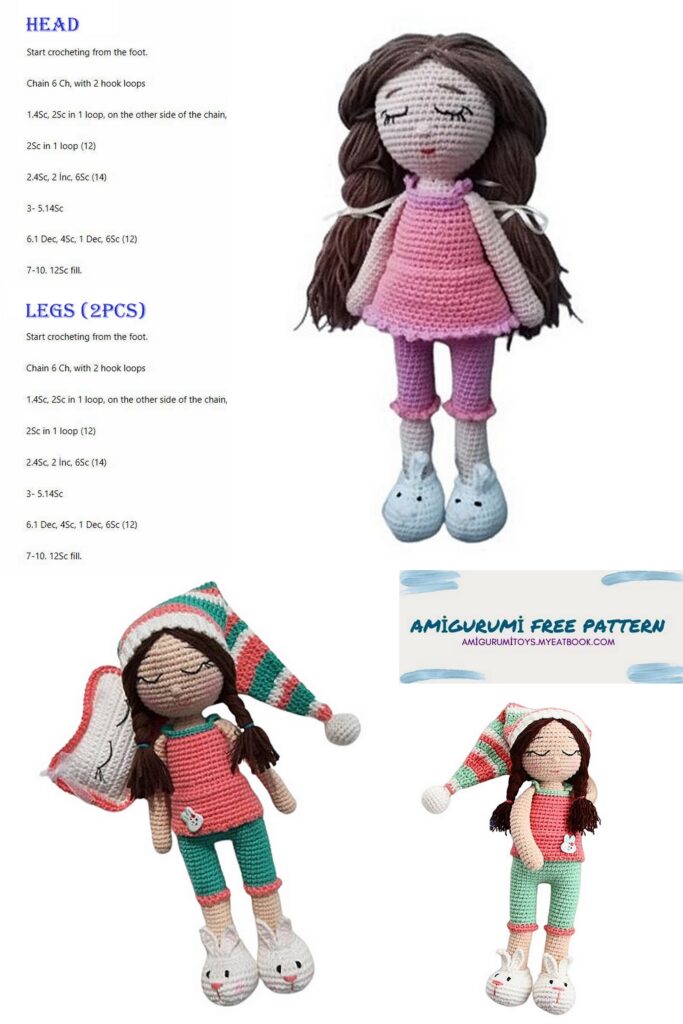
Enter the realm of sweet dreams and coziness with our endearing creation, the Amigurumi Sleepy Baby! If you’re a fan of adorable and huggable crochet projects, you’re in for a delightful treat. This sleepy baby isn’t just a project; it’s a cuddly companion designed to bring warmth and comfort. Whether you’re a seasoned crocheter or just starting, our free pattern provides detailed instructions to create your own sleepy baby, complete with dreamy vibes.
Our Amigurumi Sleepy Baby crochet pattern is crafted to be accessible and enjoyable for creators of all skill levels. With straightforward steps and accompanying images, crafting your own sleepy baby has never been more delightful.
Required materials and tools:
-Yarn for knitting Scops Owls – semi-cotton ALIZE Cotton Gold composition
yarn: Cotton-55%, Acrylic-45%
Body color No. 382 (beige)
For shoes – color No. 55 (white)
For clothes – I have two shades of pink color No. 33 and color No. 98
Another option No. 287 (blue) No. 33 (pink)
Hook No. 2.5
For hair Pekhorka “Beaded”
-Filler – holofiber
-eyes on a secure mount 12 mm
-Sewing needle, scissors, pins, knitting marker (you can just use thread in a contrasting color)
Using the specified materials, the Scops Owls doll is approximately 30-31 cm in size.
All parts are knitted in a spiral and stuffed during the knitting process. If something does not need to be stuffed, or if it is not filled completely, I will additionally indicate.
The color change occurs in the last stitch of the row.
Abbreviations
MR – amigurumi ring
sc – single crochet
ch – air loop
inc – increase
dec – decrease
DC – double crochet
ss – connecting post
(…) – the number in brackets means the number of loops in the row
(…)*X – repeat X times indicated in brackets
Handles 2 pcs.
We start with the yarn of the body
colors
1- 6 sc in MR (6)
2- 6 inc (12)
3-22– 12 sc
23– (4sc, dec)*2 times (10)
24–10 sc
25 – (3 sc, dec) * 2 times (8)
We stuff the arms halfway, do not stuff the upper part. Fold the handle in half and connect it, knitting 3 sc.
Fasten the thread and cut it.
We knit the second hand in the same way
Legs and body
We start with white.
1- 8 ch., from the 2nd loop from the hook
2- 3 sc in 1 loop, 5sc, 3 sc in 1 loop, 5sc (16)
3 – 3 inc., 5 sc., 3 inc., 5 sc. (22)
4 – (1 inc, 1sc) *2 rubles, 1 inc., 6 sc, (1 inc, 1sc) *2 rubles, 1 inc., 6 sc (28)
5- (1 inc, 2 sc,) * 2 rubles, 1 inc., 7sc, (1 inc, 2 sc,) * 2 rubles, inc., 7sc (34)
6-9 – 34 sc
10 – 20 sc., 4 dec., 6 sc. (30)
11 – 16 sc., (1 dec., 1 sc)* 3 times, 1dec., 3 sc (26)
12 – 5 sc, 1 dec., 6 sc., (1 dec., 1 sc)* 3 times, 1dec., 2 sc (21)
13–21 sc., knit behind the front half-loops. Fasten the thread, cut.
Change the color to beige (flesh)
We return to 13 p.m. (now this row will count as 14 rubles)
We knit behind the back walls as follows:
14 – 12 sc., (1 dec., 1sc) * 3 times (18)
15- 10 sc., (1 dec., 1sc) * 2 times, 1 dec. (15)
16-26–15 sc.

Shoe design.
We knit ears.
1 – 8 ch., from the 2nd loop from the hook
2 – 1 sc, 1 HDC, 2 DC, 1 HDC, 1 sc, sl-st tie 4 pcs.
Sew the ears to the top of the shoes. You can sew between rows 12 and 13 or between rows 11 and 12 of shoes.
Now we embroider the eyes and nose.
For the eyes, use needles to mark the place of embroidery. You can embroider the eyes in any way. I made a triple yarn over on the needle and tightened it.
Now we embroider the nose with pink thread.
We embroider at our discretion, you can make the nose small, you can embroider more
We continue to knit the leg
Change the color to the one we knit the pants with.
27 – 4 sc, 1 inc., 6 sc, 1 inc., 3 sc (17)
28 -17 sc for rear half loops
29-38 – 17 sc
We knit the second leg in the same way, but we don’t knit the connecting post and don’t cut the thread!
Fill the legs with holofiber.
Now we connect the legs into the body.
Body
We continue to knit with yarn the color of the panties.
In order for the feet to be parallel to each other, you need to finish knitting the second leg strictly to the side in the center of the inside of the leg.
We connect the legs: 4 ch, sl-st at the base of the last column of the first leg, 17 sc on the first leg, 4 sc on the chain of ch, 17 sc on the second leg, 4 sc on the reverse side of the chain ch. (42)
We mark the beginning of a new row.
But in order not to change colors from the front of the product, it is better to knit another 17 sc and start the row on the back of the toy.
39 –48 r. – 42 sc.
49 – knit 42 sc through the front half loops, fasten and cut the thread.
Change the thread color to beige (body color)
50- Return to row 49 and knit sc with beige thread in the back half loops, making decreases on the sides (40)
51-53 – 40 sc.
Change the color to the one we are knitting the blouse with.
54 – 40 sc.
55 – 40 sc for rear half loops
56 –( 8sc, 1 dec )* 4 times (36)
57 – 59 – 36 sc.
60 – (4 sc., 1 dec)* 6 times (30)
61-63 – 30 sc.
Change the color to flesh color.
64 – for the back half loops (3 sc, 1 dec.)* 6 times (24)
In the next row we knit handles
65 – distribute the loops evenly so that there are 9 sc on the back and front, and 3 sc on the sides (to connect the handles).
66 – (2 sc., 1 dec.)*6 times (18)
67 – 18 sc.
68 – (1 sc, 1 dec.)* 6 times (12)
69 – 12 sc.
Next we continue knitting, knitting the head.
But before we start knitting the head, we need to design the dress, collar and panties.
To knit a dress, we return to row 55.

1 skirt option.
1 – For the front half-loops we knit 40 sc with a thread of the color of the dress.
2 – We knit the next row, making increases on the sides. (42)
3 – 42 sc,
4 – make increases on the sides (44)
5 – 44 sc.
6 – knit as follows: (2 ch., 1 sc.)*
repeat until the end of the row. Fasten the thread and cut it off.
This option is offered by the author of the toy. (on the picture).
But I prefer longer pajamas. You choose the option that is closer to you.
Option 2 From 1 to 5 rows the same as in the first option.
6 – make increases on the sides (46)
7 -46 sc
8 – make increases on the sides (48)
9 -48 s c
10 – make increases on the sides (50)
11 -50 sc
12 – we make one increase each in front and behind (52)
13 -52 sc
Change the thread to blue (the color of the pants)
14- knit 52 sc
15- tie as follows: 2 ch., 1 sc. Repeat this way until the end of the row. Fasten the thread and cut it off.
Or you can finish the skirt by knitting a picot pattern: (2 ch., 1 sl-st in the same loop, sc)* repeat until the end (I finished with a picot pattern).
The photo shows all the finishing options for the dress. Choose yours.
We tie the top of the dress:
Returning to row 64:
We knit the front walls with blue thread. Since the beginning of the row may not be the same for you and me, so make sure that 10 sc are knitted in front and back. Under the handles, 2 loops remain unknitted.
So, we knit as follows:
1 – 8 sc, 5 ch., then bending around the handle from above and leaving 2 loops under it unknitted, we knit in front 10 sc., 5 ch. on the second hand, 2 sc.
2 -8 sl-st., we knit along air loops as follows: 2ch., 1 sc, 2 ch., sc, 2 ch., then 10 sl-st, on the second hand we knit 2ch., 1 sc, 2 ch. , sc, 2 ch. and 2 sl-st. Fasten the thread and cut it.
(In my opinion, this was the most difficult stage in knitting the entire doll).
The whole body is ready!
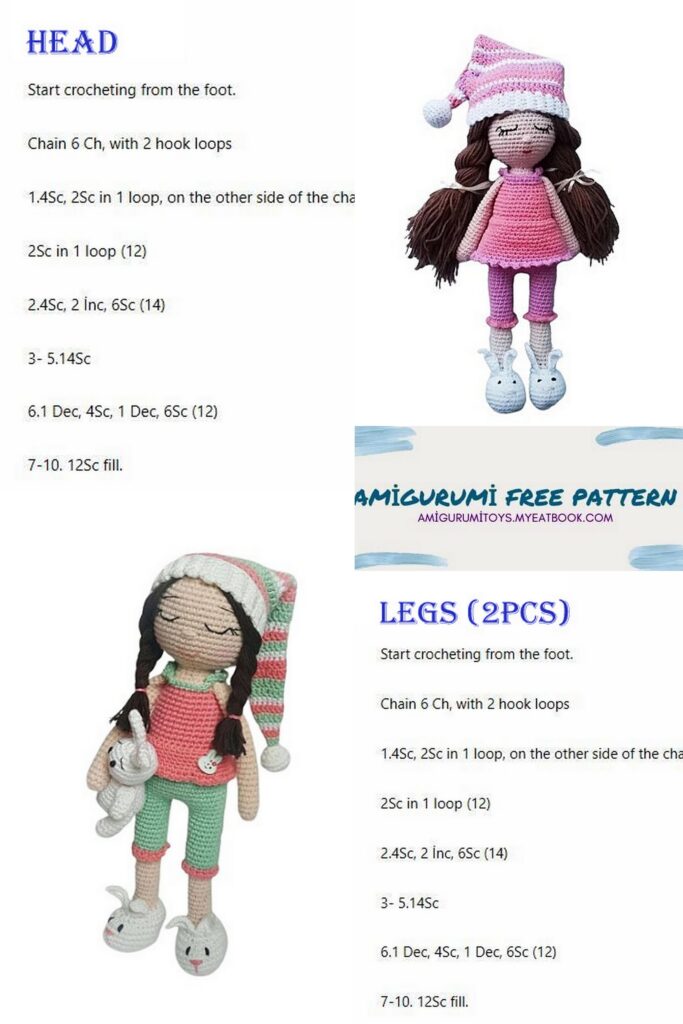
Knitting the head
1 option
70 – 12 increments (24)
71 – (2 sc, 1 inc.)* 8 (32)
72 – (3 sc, 1 inc.)* 8 (40)
73 – (4 sc, 1 inc.)* 8 (48)
74 – (7 sc, 1 inc.)* 6 (54)
75-84 – 54 sc
85 – (7sc, dec)*6 (48)
86 – (6 sc, dec)*6 (42)
87 – 42 sc
88 – (5 sc, dec)*6 (36)
89 – (4 sc, dec)*6 (30)
90 – (3 sc, dec)*6 (24)
91 – (2 sc, dec)*6 (18)
92 – (1 sc, dec)*6 (12)
93 – 6 decreases (6)
Secure the thread with a needle.
We fill the head with filler as we knit.
To hold your head tighter, insert cotton swabs inside. You will need 3-4 sticks.
Wrap them with double-sided tape or adhesive tape.
Option 2 with the top of the head (like the author’s)
According to the number of loops, everything is knitted in the same way as in the first version, we only change the color of the thread, from 70 r to 88 row we knit with a flesh-colored thread
89 – 93 – knit with hair color thread.
Secure the thread with a needle.

We fasten the hair.
We will secure the hair by pulling a strand through the posts, securing with the next strand.
I usually attach dolls’ hair starting from the top of the head and in a spiral.
But for the Scops Owls doll, we will attach the hair not in a spiral, but starting with a parting in the middle. It’s so convenient to divide your hair into two parts and braid it.
So, to begin with, we make strands of two lengths – for the top and bottom, so that the hair turns out to be approximately the same length. (I wind the yarn on a book, making long and short strands)
Before attaching, you need to mark the hairline with pins.
First we attach the strands in the middle of the head
-then in a column at the bottom.
– on the sides along the hairline in a checkerboard pattern
-now we attach the hair in the remaining part of the head through a row and through a column.
If we attach row after row to each column, then the hair can turn out to be very thick and difficult to braid.
And it will be difficult for the head to support the weight of all the hair.
To attach hair, you can use your own method.
Let’s create the face.
We embroider the eyes and nose.
Maybe a mouth.
Knitting a cap
The cap starts with an elastic band.
The elastic is knitted in sc turning rows using the rear half loops.
For the elastic, dial in white 5 ch.+ 1 ch. for lifting We knit in rotating rows.
1 row. knit 5 sc, 1 ch., turn
Next we knit the back half loops. In this way, knit 54 rows. Sew the elastic using a needle.
Next, dial 54 DC along the top of the part
2–54 DC
3 – white 54 sc
4-5 rows – 54 DC
6- (7 DC, 1 dec)* 6 (48)
7 – (10 DC, 1 dec)* 4 (44)
8 – white 44 DC
9 – (9 DC, 1 dec)* 4 (40)
10 – then we make decreases on the sides (one on each side) (38)
11 – white 38 sc
12 – decreases on both sides (36)
13 – 36 DC
14 – decreases on both sides (34)
15 – decreases on both sides (32)
16 – (in white) decreases on both sides (30) knit DC
17 – decreases on both sides (28)
18 – (5 DC, 1 dec)* 4 (24)
19 – white (4 sc, 1 dec)* 4 (20)
20 – decreases on both sides (18)
21 – decreases on both sides (16)
22 – decreases on both sides (14)
23 – decreases on both sides (12)
24 – decreases on both sides (10)
25 – decreases on both sides (8)
26 – (in white) decreases on both sides (6)
Fasten the thread, cut it off, leaving a little for sewing.
When knitting, try it on your doll’s head. The width of the head may vary, much depends on the thickness of the hair and the yarn used for the hair.
Look carefully in the description:
We knit DC with the main color. In the place where decreases are made on both sides, DCs are also knitted.
As a rule, SC is knitted in white and only one row at a time.
Attention, in the 9th and 16th rows we knit with white DC.

Pompon.
Knitting in white
1 – 6 sc in MR (6)
2 – 6 inc (12)
3 – (1 sc, 1 inc)* 6 (18)
4 – (2 sc, 1 inc)* 6 (24)
5-7 – 24 sc
8 – (2 sc, 1 dec.)* 6 (18)
9 – (1 sc, 1 dec.)* 6 (12)
10 – 6 decreases (6)
As you knit, lightly fill the pompom with filler.
P rush to the cap.