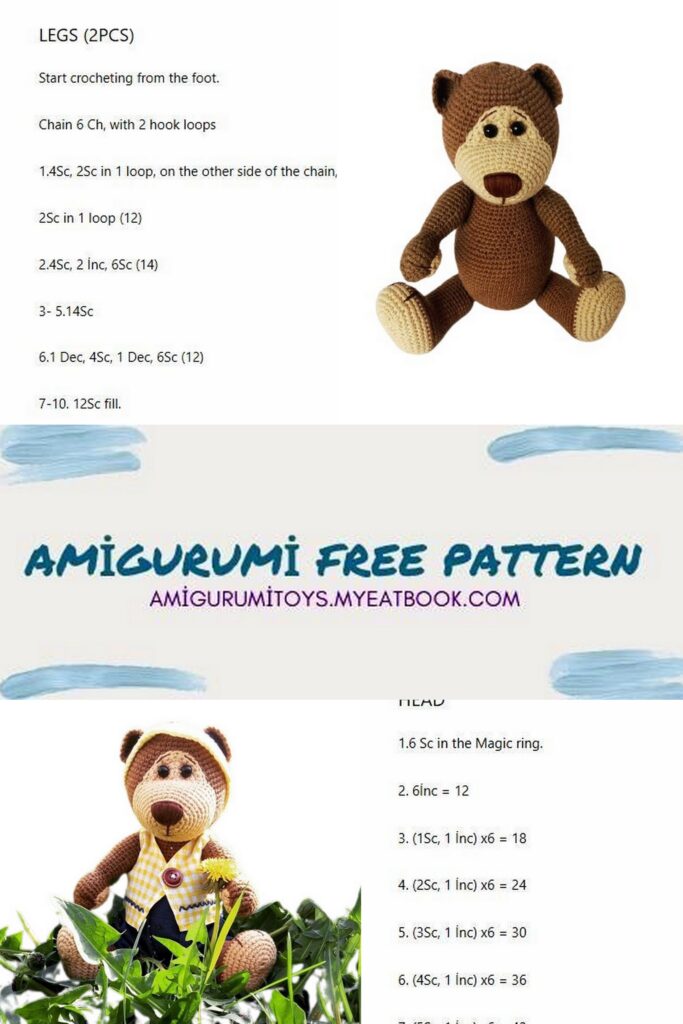
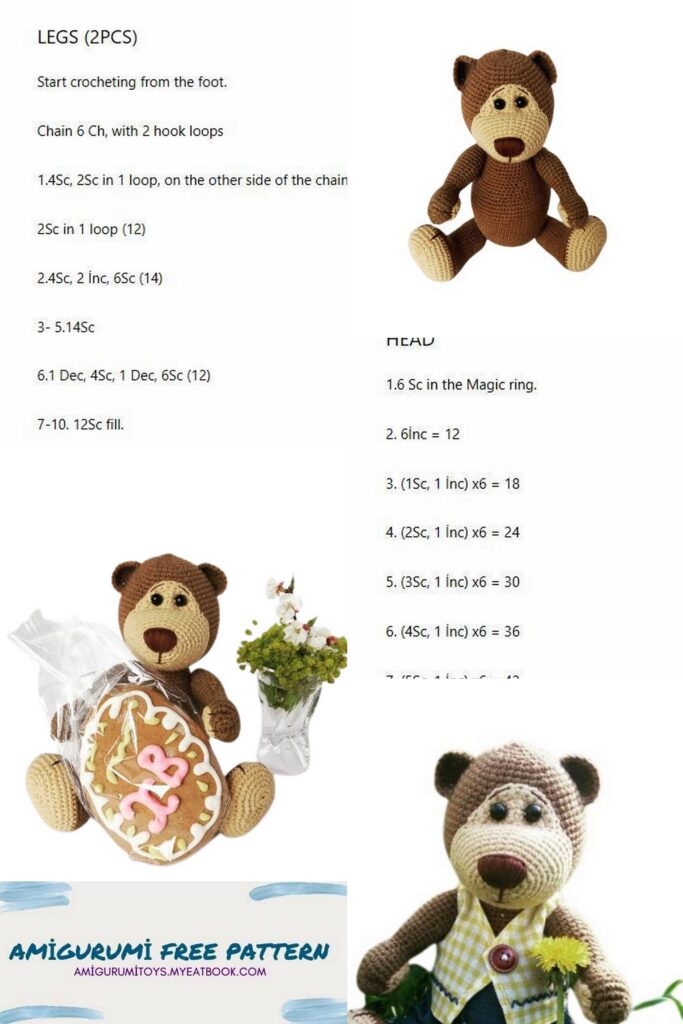
SYMBOLS:
Ch – air loop
Sc – single crochet
İnc – increase
Dec – decrease
SL-ST – connecting post
()* 6 – the number of repetitions of the scheme in brackets
() – the number of loops in a row
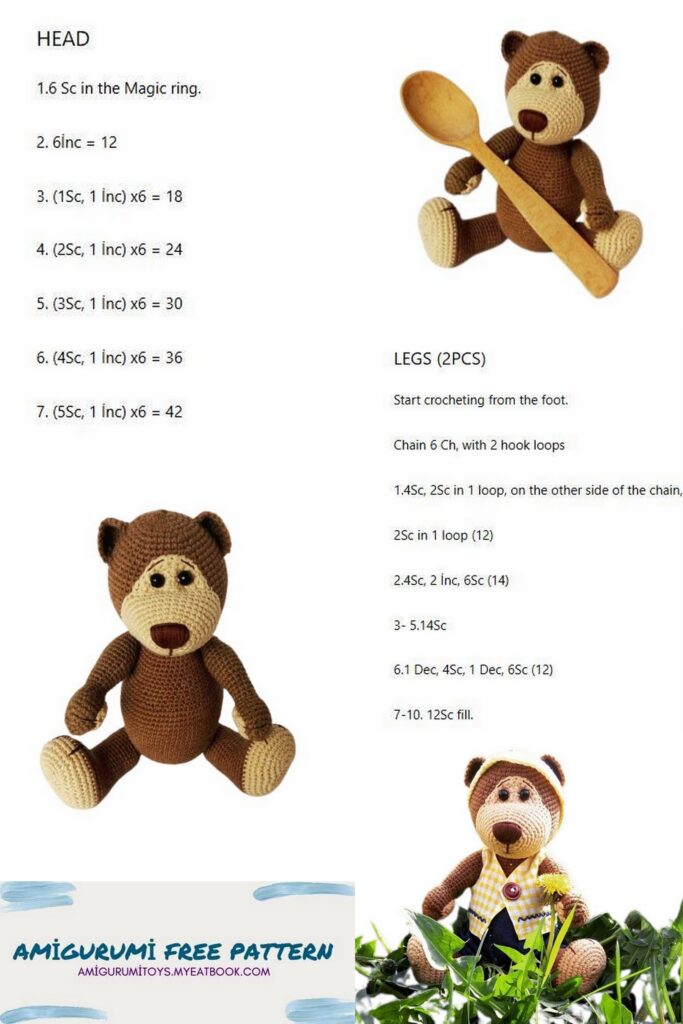
HEAD (main color):
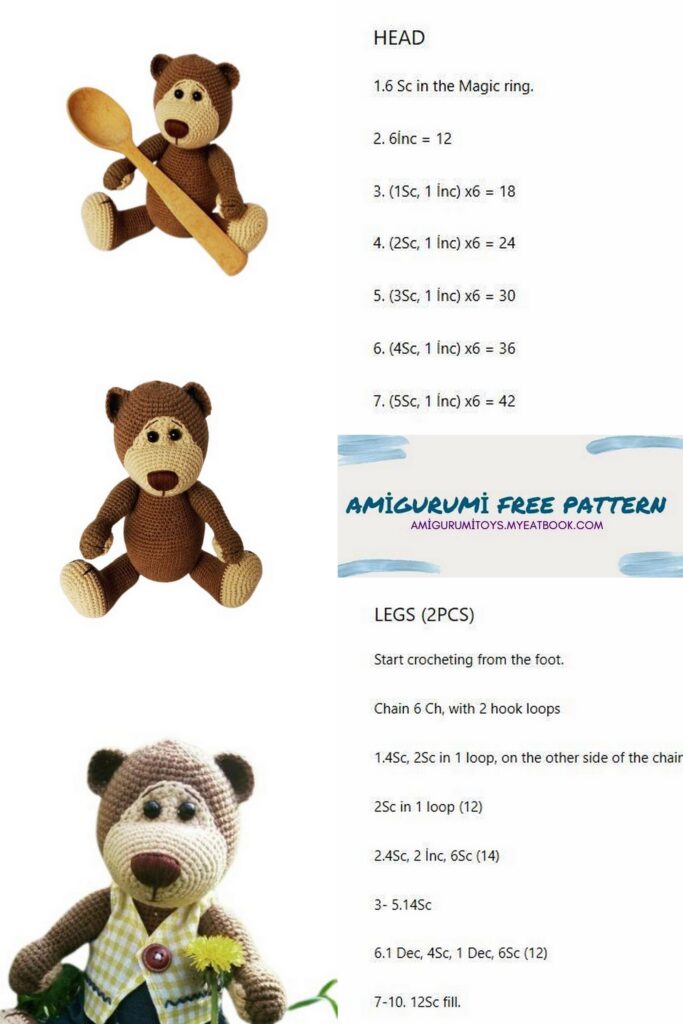
1 row – in MR 6 sc (6)
2 row – ( inc ) * 6 (12)
3 row -( sc, inc) * 6 (18)
4 row – (2sc, inc) * 6 (24)
5 row – (3sc, inc) * 6 (30)
6 row – (4sc, inc) * 6 (36)
7 row – 36sc (36)
8 row – (5sc, inc) * 6 (42)
9 row – 42sc (42)
10 row – (6sc, inc) * 6 (48)
11 row – 48sc (48)
12 row – (7sc, inc) * 6 (54)
13 row – (8sc, inc) * 6 (60)
14 row – (9sc, inc) * 6 (66)
15 row -24 row (10 rows) we knit without changes 66sc (66)
25 row – (9sc, dec) * 6 (60)
26 row – (8sc, dec) * 6 (54)
27 row – (7sc, dec) * 6 (48)
28 row – (6sc, dec) * 6 (42)
29 row – (5sc, dec) * 6 (36)
30 row – (4sc, dec) * 6 (30)
31 row – (3sc, dec) * 6 (24)
MUZZLE (beige):
1 row – in MR 6sc (6)
2 row – (inc) * 6 (12)
3 row – (sc, inc) * 6 (18)
4 row – 5sc, inc, 5sc, inc, 5sc, inc (21)
5 row – 6sc, inc, 5sc, 2inc, 6sc, inc, (25)
6 row – 6sc, inc, 3sc, inc, 3sc, inc, 3sc, inc, 6sc (29)
7 row – 7sc, inc, 4sc, inc, 4sc, inc, 4sc, inc, 6sc (33)
8 row – 7sc, inc, 5sc, inc, 5sc, inc, 5sc, inc, 7sc (37)
9 row – 9sc, inc, 5sc, inc, 5sc, inc, 5sc, inc, 9sc (41)
10 row – 10sc, inc, 6sc, inc, 6sc, inc, 6sc, inc, 10sc (45)
11 row – 10sc, inc, 7sc, inc, 7sc, inc, 7sc, inc, 10sc (49)
12 row – knit without changes 49sc
BODY:
1 row – in MR 6sc (6)
2 row – ( inc ) * 6 (12)
3 row -( sc, inc) * 6 (18)
4 row – (2sc, inc) * 6 (24)
5 row – (3sc, inc) * 6 (30)
6 row – (4sc, inc) * 6 (36)
7 row – (5sc, inc) * 6 (42)
8 row – (6sc,inc)*6 (48)
9 row – (7sc, inc) * 6 (54)
10 row – (8sc, inc) * 6 (60)
11 row – (9sc, inc) * 6 (66)
12 row – (10sc, inc) * 6 (72)
13 row – (11sc, inc) * 6 (78)
14 row -26 row (13 rows) we knit without changes 78sc (78)
27 row – 27sc (dec, 2sc) * 6, 27sc (72)
28 row – 24sc (dec, 2sc) * 6 24sc (66)
29 row – 66 sc unchanged (66)
30 row – (9sc, dec) * 6 (60)
31 row – 60sc (60)
32 row – (8sc, dec) * 6 (54)
33 row-34 row – 54sc (54)
35 row – (7sc, dec) * 6 (48)
36 row – 48sc (48)
37 row – (6sc, dec) * 6 (42)
38 row – 42sc (42)
39 row – (5sc, dec) * 6 (36)
40 row – 36sc (36)
41 row – (4sc, dec) * 6 (30)
42 row – 30sc (30)
We leave the thread I’m sewing on
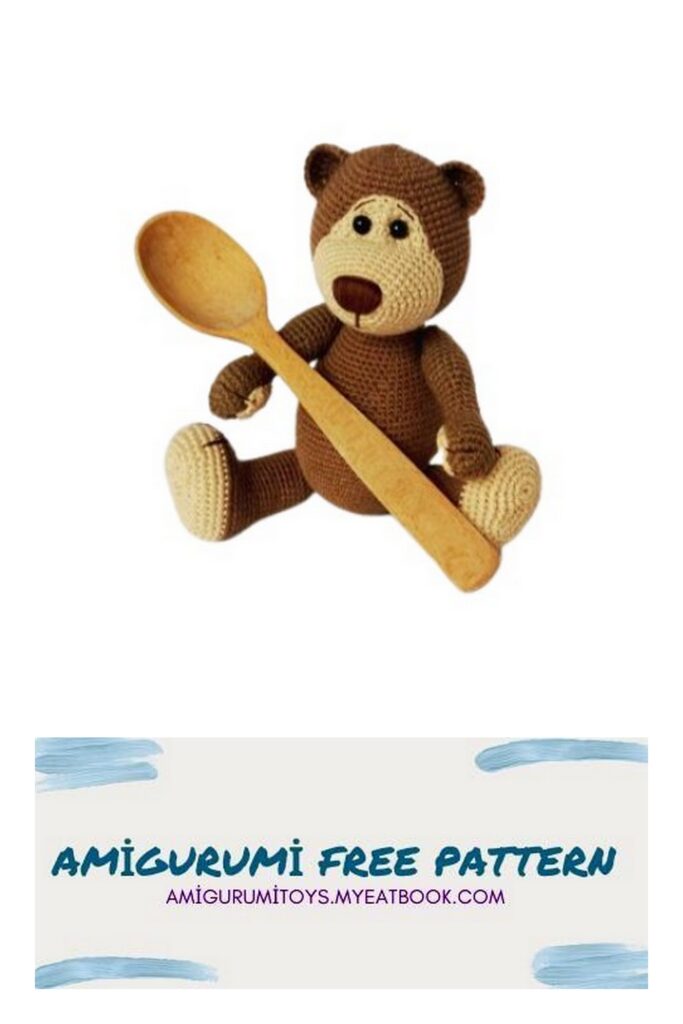
PAWS UPPER (2 parts):
1 row – in MR 6sc (6)
2 row – ( inc ) * 6 (12)
3 row – 4sc in one loop, 5sc, 4sc in one loop, 5sc (18)
4 row –( inc, sc)*2, 6sc, (inc, sc,)*2, 4sc (22)
5 row – 5sc, inc, 4sc, inc, 5sc, inc, 4sc, inc (26)
6 row – 22sc, dec, 2sc (25)
7 row – 10sc, dec, 11sc, dec (23)
8 row – 10sc, dec, 9sc, dec (21)
9 row – 9sc, dec, 8sc, dec, 8sc, dec (18)
here we have a long row (one and a half circles, if you use a marker, move it to the end of this row)
10 row – (sc, dec) * 6 (12)
11 row – 12 sc knit without changes (12)
12 row – (3sc, inc) * 3 (15)
13 row – 14 row (2 rows) 15sc knit without changes (15)
15 row – (4sc, inc) * 3 (18)
16 row – 17 row (2 rows) 18sc knit without changes (18)
18 row – (5sc, inc) * 3 (21)
19 row – 22 row (4 rows) -21sc knit without changes (21)
23 row – 17sc, dec, 2sc (20)
24 row – 16sc, dec, 2sc (19)
25 row – 15sc, dec, 2sc (18)
26 row – 14sc, dec, 2sc (17)
27 row – 13sc, dec, 2sc (16)
28 row – (2sc, dec) * 4 (12)
29 row – dec * 6 (6)
Close knitting, hide the thread inside
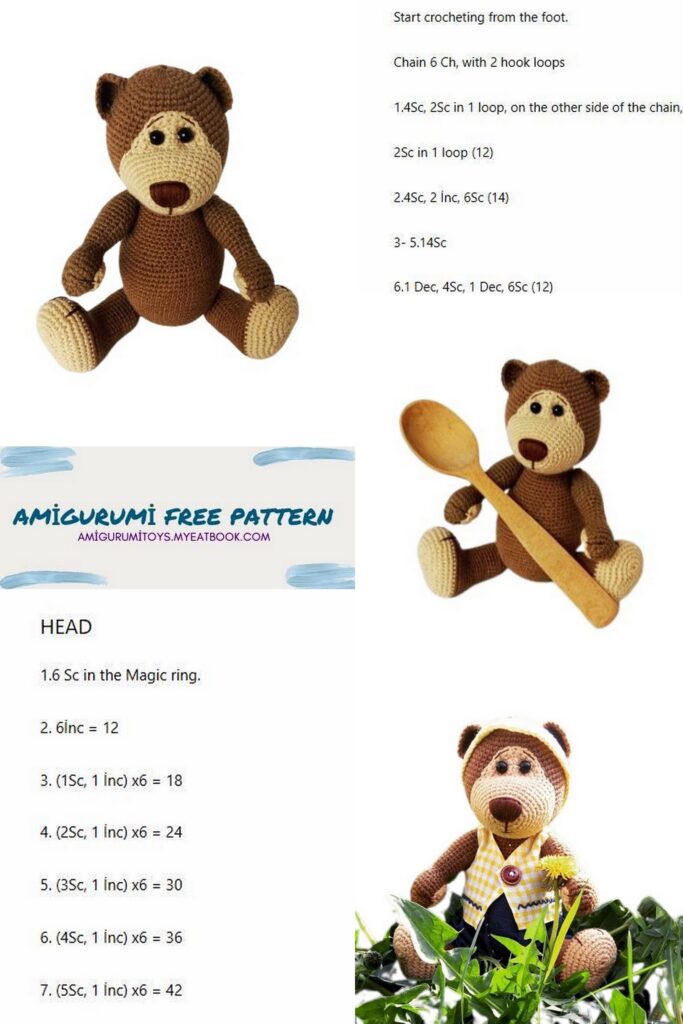
LOWER RIGHT PAWS (begin in beige):
1 row – in MR 6sc (6)
2 row – ( inc ) * 6 (12)
3 row – 5ch, start knitting in the second loop, 7sc, inc, 2sc, inc, 2sc, inc, 4sc, inc (23)
4 row – sc, inc, sc, inc, 3sc, inc, 2sc, inc, 3sc, inc, 2sc, inc, 3sc, inc, sc (30)
5 row – 2sc, inc, 5sc, inc, 3sc, inc, 2sc, inc, 4sc, inc, 2sc, inc, 6sc (36)
6 row – sc, inc, 2sc, inc, 2sc, inc, 4sc, inc, 3sc, inc, 3sc, inc, 4sc, inc, 3sc, inc, 4sc, inc, sc (45)
7 row – 3sc, inc, 2sc, inc, 5sc, inc, then we knit to the end of the row without changes 32sc (48)
8 and 9 row (2 rows) 48 sc (48)
We change the thread to the main color, if your end of the row has shifted, knit the required number of loops to change the thread in the center of the heel
10 row and 11 row (two rows) 48sc (48)
12 row – 15sc, ( dec, 2sc) * 5, 13sc (43)
13 row – 14sc (dec, sc) * 5, 12sc, dec (37)
14 row – dec, 12sc, (dec) * 5, 13sc (31)
15 row – 10sc, (dec) * 5, 11sc (26)
16 row – 25 row (10rds) – 26sc
26 row – 6sc, dec, 18sc (25)
27 row – 6sc, dec, 17sc (24)
28 row – 5sc, dec, 17sc (23)
29 row – 5sc, dec, 16sc (22)
30 row – 5sc, dec, 15sc (21)
31 row – 5sc, dec, 14sc (20)
32 row – 5sc, dec, 13sc (19)
33 row – 5sc, dec, 12sc (18)
34 row – 5sc, dec, 11sc (17)
35 row – 5sc, dec, 10sc (16)
36 row – (2sc, dec) * 4 (12)
37 row – dec * 6 (6)
We tighten, cut the thread, hide it inward, bring it out anywhere (preferably from the inside of the leg) and tighten it so that we have a neat end of knitting.
LOWER PAWG LEFT (we start with a beige thread):
From the 1st row to the 26th row we knit in the same pattern as in the right paw
26 row – 21sc, dec, 3sc (25)
27 row – 20sc, dec, 3sc (24)
28 row – 20sc, dec, 2sc (23)
29 row – 20sc, dec, sc (22)
30 row – 20sc, dec (21)
31 row – 19sc, dec (20)
32 row – 18sc, dec (19)
33 row – 17sc, dec (18)
34 row – 16sc, dec (17)
35 row – 15sc, dec (16)
36 row – (2sc, dec) * 4 (12)
37 row – dec * 6 (6)
We tighten, cut the thread, hide it inward, bring it out anywhere (preferably from the inside of the leg) and pull it up so that us knitting end was neat.
EARS (main color) and UPPER Muzzle (beige) – only three details:
1 row – 6sc in MR, do not close the circle with a connecting loop, then knit with turning rows
2 Row – inc st, starting in first st, 6sc (6)
3 row – lifting loop, starting in the first loop 5sc, increase in the last loop (7)
4 row – lifting loop, starting in the first loop 6sc, increase in the last loop (8)
5 row – lifting loop, starting in the first loop 7sc, increase in the last loop (9)
6 row – lifting loop, starting in the first loop 8sc, in the last loop increase 10)
5 row – lifting loop, starting in the first loop 9sc, increase in the last loop (11)
Leave the thread for sewing
We tighten the parts for the ears with the thread from which the amigurumi ring was formed, the part for the muzzle does not need to be pulled together.
PALM PILLOWS (beige) 2 parts:
1 row – in MR 6 sc (6)
2 row – ( inc ) * 6 (12)
3 row – (4ch, in the next loop 1sc (as if attaching air loops to the ring), 1sl-st) * 3
ASSEMBLY:
Before sewing the pieces together, pin them with a needle to make sure they are even.
We sew the head to the body, (we insert the head into the body, we sew it for the last row of the body and for the penultimate row of the head, we insert the needle under each loop of the body and head in turn horizontally to the seam line).
We sew on the ears, I have one edge of each ear located between the 6th and 7th rows and the other between the 12th and 13th rows.
Muzzle: first of all, we sew the upper part, I have its upper part sewn between the 8th and 9th rows, and the lower part – on the 15th row. We cover the bottom of the upper part with the lower part of the muzzle so that the amigurumi ring is not visible, i.e. this is also on the 15th row of the head. In the course of how we will sew on (we will sew on most of it), we stuff it very tightly until the shape of the muzzle satisfies you. If it seems to you that you have stuffed tightly, stuff a little more, but not in the center, but along the edges for knitting, help with improvised items, I use scissors.
On the upper part of the muzzle we make a tightening for the eyes. We determine where our eyes will be located, we fix and insert the thread there (we will pull each eye in turn), we bring it out on the back of the head, we enter it in the same place, without catching the yarn of the head, so that we don’t have a tightening on the back of the head and bring it out to eye attachment site. And so a few stitches. We fix the eyes.
Embroider eyebrows, nose and mouth. I have a spout from the center of the muzzle to the 5th row up and in width about 8 – 10 loops.
We embroider claws on the lower paws, sew on pads on the upper paws and also embroider the claws, only here we tighten the thread well so that our fingers form a little.
We fasten the paws. I use a button mount. I determine the place where the paw will be, fasten the thread (I use 100% cotton, it is very strong, it should not fray over time), insert the needle into the paw (somewhere in the third row from the end), string the button, then again into the paw, insert it into the body (in the same place where the thread was fixed), I bring it out on the opposite side, insert it into the second paw, string a button, etc. So you need to make a few stitches through the whole body, pull the thread well so that the paws do not hang out.
Similarly with the lower paws, only before fastening we make a tightening. We determine the place of attachment of the paws, insert the thread, bring it out on the opposite side, pull it up well. And so several times, until the tightening will not hold. I pull on the 11-12th row.