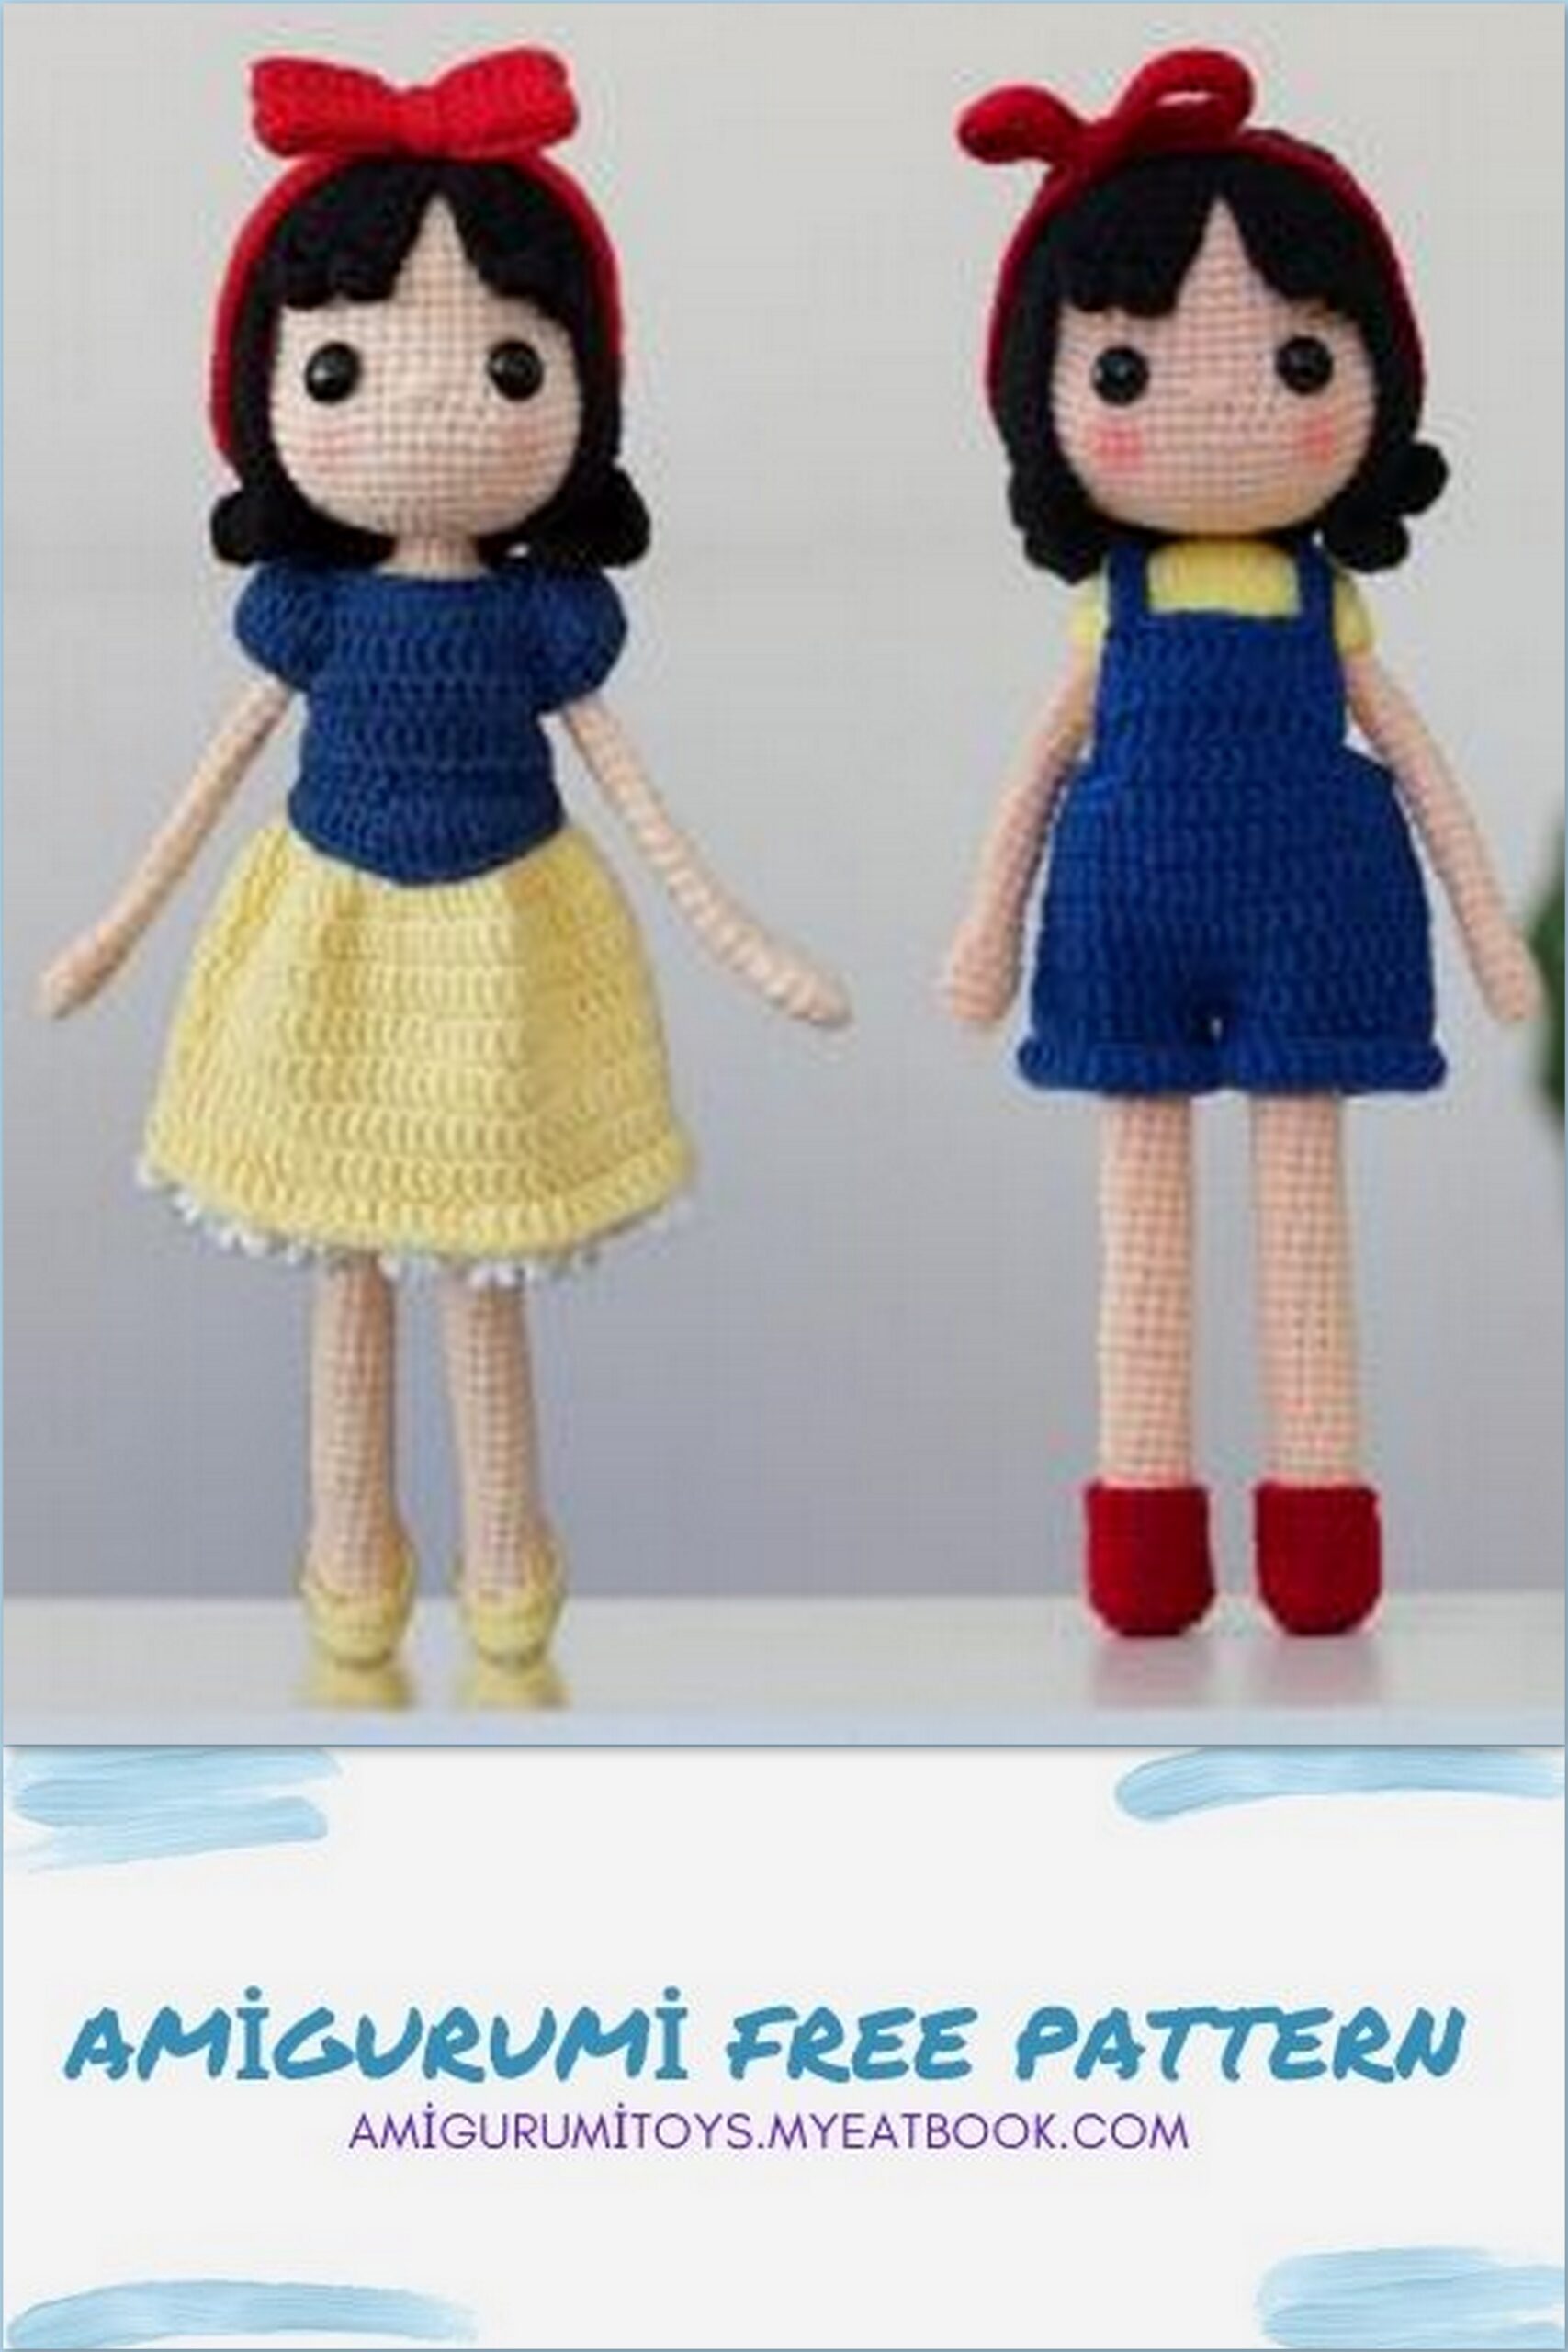
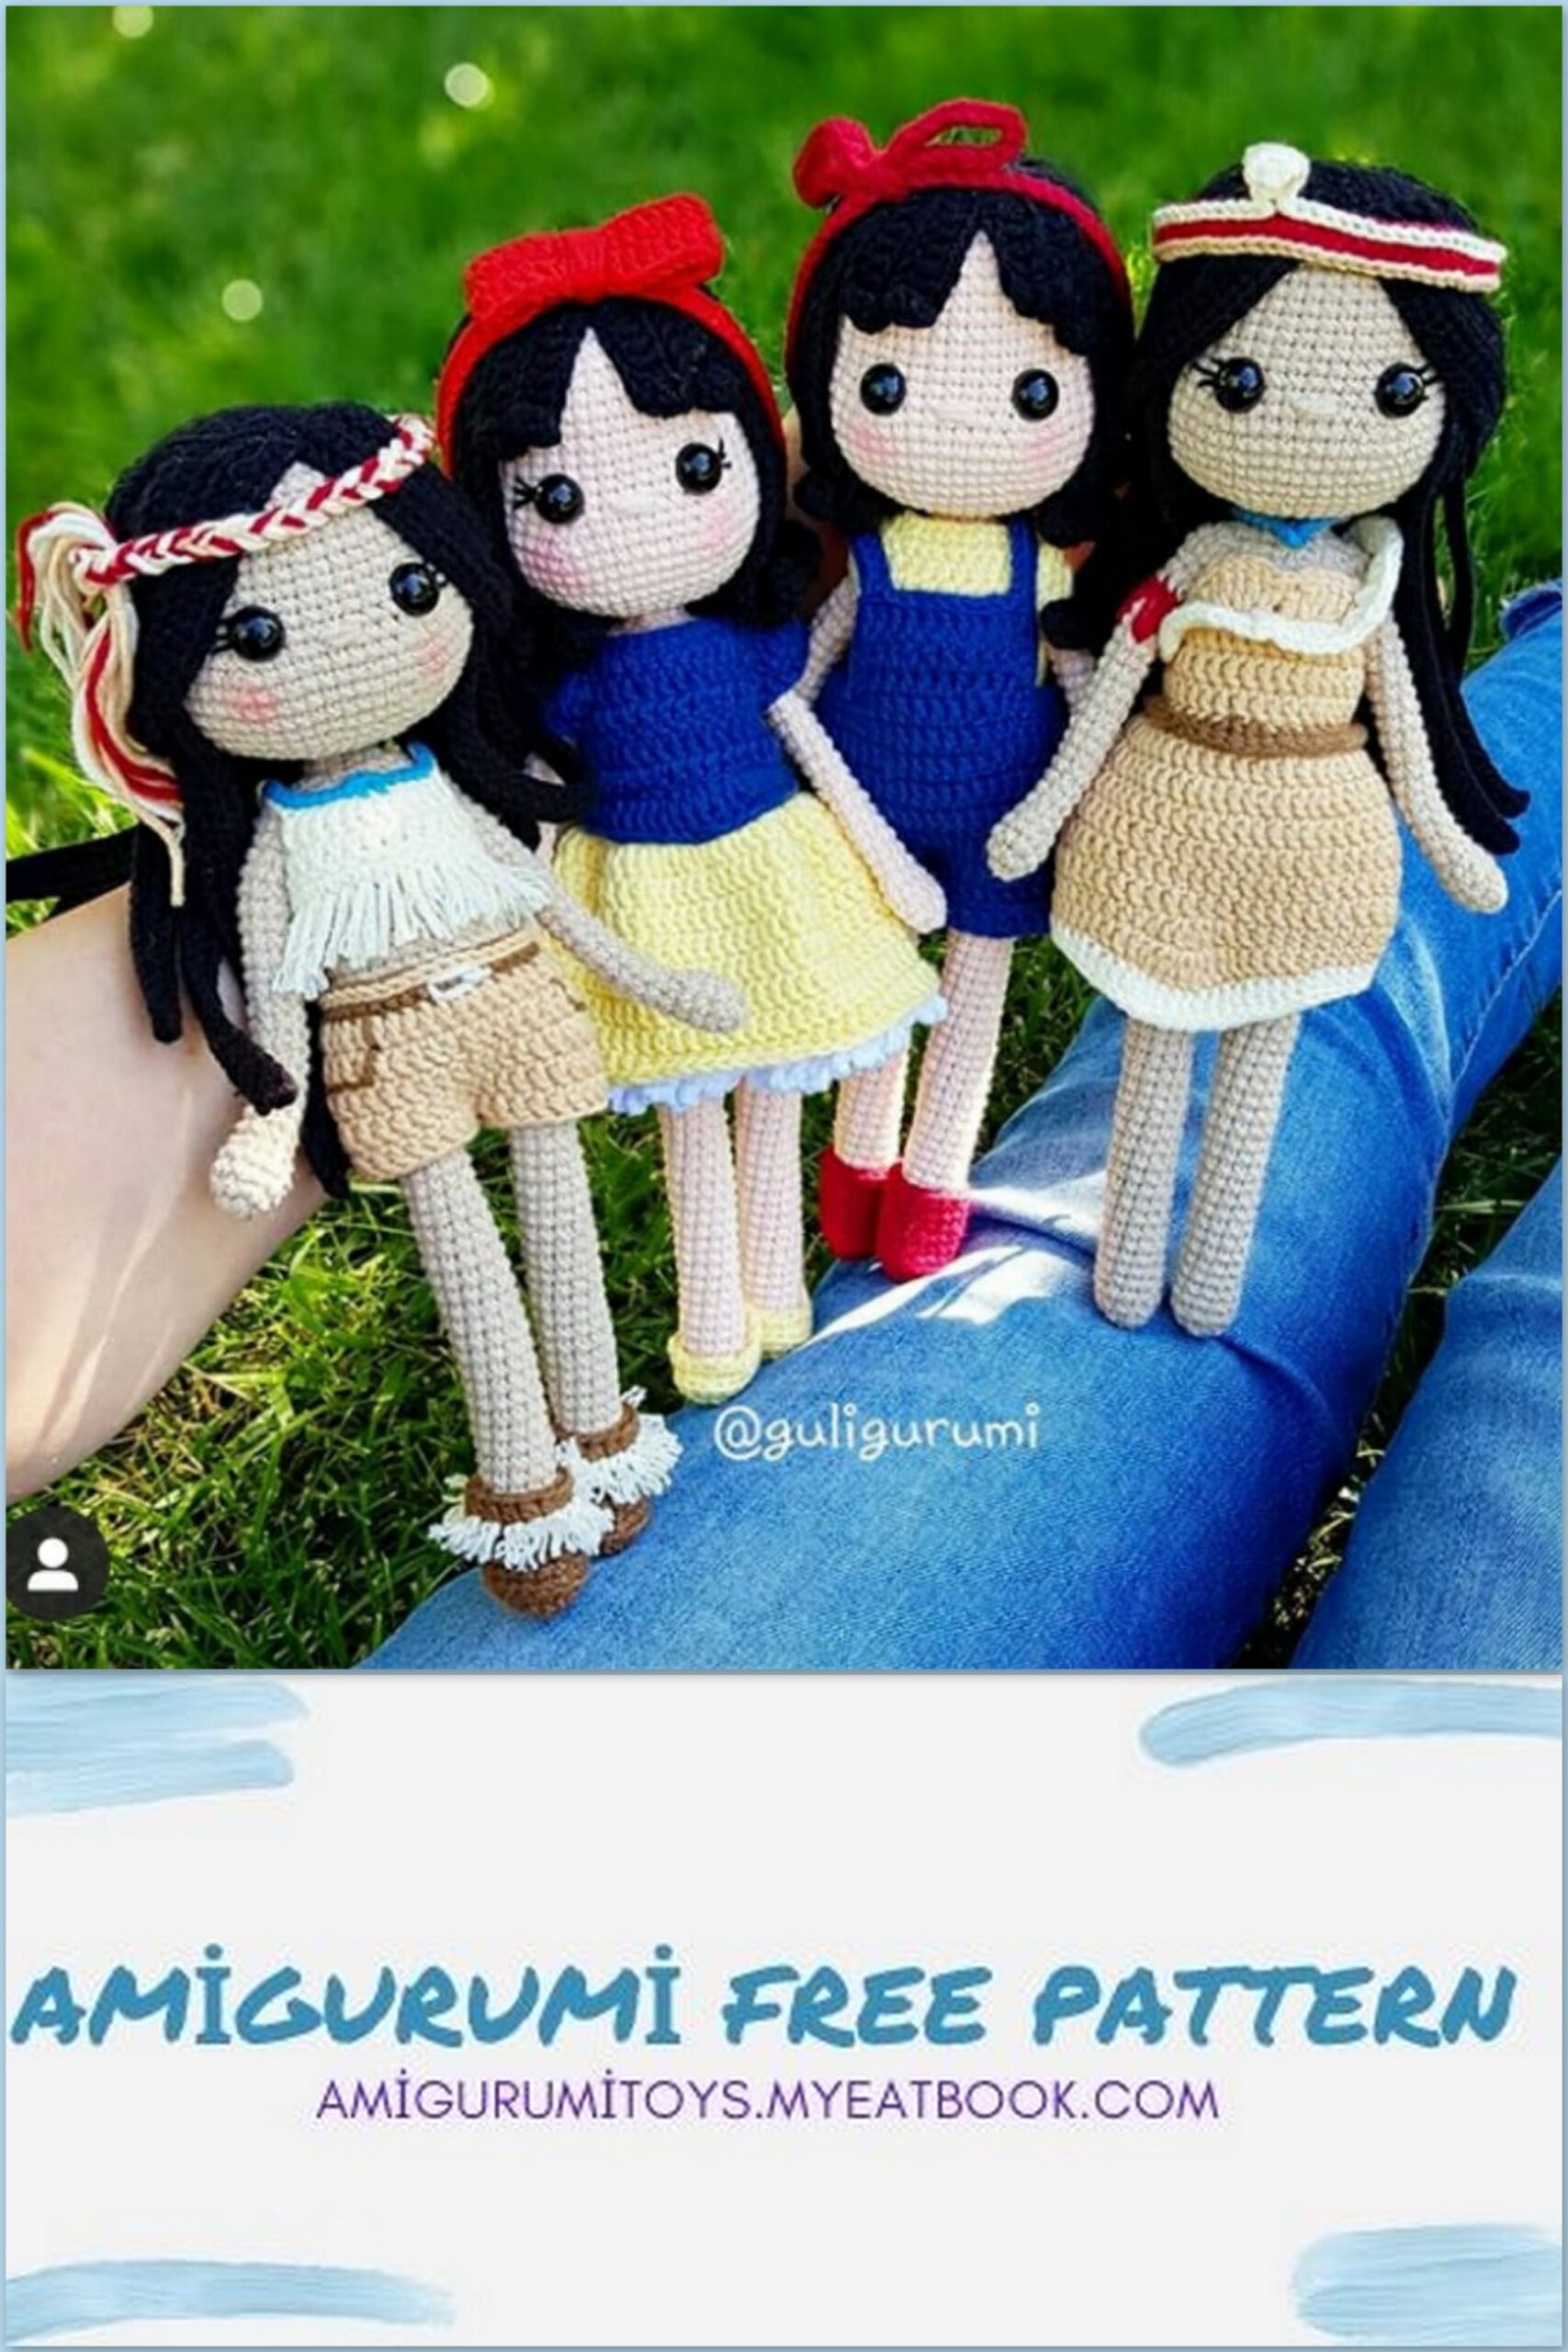
Amigurumi Pamuk Free Pattern
Pamuk doll and its pattern are designed and written by guligurumi. The pattern is for
personal use only. You can sell your toys made by my design but please give credit to the
designer by adding “design and pattern by guligurumi”.
MATERIALS
- Suitable colored cotton yarn
- Crochet hook suitable with your yarns
- Safety eyes (10 mm)
- Polyester fiber fill
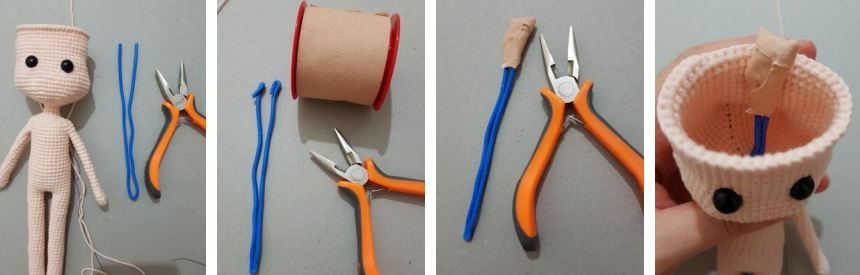
- 1,5 mm wire (28 cm)
- Patch tape
- 4 buttons
Color Codes of Yarns I Used
In this model, I used Alize Cotton Gold (100g, 330m) on dresses and YarnArt Jeans (50g,
160m) on body. With these yarns I used 2 mm crochet hook
- Skin color: YarnArt Jeans 73
- Hair: Alize Cotton Gold 60
- Ribbon: Alize Cotton Gold390
- Shirt: Alize Cotton Gold 187
- Overalls: Alize CottonGold141
- Boot: Alize Cotton Gold390
- Dress: Alize Cotton Gold 187, 141, 55
- Shoe: Alize Cotton Gold187
- Princess hair band: Alize Cotton Gold56
- If you use same or similar yarns and use 2.00 mm crochet hook, Pamuk Doll will be approx. 25 cm tall.
ABBREVIATIONS
Mr: magic ring
Sc: single crochet
inc: increase (two single crochet in the same stitch)
dec: decrease (single crochet two stitches together from front loops)
ch: chain
W: three single crochet in the same stitch
M: single crochet three stitches together from front loops
In BLO: crochet the entire round in back loops only
BLOA: use back loops when making decrease
In FLO: crochet the entire round in front loops only
Sl st: slip stitch
Dec slst: make slip stitch while decreasing
HDC: half double crochet
incHDC: increasing half double crochet (two half double crochet in the same stitch)
decHDC: make half double crochet while decreasing
DC: double crochet
incDC: increasing double crochet (two double crochet in the same stitch)
WDC: make three double crochet in the same stitch
decDC: make double crochet while decreasing
TR: triple crochet
incTR: increasing triple crochet (two triple crochet in the same stitch)
(….)*: repeat instructions in the brackets … times

ARMS
- Use skin color
- Do not stuff them

1 ➢ 6sc in the magic ring
2 ➢ (1sc, 1inc)*3=9sc
3 ➢ 2sc, 1inc, 4sc, 1inc, 1sc =11sc
4 ➢ 11sc
5 ➢ (2sc, 1dec)*2, 1sc, 1dec =8sc
6-23 ➢ 8sc (17 rounds)
Make sl st, fasten off.
LEGS
- Use skin color
- Stuff as you go.
- When you have finished the first leg, fasten off and weave in the yarn tail. But don’t fasten off at the second leg.
First Leg
1 ➢ 6sc in the magic ring
2 ➢ 6inc =12sc
3-33 ➢ 12sc (31 rounds)
34 ➢ 12sc, sl st, fasten off and weave in the yarn tail
Second Leg
1 ➢ 6sc in the magic ring
2 ➢ 6inc =12sc
3-34 ➢ 12sc (32 rounds)
35 ➢ 6sc, 4 ch
Now we will join two legs.
BODY
Stuff as you go.
Connect second leg with a sc to the last stitch of the first leg.
1 ➢ Make 4 chain to join two legs and make sc into each stitch around, total 32 stitches
(for beginners: sc in each of next 12 stitch from first leg, sc in each of next 4 stitch on chain,
sc in each of next 12 stitch from second leg, sc in each of next 4 stitch on chain =32)
– Now this is the back of the body. This is the new beginning of the round. If you are
using a stitch marker, place it here.
2-11 ➢ 32sc (10 rounds)
12 ➢ (6sc, 1dec)*4 =28sc
13-19 ➢ 28sc (7 rounds)
NOTE:
When you combine the arms with the body, they will appear a little behind the body.
If you have followed the pattern exactly and made the stitches completely, do not worry, it
is normal for the arms to appear on the back. As you continue crocheting, the arms will fit
the body properly.
20 ➢ 4sc, 3sc (stitch together from the arm and body), 12sc, 3sc (stitch together from the
arm and body), 6sc =28sc
21 ➢ 4sc, (from the remaining stitches of arms 1sc, 1inc, 1sc, 1inc, 1sc), (from the front of
body 12sc), (from the remaining stitches of arms 1sc, 1inc, 1sc, 1inc, 1sc), 6sc =36sc
22 ➢ 36sc
23 ➢ 36sc
24 ➢ 4sc, M, 1sc, M, 2sc, dec, 1sc, dec, 1sc, dec, 2sc, M, 1sc, M, 4sc, 1dec =24sc
25 ➢ 4sc, 3dec, 3sc, 3dec, 3sc, 1dec =17sc
26 ➢ (1sc, 1dec)*5, 1dec =11sc
27-29 ➢ 11sc (3 rounds)
Now we will start making the head. Don’t cut the yarn!
HEAD
1 ➢ 11inc =22sc
2 ➢ (2sc, 1inc)7,1sc =29sc 3 ➢ (3sc, 1inc)7,1sc =36sc
4 ➢ (5sc, 1inc)6 =42sc 5 ➢ (6sc, 1inc)6 =48sc
6 ➢ 13sc, 1inc, 24sc, 1inc, 9sc =50sc
7 ➢ (4sc, 1inc)10 =60sc 8 ➢ (9sc, 1inc)6 =66sc
9 ➢ 66sc
10 ➢ 66sc
11 ➢ 66sc
12 ➢ (9sc, 1dec)6 =60sc 13 ➢ (8sc, 1dec)6 =54sc
14 ➢ (7sc, 1dec)*6 =48sc
15-24 ➢ 48sc (10 rounds)
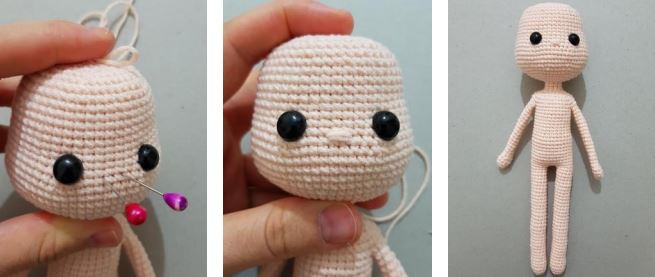
İnsert the safety eyes between rounds 14 and 15. Leave a space of 8 stitches
between the eyes.
Cut approximately 28 cm wire. Fold it in half, tape ends of it together. Put it into the
neck till the end of the body. Fill the neck tightly.
25 ➢ (6sc, 1dec)6 =42sc 26 ➢ (5sc, 1dec)6 =36sc
From this part on, fill the cheeks tightly. Fill tight, but be careful not to create any holes in
the stitches. Cheeks don’t look beautiful if they are not filled enough.
27 ➢ 18dec=18sc
28 ➢ (1sc, 1dec) =12sc
29 ➢6dec =6sc
Fasten off; leave a long tail to embroider the nose.
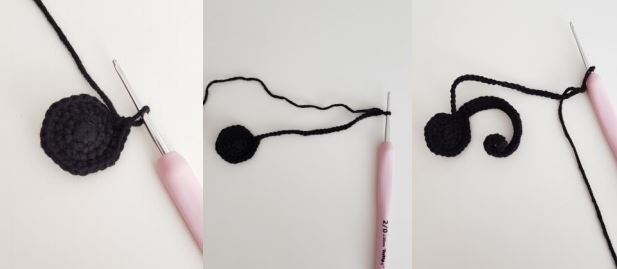
HAIR
Use black color
1 ➢ 8sc in the magic ring
2 ➢ (1sc, 1inc)4 =12sc 3 ➢ (1sc, 1inc)6 =18sc
4 ➢ (2sc, 1inc)*6 =24sc
DO NOT CUT THE YARN.YOU ARE GOİNG TO MAKE 18 STRANDS OF HAİR.
1-10.strands; ch 32, in 3rd ch from the hook make 30 DC, sl st to the next st
11.strand; ch 29, in 3rd ch from the hook make 27 DC, sl st to the next st
12.strand; ch 26, in 3rd ch from the hook make 24 DC, sl st to the next st
13-16.strands; ch 12, in 3rd ch from the hook make 10 DC, 2 sl st to the next stitches (bangs)
17.strand; ch 26, in 3rd ch from the hook make 24 DC, sl st to the next st
18.strand; ch 29, in 3rd ch from the hook make 27 DC, sl st to the next st
Fasten off and leave a long tail for sewing
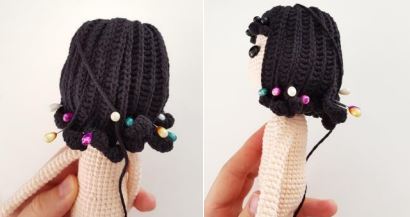
Now style the hair by following the descriptions and photos.
1 ➢ Place the center of the hair on center of the head. Bangs have to be in front.
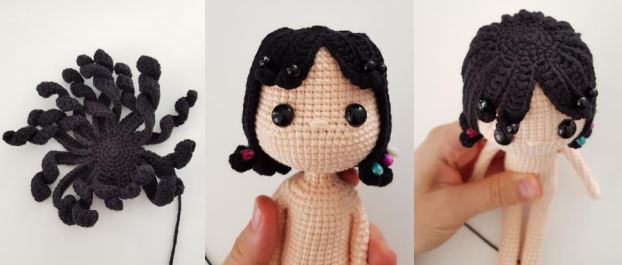
2 ➢ Pin the hair strands with pins. Leave hair ends curly.
3 ➢ Sew two strands together on their sides but don’t sew bangs together. Do not sew
them on the head.
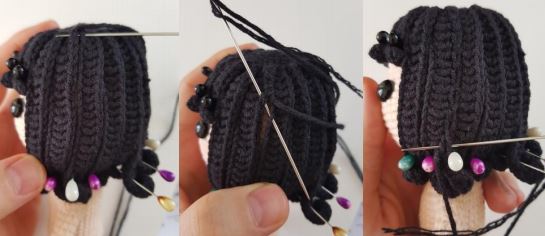
4 ➢ Now you will sew hear to the head at bottom and on the top of the head.

5 ➢ Sew bangs at their end to the head leaving space between them.( do not sew bangs
together.)
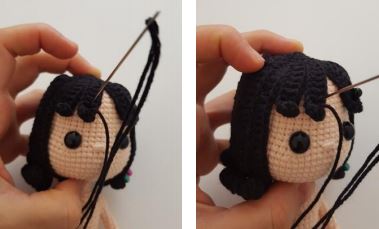
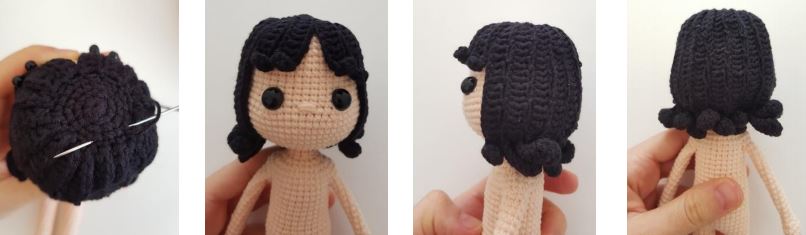
6 ➢ When the hair strands are finished, sew the top of the hair to the head. (From round 4,
24 stitch)
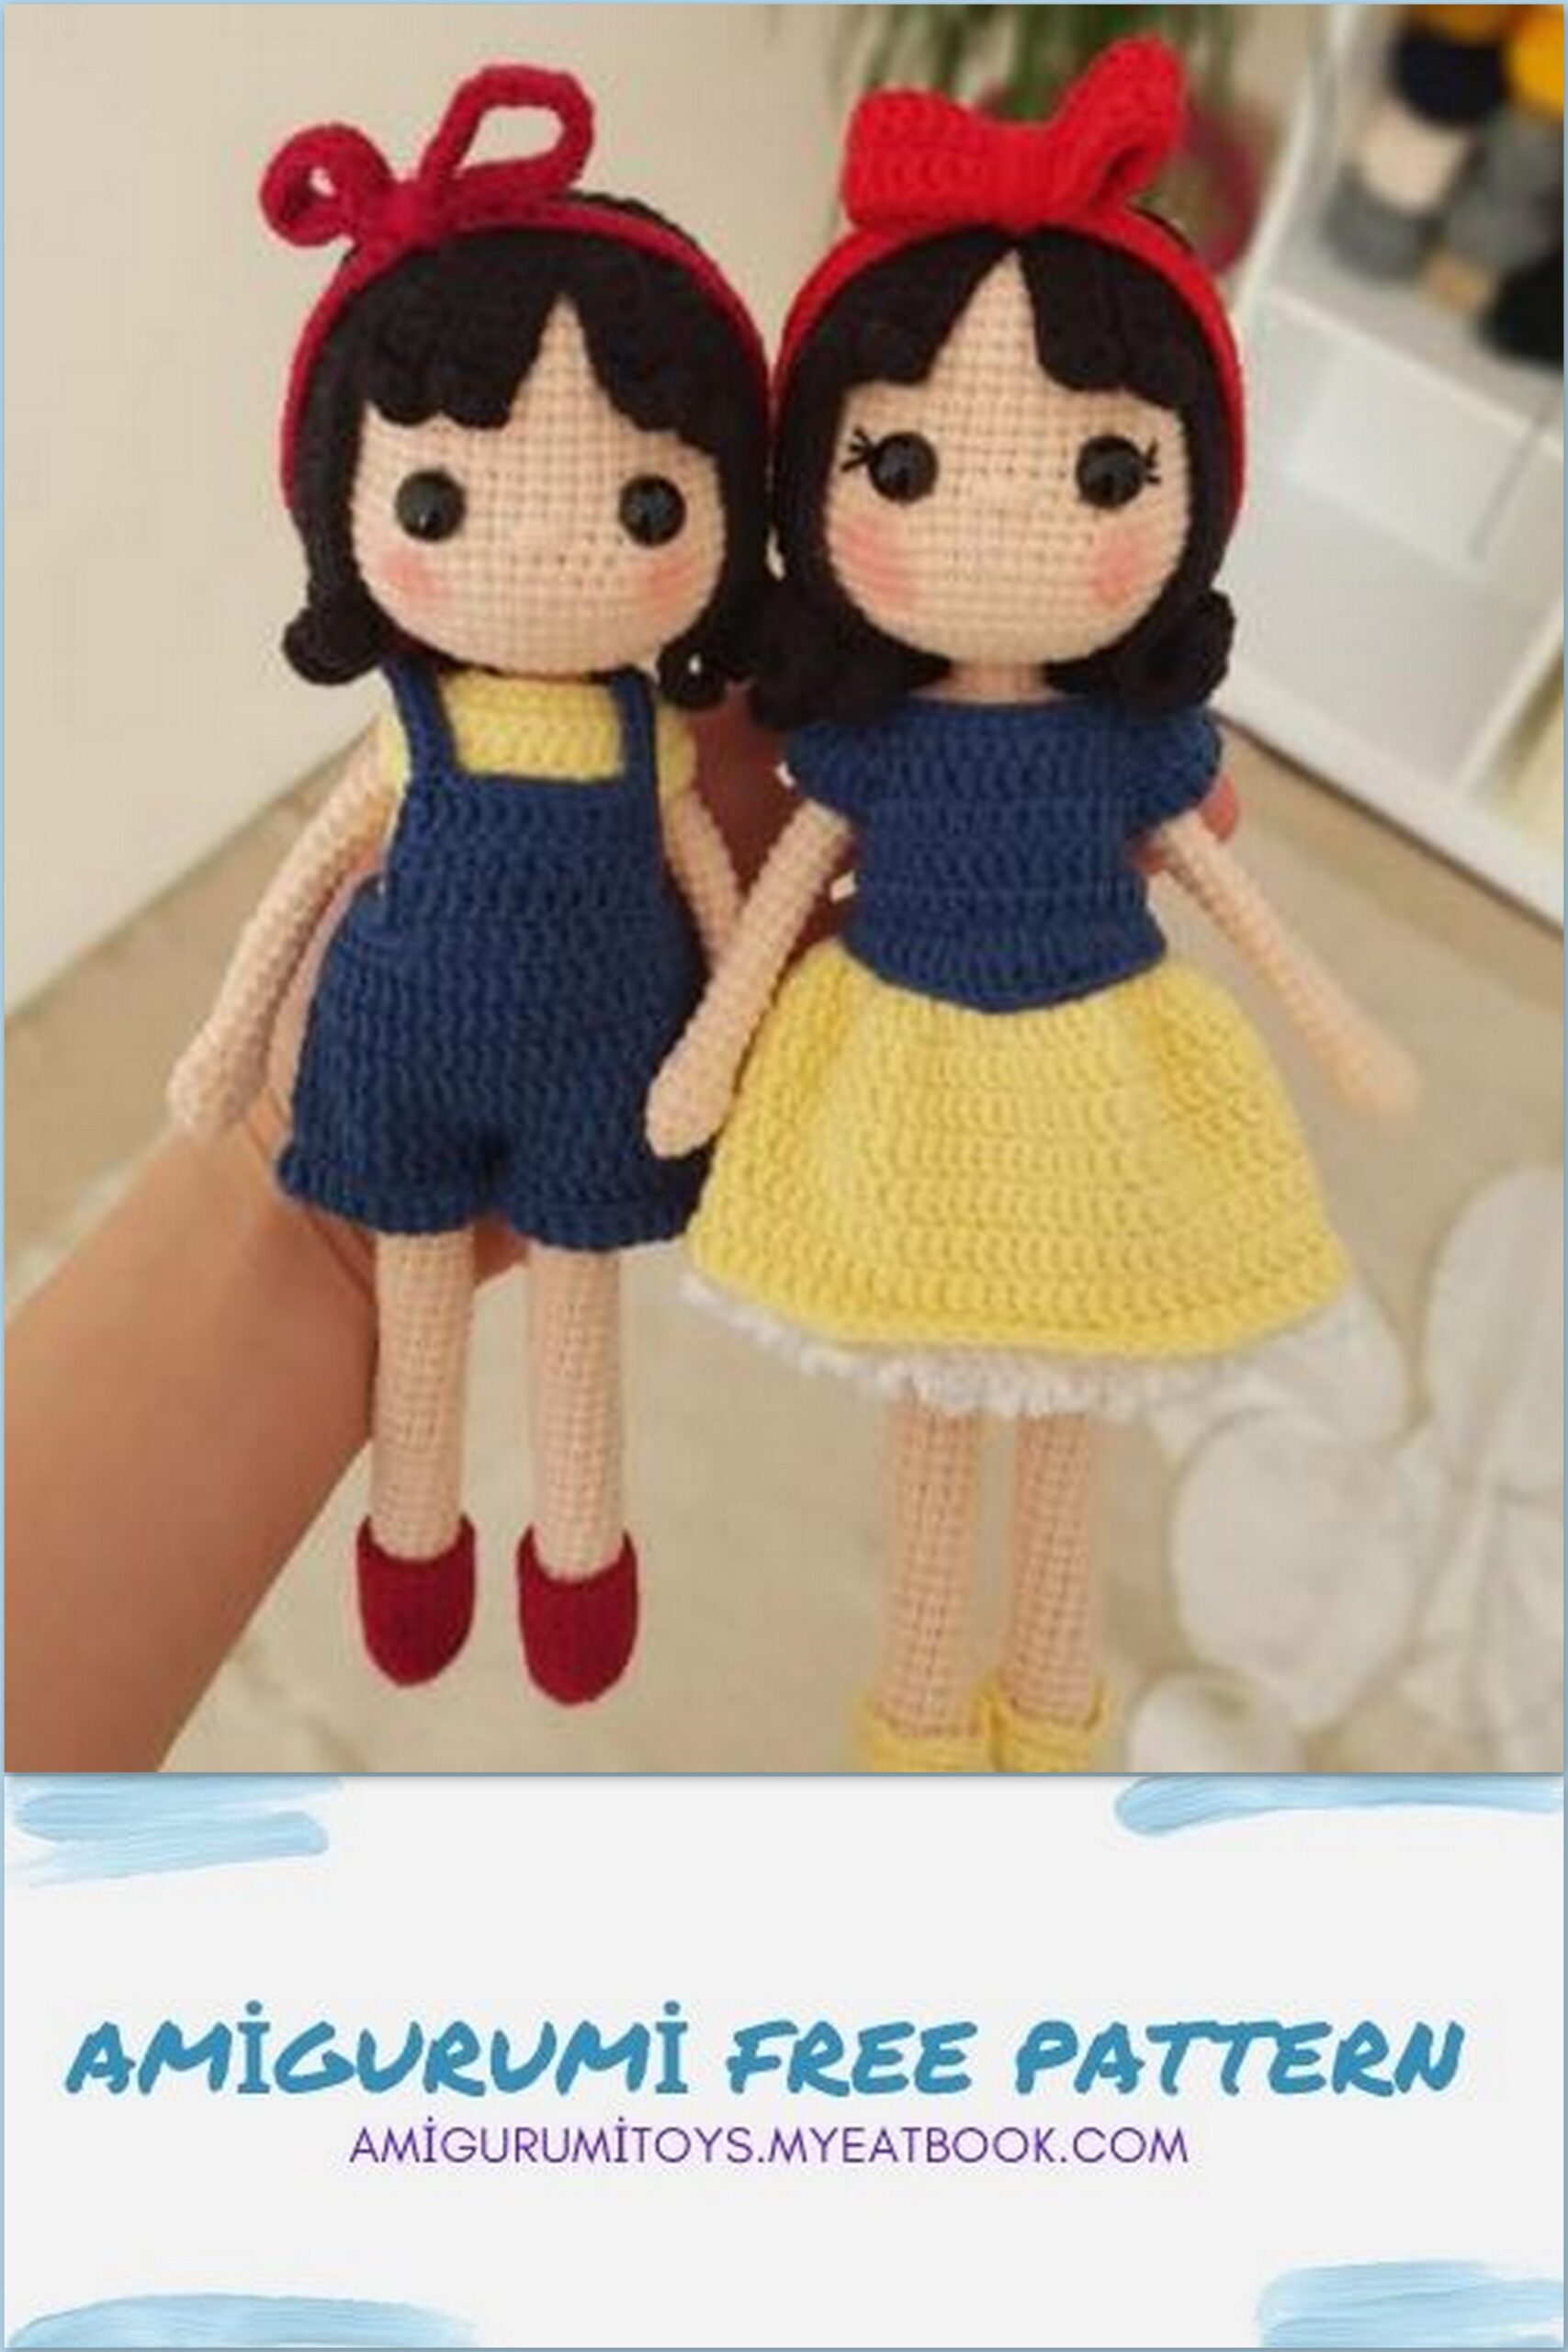
CASUAL OUTFIT
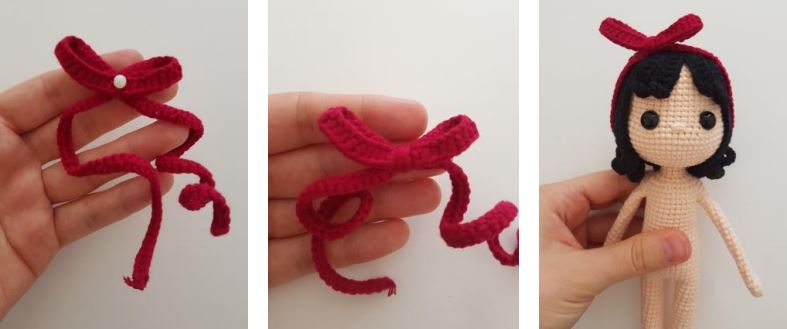
RIBBON
1 ➢ Make 141 ch and turn, 50sc from the second ch, 40HDC, 50sc fasten off and weave in
the yarn tail.
– Shape the head bow by twisting ribbon and secure it with yarn in the middle
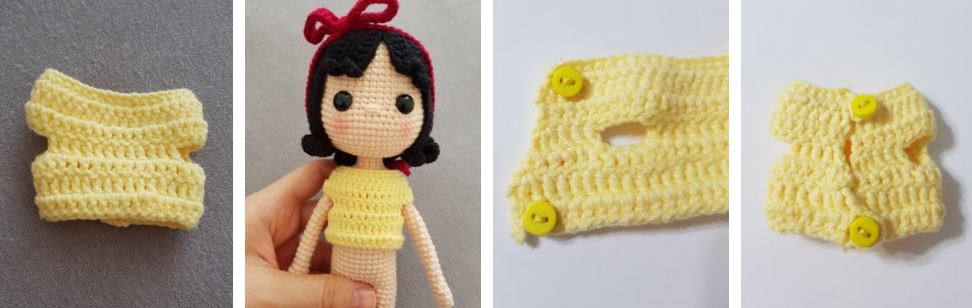
SHIRT
Use yellow yarn
1 ➢ Make 33 ch and turn, 32sc from the second ch, make 6 ch turn and join with 1st of the
6ch ( for buttonhole)
2 ➢ 1inc, 30sc, 1inc =34sc, make 1 ch and turn
3 ➢ 1incHDC, 32 HDC, 1incHDC =36HDC, make 2 ch and turn
4 ➢ 36DC, make 2 ch and turn
5 ➢ 1incDC, 5DC, make 4 ch and skip 6sc, 12DC, make 4 ch and skip 6sc, 5DC, 1incDC =34
stitch, make 2 ch and turn
6 ➢ 1incDC, 6DC, 4DC (to chain), 12DC, 4DC (to chain), 6DC, 1incDC =36DC, make 2 ch and
turn
7 ➢ 1incDC, 34DC, 1incDC =38DC, make 6ch, turn and join with 1st of the 6ch (for
buttonhole),2ch
8 ➢ 38DC fasten off and weave in the yarn tail.
Sew buttons as shown in the photos.
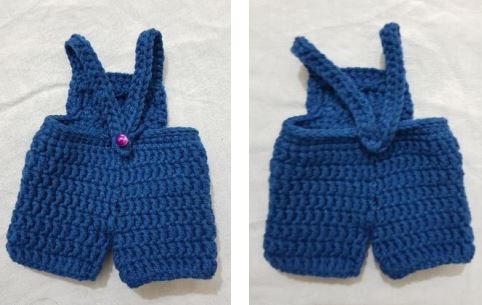
OVERALLS
Use blue yarn
1st piece
1 ➢ Make 23 ch and join the two ends with sl st. make 2 chain –this doesn’t count as the
first TR- make the first TR in the same stitch as you made the sl st.
2 ➢ 23 TR, join with a slip stitch in the first DC. Make 2 chains –this doesn’t count as the
first DC- make the first DC in the same stitch as you made the sl st.
3 ➢ 23DC, join with a slip stitch in the first DC, fasten off
2nd piece
1 ➢ Make 23 ch and join the two ends with sl st. make 2 chain –this doesn’t count as the
first TR- make the first TR in the same stitch as you made the sl st.
2 ➢ 23 TR, join with a slip stitch in the first DC. Make 2 chains –this doesn’t count as the
first DC- make the first DC in the same stitch as you made the sl st.
3 ➢ 23DC, join with a slip stitch in the first DC
Now we will join the two parts. Connect the second piece with a sl st to the last
stitch of the first piece. Make 2 chains –this doesn’t count as the first DC- make the first DC
in the same stitch as you made the sl st.
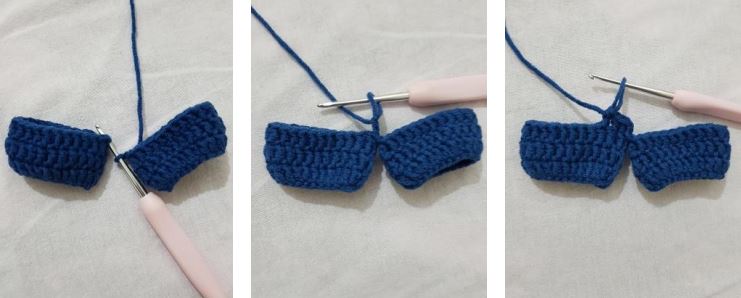
4-8 ➢ 46DC, join with a slip stitch in the first DC. Make 2 chains –this doesn’t count as the
first DC- make the first DC in the same stitch as you made the sl st. (5 rounds)
9 ➢ 18sc, 1HDC, 8DC, 1HDC, 18sc =46 stitch, join with a slip stitch in the first sc. make 1
chain –this doesn’t count as the first sc- make the first sc in the same stitch as you made the
sl st.
10 ➢ 18sc, 1HDC, 8DC, 1HDC, 18sc =46 stitch, join with a sl st in the first sc. make 1 chain –
this doesn’t count as the first sc- make the first sc in the same stitch as you made the sl st.
11 ➢ 17sc, 1HDC, 8DC, 1HDC, 2 ch and turn
12 ➢ 10DC, 2 ch and turn
13 ➢ 10DC, 6sc from the side, 18 sl st , join with a sl st in the first sc, make the first sc in thenext stitch as you made the sl st,
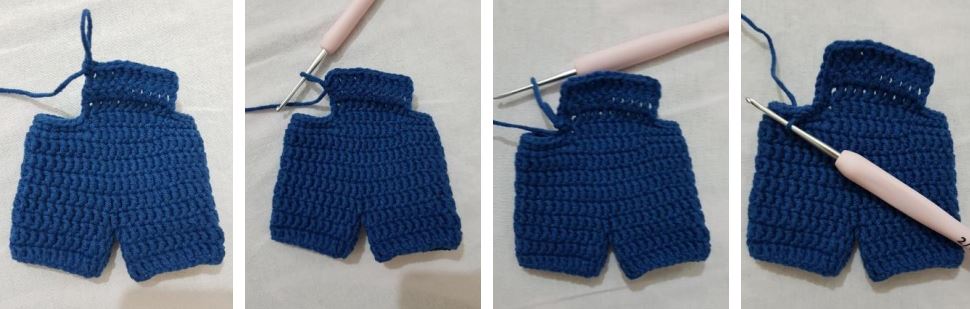
14 ➢ 17 sl st, from side 5sc, 25 ch and turn; 24sc from the second ch, 9 sl st, 25 ch and turn; 24sc from the second ch, 1 sl st and fasten off and weave in the yarn tail. Attach the straps as in the photo and sew them to the back of dress.
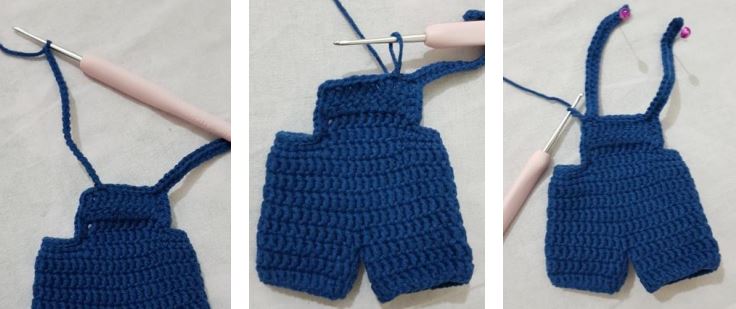
Reverse the first row of the overalls legs and make a cuff.
BOOTS
1 ➢ make 7 ch, from the second ch; 5sc, W, now on the other side of the chain; 4sc, 1inc =14sc
2 ➢ 1inc, 4sc, 3inc, 4sc, 2inc =20sc
3 ➢ 20sc
4 ➢ inBLO 20sc
5 ➢ 20sc
6 ➢ 8sc, 1HDC, decHDC, 1HDC, 8sc =19 stitch
7 ➢ 8sc, M, 8sc =17sc
8 ➢ inFLO 17sc
9 ➢ 17sc
10 ➢ 17sc fasten off and weave in the yarn tail.
PRİNCESS OUTFIT
HAIR BAND
1 ➢ make 101 ch and turn, 100sc from the second ch, make 1 ch and turn
2 ➢ 100 sl st fasten off and weave in the yarn tail.
RIBBON
Make 32ch, from the second ch; 29DC, WDC, now on the other side of the chain; 28DC
Fasten off and join the two ends and sew.
Place the ribbon right in the middle of the hair band and secure them together with a yarn.
DRESS
Start with blue yarn
1 ➢ make 37 ch and turn; from the 8th ch(for button hole) ; 9sc, W, 10sc, W, 9sc, 1 ch and turn =34sc
2 ➢ 3sc, W, 6sc, W, decBLO, 8sc, decBLO, W, 6sc, W, 3sc=40sc, 1ch and turn
3 ➢ 4DC, WDC, 8incTR, WDC, 1decDC, 8DC, 1decDC, WDC, 8incTR, WDC, 4DC =62 stitch, make 2 ch and turn
4 ➢ 6DC, make 4ch and skip 18 stitch, 14DC, make 4ch and skip 18 stitch, 6DC =34 stitch, 2 ch and turn
5 ➢ 34DC, 2 ch and turn
6 ➢ 34DC, make 7ch, turn and join with 1st of the 7ch (for buttonhole)
7 ➢ inFLO; 8sc, 4HDC, 3DC, 1incDC, 2incTR, 1incDC, 3DC, 4HDC, 8sc =38 stitch, 1 ch and turn
8 ➢ 18 sl st, 2 ch and skip 2 stitch, 18 sl st. fasten off and weave in the yarn tail.
Use yellow yarn
9 ➢ Thread the yellow yarn to 7th round of first sc ( BLO stitches).; 34TR , 3 ch and turn
10 ➢ 1DC, 32incDC, 1DC =66DC, join with a sl st in the first DC
! At the end of round 10 (and all the other following rounds) end each round with a slip stitch in the first DC. At the beginning of each new round begin with 2 chains –this doesn’t count as the first DC- make the first DC in the same stitch as you made the sl st.
11-16 ➢ 66DC (6 rounds)
17 ➢ inFLO 66DC. Fasten off and weave in the yarn tail.
Use White yarn
18 ➢ Thread the white yarn to 17th round’s first sc (BLO stitches); 66TR
19 ➢ 4 ch, skip 1 stitch and sl st to the next stitch. Repeat this until the end of the row
SLEEVES OF DRESS
Turn the dress backwards
At right sleeve; thread the yarn to leftmost one of 4 stitches under sleeve;
1 ➢ 1sc, 1sc (in the side hole), (1DC, 1decDC)*6, 1sc (in the side hole), 3sc, join with a slip stitch in the first DC, fasten off and weave in the yarn tail.
At left sleeve; thread the yarn to rightmost one of 4 stitches under sleeve;
1 ➢ 4sc, 1sc (in the side hole), (1DC, 1decDC)*6, 1sc (in the side hole), join with a slip
stitch in the first DC, fasten off and weave in the yarn tail.
Sew the buttons as in the photo
SHOES
1 ➢ Make 7 ch, from the second ch; 5sc, W, now on the other side of the chain; 4sc, 1inc =14sc
2 ➢ 1inc, 4sc, 3inc, 4sc, 2inc =20sc
3 ➢ 20sc
4 ➢ inBLO 20sc, join with a sl st in the first sc, make 2 chains –this doesn’t count as the first sc- make the first sc in the same stitch as you made the sl st.
5 ➢ 3DC, 3 sl st , 2DC, 2 dec sl st, 2DC, 3 sl st , 3DC, join with a slip stitch in the first sc. Fasten off and weave in the yarn tail.